Building a Scalable Lakehouse with Iceberg, Trino, OLake & Apache Polaris


Why choose this lakehouse stack?
Modern data teams are moving toward the lakehouse architecture—combining the reliability of data warehouses with the scale and cost-efficiency of data lakes. But building one from scratch can feel overwhelming with so many moving parts.
This guide walks you through building a production-ready lakehouse using four powerful open-source tools: Apache Iceberg (table format), Apache Polaris (catalog), Trino (query engine), and OLake (data ingestion). We'll show you exactly what each component does, why it matters, and how they work together.
Understanding Apache Iceberg: The table format that changes everything
Apache Iceberg reimagines how we structure data lakes. Think of a data lake as a massive library where data files are scattered across random shelves with no catalog system.
Key benefits of using Iceberg
- ACID transactions on object storage: Get database-like guarantees on cheap S3/GCS/Azure storage
- Schema evolution made easy: Add, rename, or drop columns without rewriting terabytes of data
- Hidden partitioning: Queries automatically prune irrelevant data without users writing complex WHERE clauses
- Time travel capabilities: Query your data as it existed at any point in time for audits or debugging
- Production-grade performance: Efficiently handle petabyte-scale datasets with fast metadata operations
Why you need a catalog: Keeping your lakehouse organized
Here's the challenge with Iceberg: every time you make a change (add data, update schema, delete rows), Iceberg creates a new metadata file. Over time, you might have hundreds of these files. The big question becomes: which metadata file represents the current state of your table?
This is where the catalog comes in. Think of it as the central registry that:
- Maintains a list of all your Iceberg tables
- Tracks which metadata file is the "current" version for each table
- Ensures all query engines see a consistent view of your data
Without a proper catalog, different tools might read different versions of your tables, leading to inconsistent results and data chaos.
Enter Apache Polaris: A lightweight, standards-based catalog
Apache Polaris is a relatively new but powerful REST catalog for Iceberg that strikes the perfect balance between simplicity and enterprise capabilities. Unlike heavyweight proprietary catalogs, Polaris is:
- Easy to deploy: Single docker container
- Standards-compliant: Implements the Iceberg REST Catalog spec, so any Iceberg-compatible engine works seamlessly
- Production-ready: Ships with Kubernetes Helm charts and supports enterprise authentication (OIDC)
- Cloud-agnostic: Works with S3, MinIO, GCS, Azure Blob Storage, and more
What makes Polaris special
Polaris was designed to solve the catalog complexity problem. Traditional catalogs like Hive Metastore or AWS Glue can be heavyweight, expensive, or lock you into a specific cloud provider. Polaris gives you:
- Role-based access control out of the box
- Flexible authentication (internal tokens or external OIDC providers)
- Lightweight architecture that scales without the bloat
- Open source with active community support
OLake: Real-time data ingestion made simple
Now that you have Iceberg tables and a Polaris catalog, how do you actually get data into your lakehouse? This is where OLake comes in.
OLake is an open-source, high-performance tool specifically built to replicate data from operational databases directly into Iceberg format. It supports:
- Popular databases: PostgreSQL, MySQL, MongoDB, Oracle, plus Kafka streams
- Change data capture (CDC): Captures every insert, update, and delete in real-time
- Native Iceberg writes: Data lands directly in Iceberg format with proper metadata
- Simple configuration: Point it at your database and catalog, and you're done
Why OLake over traditional ETL?
Traditional ETL tools like Debezium + Kafka + Spark require complex pipelines with multiple moving parts. OLake simplifies this dramatically:
- Direct to Iceberg: No intermediate formats or complex transformations
- Real-time sync: Changes appear in your lakehouse within seconds
- Catalog-aware: Automatically registers tables with Polaris
- CLI and UI: Choose your preferred way to manage pipelines
What this means in practice: your applications keep writing to operational databases (MySQL, Postgres, MongoDB) as usual. OLake continuously captures those changes and writes them to Iceberg tables that are immediately queryable via Trino or any other Iceberg-compatible engine.
Trino: Your high-performance query engine
With data in Iceberg format and a Polaris catalog managing it all, you need a powerful query engine to actually analyze that data. Trino is perfect for this role.
Trino is a distributed SQL engine designed for fast, interactive analytics on massive datasets. Originally created at Facebook (as Presto), it's now one of the most popular open-source query engines for data lakes.
Why Trino excels for lakehouse architectures
- Blazing fast: MPP (massively parallel processing) architecture runs queries in seconds, not hours
- Standard SQL: Use familiar ANSI SQL—no need to learn new query languages
- Federation: Query across multiple data sources (Iceberg, PostgreSQL, MySQL, Kafka) in a single query
- Iceberg-native: Full support for Iceberg features including Time travel, schema evolution, and hidden partitioning
- Scales horizontally: Add more workers to handle larger datasets and higher concurrency
How the pieces mesh
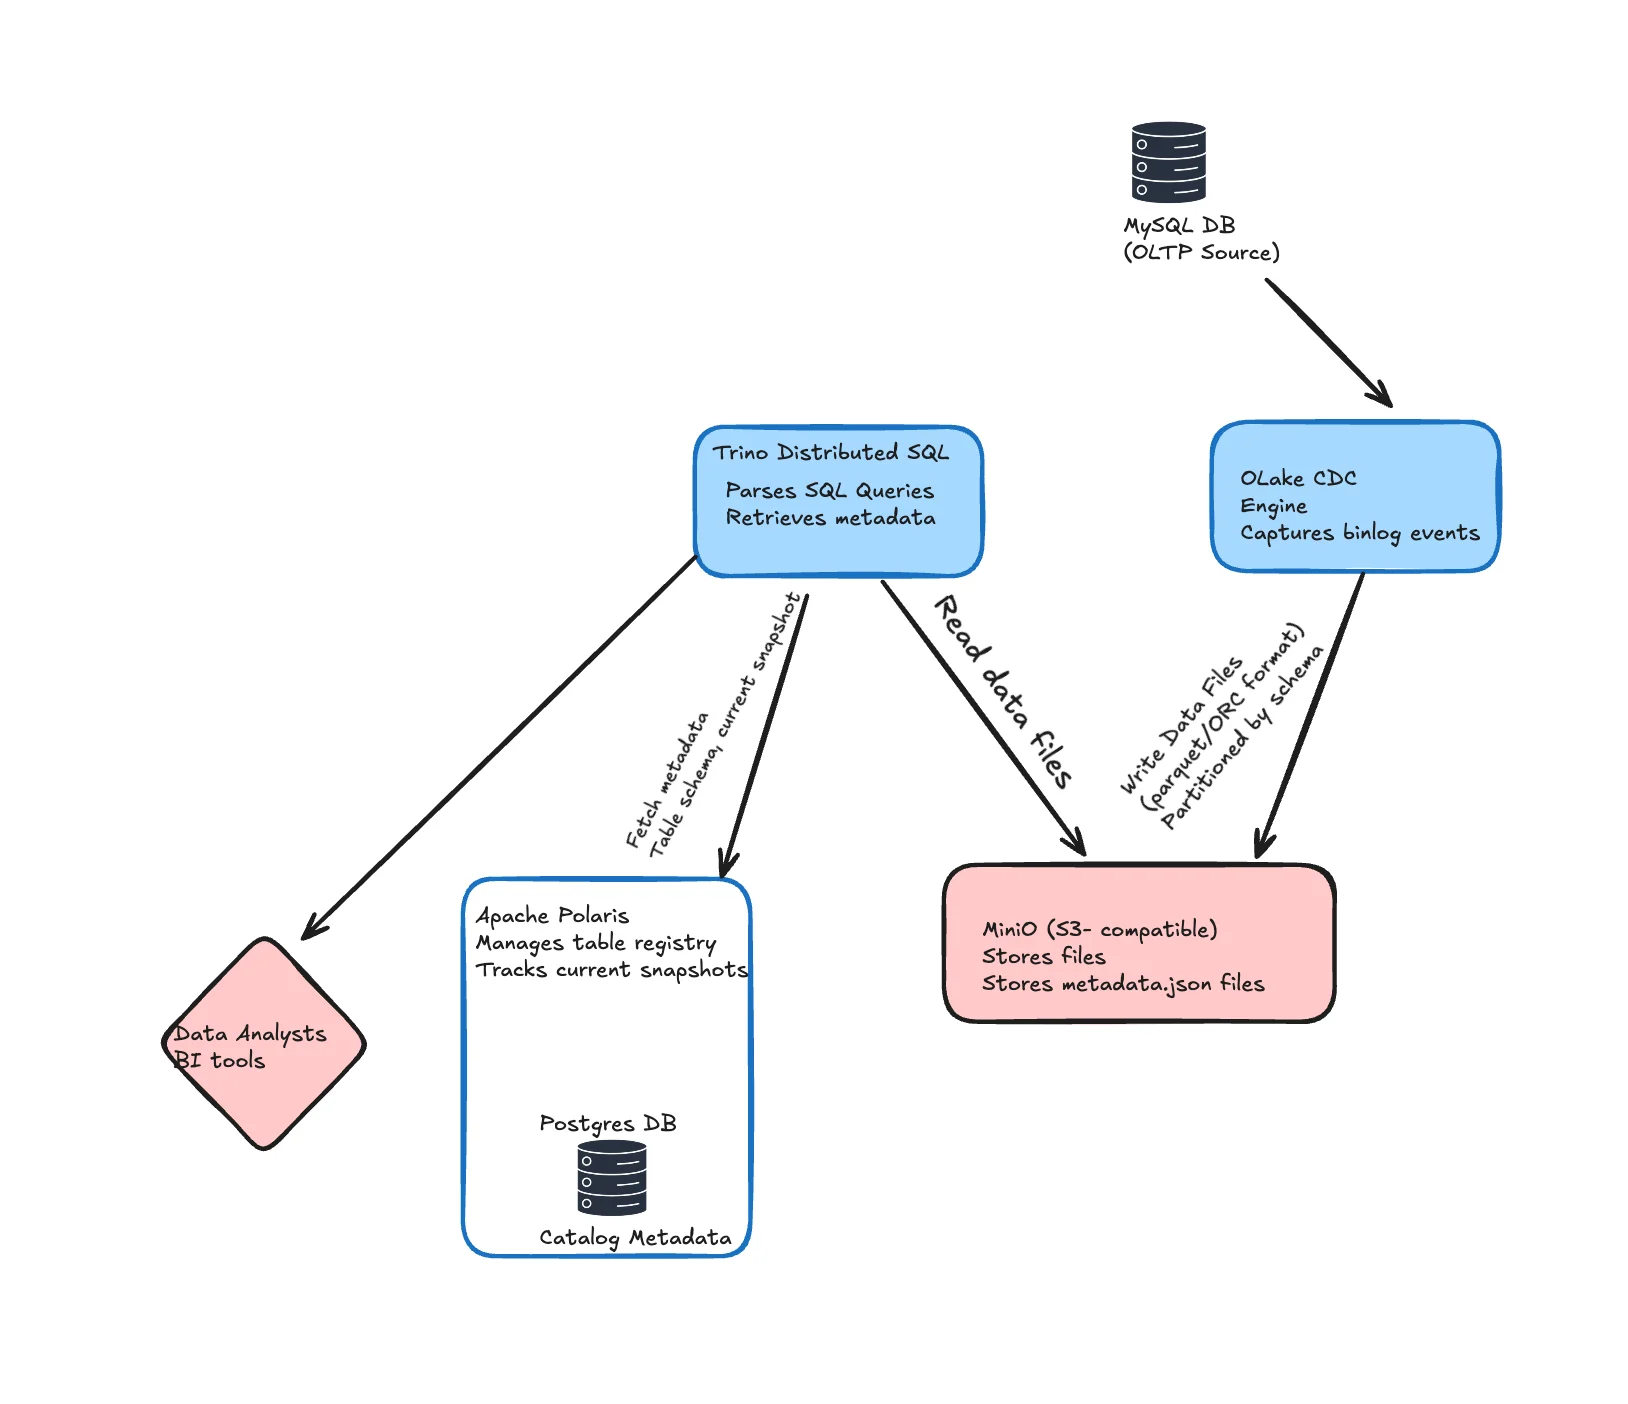
- Ingest: OLake captures CDC from MySQL/Postgres/MongoDB and commits Iceberg snapshots (data + metadata) into object storage.
- Catalog: Polaris exposes those tables through the Iceberg REST API so all engines share the same view of "current."
- Query: Trino points its Iceberg connector at Polaris and runs federated SQL, including time-travel on Iceberg tables.
Hands-On: Run the Stack with Docker Compose
We'll spin up:
- Apache Polaris — REST catalog pointing to S3
- MySQL — sample source DB
- OLake — CDC ingestion
- Trino — query engine
Prerequisites
Before deploying OLake on AWS, ensure the following setup is complete:
EC2 Instance
- Must have Docker and Docker Compose installed.
S3 Bucket
- Used for Iceberg data storage.
Create IAM Role for Polaris
Create the IAM Policy:
aws iam create-policy --policy-name polaris-s3-access-policy --policy-document file://iam-policy.json
{
  "Version": "2012-10-17",
  "Statement": [
    {
      "Effect": "Allow",
      "Action": [
        "s3:GetObject",
        "s3:PutObject",
        "s3:DeleteObject",
        "s3:ListBucket"
      ],
      "Resource": [
        "arn:aws:s3:::<YOUR_S3_BUCKET>",
        "arn:aws:s3:::<YOUR_S3_BUCKET>/*"
      ]
    }
  ]
}
Create the IAM Role:
aws iam create-role --role-name polaris-lakehouse-role --assume-role-policy-document file://trust-policy.json
{
  "Version": "2012-10-17",
  "Statement": [
    {
      "Effect": "Allow",
      "Principal": {
        "Service": "ec2.amazonaws.com"
      },
      "Action": "sts:AssumeRole"
    },
    {
      "Effect": "Allow",
      "Principal": {
        "AWS": "arn:aws:iam::<ACCOUNT_ID>:role/<YOUR_ROLE_NAME>"
      },
      "Action": "sts:AssumeRole"
    }
  ]
}
The --assume-role-policy-document file://trust-policy.json parameter associates the trust policy with this role, allowing both EC2 and the role itself to assume it. The trust policy defines who can assume the role, while the IAM policy (attached in the next step) defines what the role can do.
Attach Policy to Role:
aws iam attach-role-policy --role-name polaris-lakehouse-role --policy-arn arn:aws:iam::<AWS_ACCOUNT_ID>:policy/polaris-s3-access-policy
Create Instance Profile:
aws iam create-instance-profile --instance-profile-name polaris-lakehouse-profile
Add Role to Instance Profile:
aws iam add-role-to-instance-profile --instance-profile-name polaris-lakehouse-profile --role-name polaris-lakehouse-role
Attach to EC2 Instance:
aws ec2 associate-iam-instance-profile --instance-id <YOUR_EC2_INSTANCE_ID> --iam-instance-profile Name=polaris-lakehouse-profile
Get the Role ARN (you'll need this for catalog creation):
aws iam get-role --role-name polaris-lakehouse-role --query 'Role.Arn' --output text
This will output something like:
arn:aws:iam::123456789012:role/polaris-lakehouse-role
Save this ARN — you'll use it when creating the Polaris catalog.
Apache Polaris Catalog
Now, lets start the Apache Polaris Catalog service on the EC2 instance. A detailed doc to start the Polaris Catalog can be found in our official doc.
docker-compose.yml
services:
  polaris:
    image: apache/polaris:1.1.0-incubating
    container_name: polaris
    ports:
      - "8181:8181"
    networks:
      - polaris-network

networks:
  polaris-network:
    driver: bridge
docker compose up -d
Find bootstrap credentials in logs:
docker logs polaris | grep --text "root principal credentials"

If the above command does not fetch you any credentials, you can do docker logs polaris and find your credentials there.
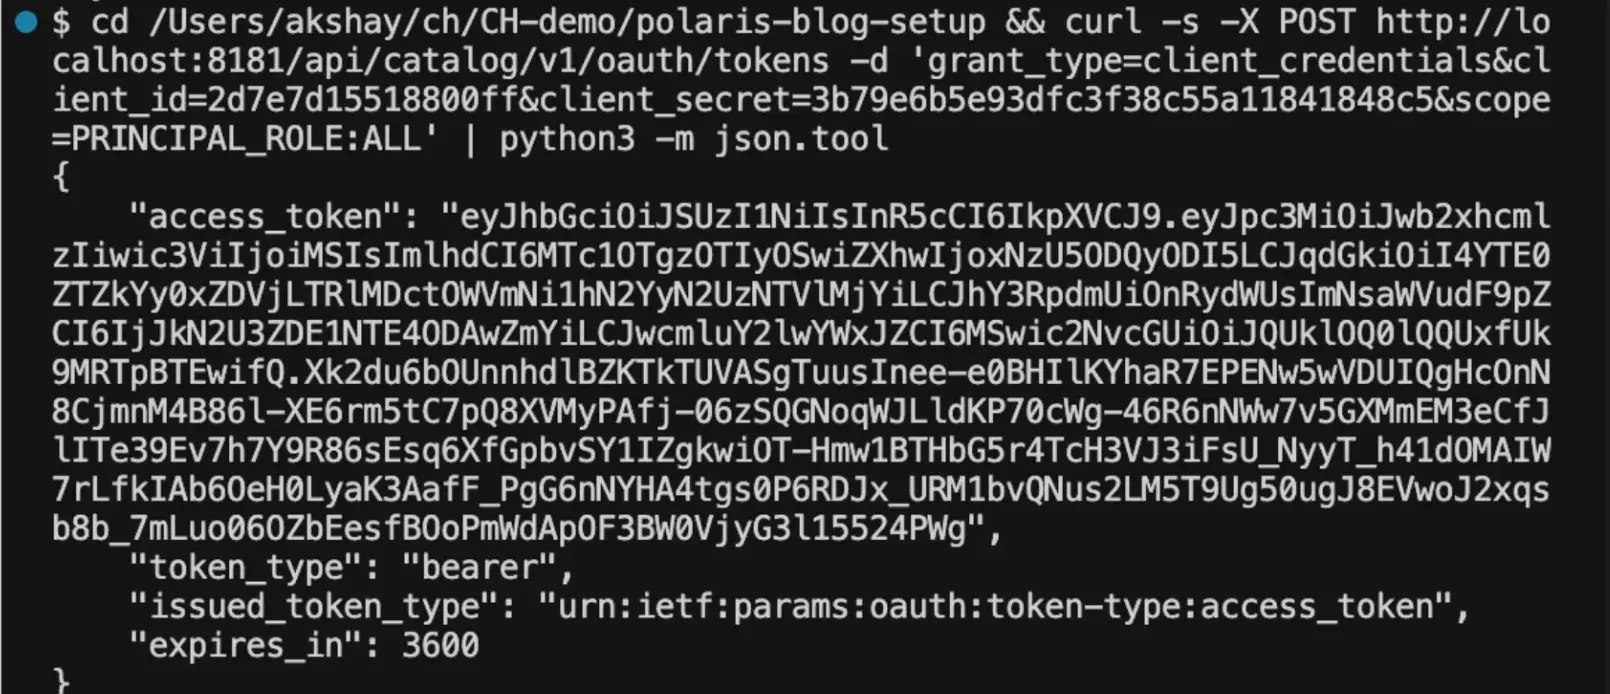
Exchange for a bearer token:
curl -X POST http://localhost:8181/api/catalog/v1/oauth/tokens \
  -d 'grant_type=client_credentials&client_id=<CLIENT_ID>&client_secret=<CLIENT_SECRET>&scope=PRINCIPAL_ROLE:ALL'
Create a catalog in Polaris
curl -i -X POST http://localhost:8181/api/management/v1/catalogs \
  -H "Authorization: Bearer <bearer_token>" \
  -H 'Accept: application/json' \
  -H 'Content-Type: application/json' \
  -d '{
    "name": "olake_catalog",
    "type": "INTERNAL",
    "properties": {
      "default-base-location": "s3://<your-bucket-name>"
    },
    "storageConfigInfo": {
      "storageType": "S3",
      "roleArn": "<your-iam-role-arn>",
      "allowedLocations": ["s3://<your-bucket-name>"]
    }
  }'
Create User for Trino and OLake
Create user and assign roles (replace <bearer_token> with your bearer token). The create user command's response includes the new user's client credentials.
curl -i -X POST "http://localhost:8181/api/management/v1/principals" \
  -H "Authorization: Bearer <bearer_token>" \
  -H "Content-Type: application/json" \
  -d '{"name": "olake_user", "type": "user"}'
The response should include:
- clientId:
abc123... - clientSecret:
xyz789...
You'll use these credentials in BOTH Trino configuration (iceberg.properties) and OLake configuration.
Create principal role:
curl -i -X POST "http://localhost:8181/api/management/v1/principal-roles" \
  -H "Authorization: Bearer <bearer_token>" \
  -H "Content-Type: application/json" \
  -d '{"principalRole": {"name": "olake_user_role"}}'
Assign role to user:
curl -i -X PUT "http://localhost:8181/api/management/v1/principals/olake_user/principal-roles" \
  -H "Authorization: Bearer <bearer_token>" \
  -H "Content-Type: application/json" \
  -d '{"principalRole": {"name": "olake_user_role"}}'
Create catalog role:
curl -i -X POST "http://localhost:8181/api/management/v1/catalogs/olake_catalog/catalog-roles" \
  -H "Authorization: Bearer <bearer_token>" \
  -H "Content-Type: application/json" \
  -d '{"catalogRole": {"name": "olake_catalog_role"}}'
Assign catalog role to principal role:
curl -i -X PUT "http://localhost:8181/api/management/v1/principal-roles/olake_user_role/catalog-roles/olake_catalog" \
  -H "Authorization: Bearer <bearer_token>" \
  -H "Content-Type: application/json" \
  -d '{"catalogRole": {"name": "olake_catalog_role"}}'
Grant privileges:
curl -i -X PUT "http://localhost:8181/api/management/v1/catalogs/olake_catalog/catalog-roles/olake_catalog_role/grants" \
  -H "Authorization: Bearer <bearer_token>" \
  -H "Content-Type: application/json" \
  -d '{"grant": {"type": "catalog", "privilege": "CATALOG_MANAGE_CONTENT"}}'
When accessing the Polaris REST Catalog from outside the EC2 instance:
- Use a reachable host: Replace
localhostwith the EC2 instance's public IP or a DNS name. - Production note: For internet-facing deployments, enable HTTPS and update URLs to
https://.
Example External Configuration (non‑TLS/testing):
{
  "rest_catalog_url": "http://polaris.olake.io/api/catalog",
  "oauth2_uri": "http://polaris.olake.io/api/catalog/v1/oauth/tokens"
}
MySQL
Here is a simple docker compose setup to start a MySQL source database.
version: '3.8'

services:
  mysql:
    image: mysql:8.0
    container_name: mysql
    environment:
      MYSQL_ROOT_PASSWORD: root_password
      MYSQL_DATABASE: demo_db
      MYSQL_USER: demo_user
      MYSQL_PASSWORD: demo_password
    command: >
      --log-bin=mysql-bin --server-id=1 --binlog-format=ROW
      --gtid-mode=ON --enforce-gtid-consistency=ON
      --binlog-row-image=FULL --binlog-row-metadata=FULL
    ports:
      - "3307:3306"  # Host:Container mapping
    volumes:
      - mysql-data:/var/lib/mysql
      - ./mysql-init:/docker-entrypoint-initdb.d:ro
    healthcheck:
      test: ["CMD", "mysqladmin", "ping", "-h", "localhost"]
      interval: 10s
      timeout: 5s
      retries: 30
    restart: always

volumes:
  mysql-data:
Create ./mysql-init/01-setup.sql:
Click to view SQL initialization script
USE demo_db;

CREATE TABLE IF NOT EXISTS customers (
  customer_id INT PRIMARY KEY AUTO_INCREMENT,
  first_name VARCHAR(50) NOT NULL,
  last_name  VARCHAR(50) NOT NULL,
  email      VARCHAR(100) UNIQUE NOT NULL,
  country    VARCHAR(50) NOT NULL,
  created_at TIMESTAMP DEFAULT CURRENT_TIMESTAMP
);

CREATE TABLE IF NOT EXISTS orders (
  order_id     INT PRIMARY KEY AUTO_INCREMENT,
  customer_id  INT NOT NULL,
  product_name VARCHAR(100) NOT NULL,
  amount       DECIMAL(10,2) NOT NULL,
  order_date   DATE NOT NULL,
  created_at   TIMESTAMP DEFAULT CURRENT_TIMESTAMP,
  FOREIGN KEY (customer_id) REFERENCES customers(customer_id)
);

INSERT INTO customers (first_name, last_name, email, country) VALUES
('John','Doe','john.doe@email.com','USA'),
('Jane','Smith','jane.smith@email.com','Canada'),
('Bob','Johnson','bob.johnson@email.com','UK'),
('Alice','Brown','alice.brown@email.com','Australia'),
('Charlie','Wilson','charlie.wilson@email.com','USA');

INSERT INTO orders (customer_id, product_name, amount, order_date) VALUES
(1,'Laptop',   1299.99,'2025-01-15'),
(1,'Mouse',      29.99,'2025-01-16'),
(2,'Keyboard',   79.99,'2025-01-17'),
(3,'Monitor',   299.99,'2025-01-18'),
(4,'Headphones',149.99,'2025-01-19'),
(5,'Tablet',    599.99,'2025-01-20'),
(2,'Webcam',     89.99,'2025-01-21'),
(1,'Desk',      199.99,'2025-01-22');
docker compose up -d
Verify MySQL Source Data
Check customers table:
docker exec mysql mysql -u demo_user -pdemo_password demo_db \
  -e "SELECT customer_id, first_name, last_name, email, country FROM customers;" 2>&1 | grep -v "Warning"

5 customers in our source database ready to replicate
Check orders table:
docker exec mysql mysql -u demo_user -pdemo_password demo_db \
  -e "SELECT order_id, customer_id, product_name, amount, order_date FROM orders;" 2>&1 | grep -v "Warning"
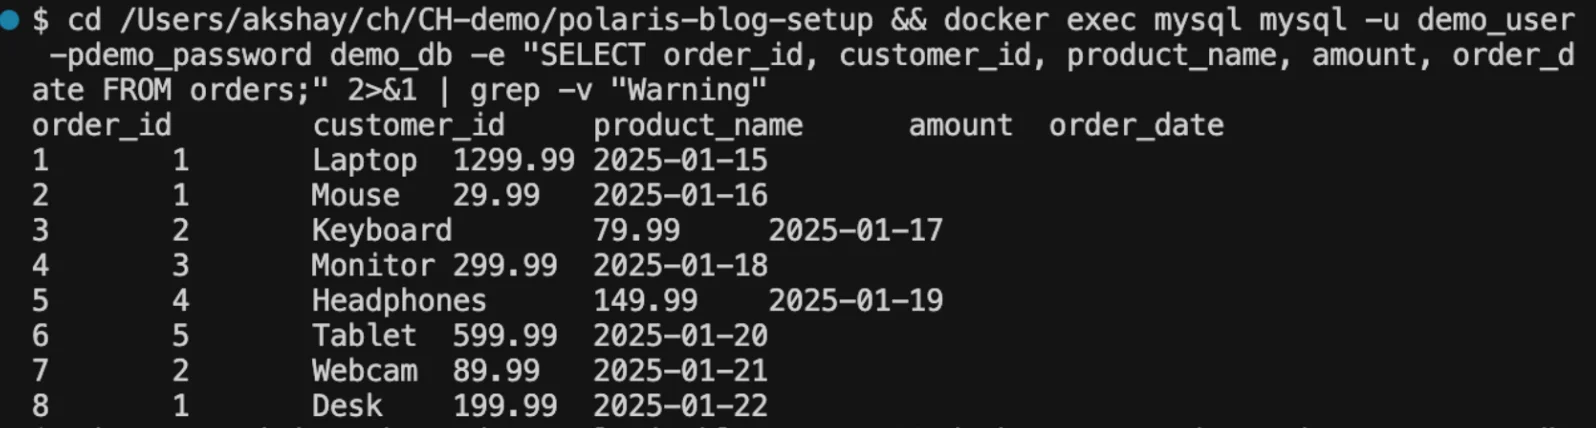
8 orders spanning different customers and dates
For this simple test, both the source (MySQL) and OLake are running on the same EC2 instance. However, in a real-world scenario, the source can be hosted anywhere.
OLake
Ensure the instance running OLake has AWS permissions equivalent to those attached to the instance hosting Polaris (for example, the same S3 access via IAM role/policy).
Start OLake UI
curl -sSL https://raw.githubusercontent.com/datazip-inc/olake-ui/master/docker-compose.yml | docker compose -f - up -d
You can access the UI at port 8000. In case you are running OLake on an EC2 instance, you can port map to your localhost using this command: ssh -L <local_port>:localhost:<remote_port> <ssh_alias>
For more detailed instructions on how to run your first job using OLake refer to Create Your First Job Pipeline
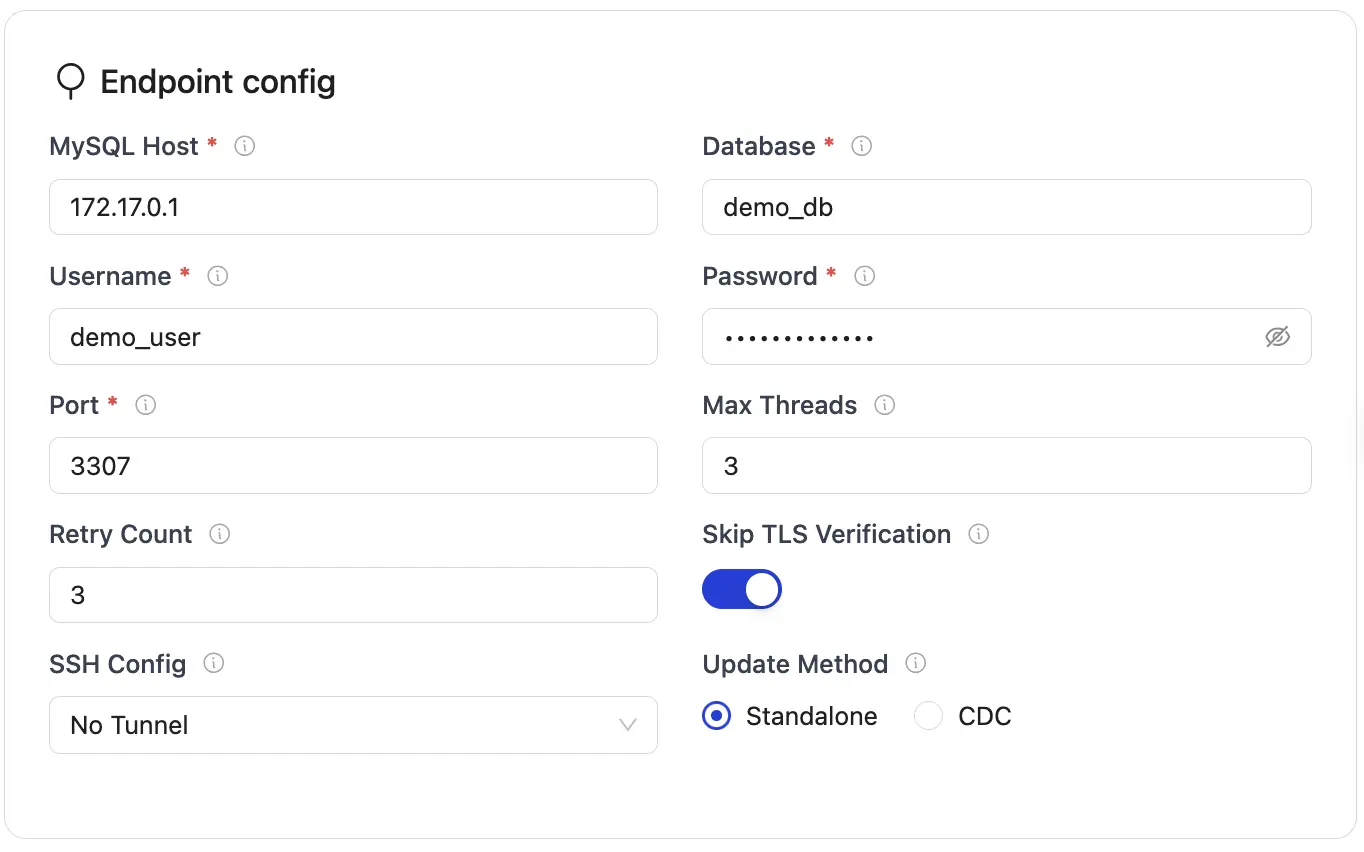
Create Source
Create Destination
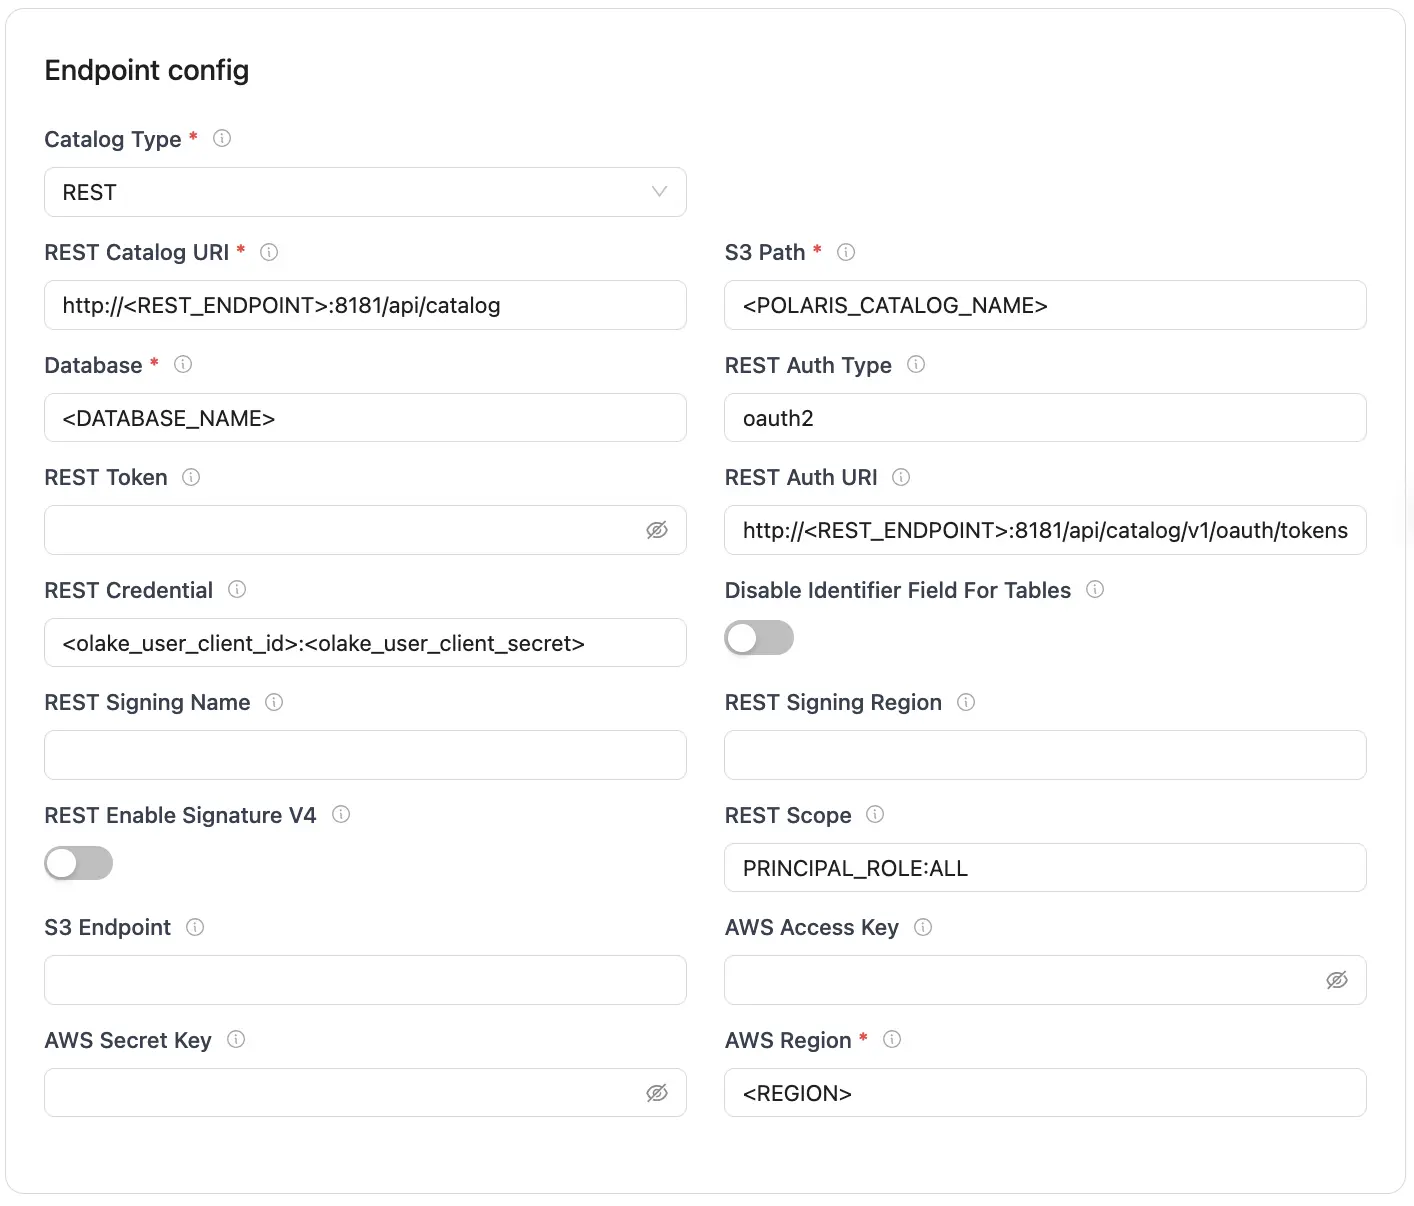
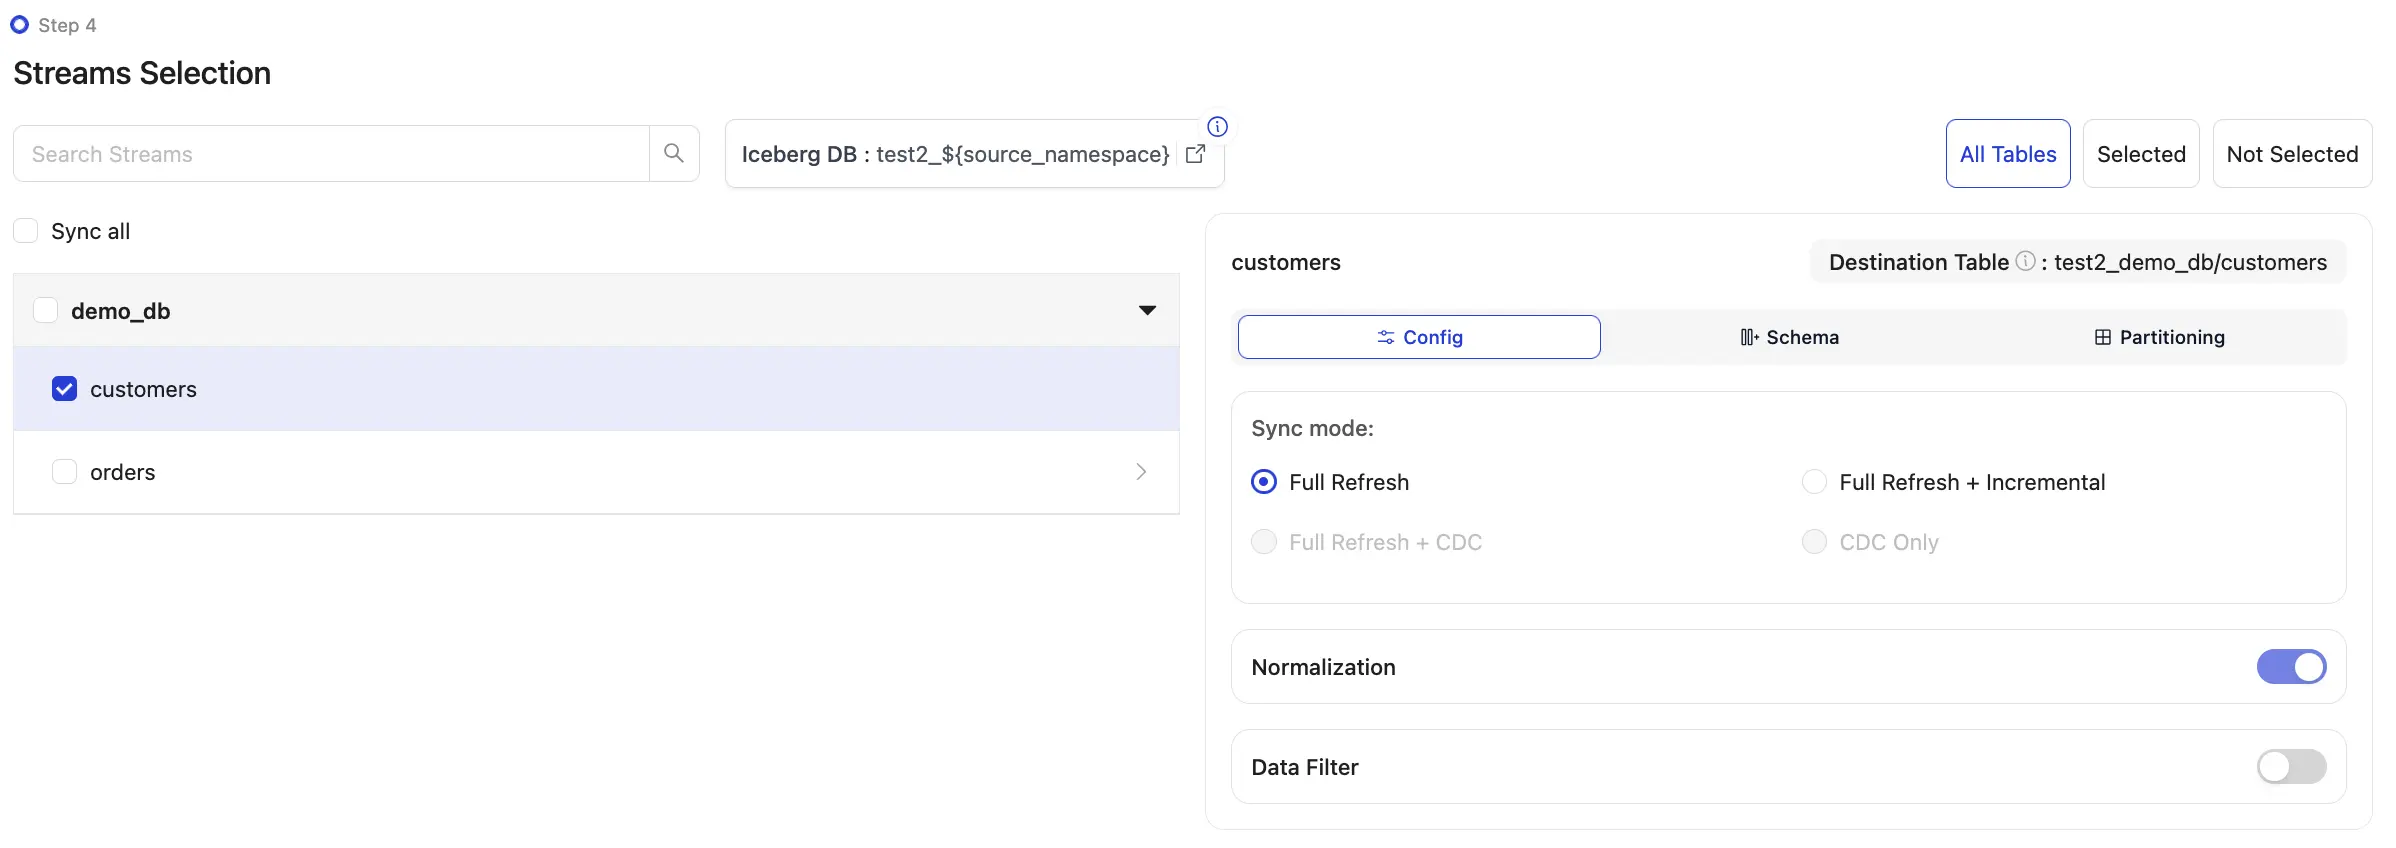
After you have successfully created your source and destination, you can configure your streams to start replicating your data.
Trino
You can run Trino from any machine without attaching AWS IAM roles. Trino connects to Polaris over REST using OAuth2, and Polaris accesses S3 with its own IAM role, so no AWS credentials are needed on the Trino host.
Setup your Trino according to the following directory structure:
├── docker-compose.yml
└── etc
    ├── catalog
    │   └── iceberg.properties
    ├── config.properties
    ├── jvm.config
    └── node.properties
docker-compose.yml
services:
  trino:
    image: trinodb/trino:476
    ports:
      - "8080:8080"
    environment:
      - CLIENT_ID=<CLIENT_ID>
      - CLIENT_SECRET=<CLIENT_SECRET>
      - AWS_REGION=<AWS_REGION>
    volumes:
      - ./etc:/etc/trino:ro
      - ./trino/data:/var/lib/trino
iceberg.properties
connector.name=iceberg
iceberg.catalog.type=rest
iceberg.rest-catalog.uri=http://<POLARIS_REST_ENDPOINT>/api/catalog
iceberg.rest-catalog.security=OAUTH2
iceberg.rest-catalog.oauth2.credential=<OLAKE_USER_CLIENT_ID>:<OLAKE_USER_CLIENT_SECRET>
iceberg.rest-catalog.oauth2.scope=PRINCIPAL_ROLE:ALL
iceberg.rest-catalog.warehouse=<POLARIS_CATALOG_NAME>
iceberg.rest-catalog.vended-credentials-enabled=true
iceberg.file-format=PARQUET
fs.native-s3.enabled=true
config.properties
coordinator=true
node-scheduler.include-coordinator=true
http-server.http.port=8080
discovery.uri=http://localhost:8080
web-ui.preview.enabled=true
jvm.config
-server
-Xmx1G
-XX:+UseG1GC
-XX:G1HeapRegionSize=32M
-XX:+UseGCOverheadLimit
-XX:+ExplicitGCInvokesConcurrent
-XX:+HeapDumpOnOutOfMemoryError
-XX:+ExitOnOutOfMemoryError
-Djdk.attach.allowAttachSelf=true
node.properties
node.environment=testing
node.id=ffffffff-ffff-ffff-ffff-ffffffffffff
node.data-dir=/var/lib/trino
Now start your Trino service:
docker compose up -d
Now, enter your query engine:
docker exec -it <CONTAINER_ID> trino
SHOW CATALOGS;
SHOW SCHEMAS FROM iceberg;
OLake has already created and populated Iceberg tables automatically. Let's verify the data and explore Iceberg's capabilities.
Select Table:
SELECT * FROM iceberg.<NAMESPACE>.customers LIMIT 10;

List Snapshots for an Iceberg Table
SELECT * FROM iceberg.<NAMESPACE>."customers$snapshots" ORDER BY committed_at DESC LIMIT 5;

Time Travel Query by Snapshot ID
SELECT * FROM iceberg.<NAMESPACE>.customers FOR VERSION AS OF <SNAPSHOT_ID> LIMIT 10;

Troubleshooting
Trino → Polaris: 403 Forbidden
Verify OAuth2 in iceberg.properties:
iceberg.rest-catalog.oauth2.credential=<OLAKE_USER_CLIENT_ID>:<OLAKE_USER_CLIENT_SECRET>
iceberg.rest-catalog.oauth2.scope=PRINCIPAL_ROLE:ALL
S3 AccessDenied
IAM role missing permissions or incorrect roleArn in catalog configuration.
Confirm IAM policy allows bucket + objects:
{
  "Version": "2012-10-17",
  "Statement": [{
    "Effect": "Allow",
    "Action": ["s3:*"],
    "Resource": [
      "arn:aws:s3:::your-bucket-name",
      "arn:aws:s3:::your-bucket-name/*"
    ]
  }]
}
Verify the roleArn in your catalog creation matches your IAM role:
aws iam get-role --role-name polaris-lakehouse-role --query 'Role.Arn' --output text
Test S3 access from EC2:
aws s3 ls s3://<YOUR_S3_BUCKET>/
Empty Iceberg tables
- Check counts and S3 paths
- Inspect snapshots via
...$snapshots
Polaris cannot reach S3
IAM role not properly attached or missing permissions.
Fix:
Verify IAM role is attached to EC2:
aws ec2 describe-instances --instance-ids <YOUR_INSTANCE_ID> --query 'Reservations[0].Instances[0].IamInstanceProfile'
Verify role has S3 permissions:
aws iam list-attached-role-policies --role-name polaris-lakehouse-role
Test S3 access from EC2:
aws s3 ls s3://<YOUR_S3_BUCKET>/
Conclusion
Building a modern lakehouse doesn't have to be complex. With Iceberg + Polaris + Trino, you get warehouse-grade guarantees on low-cost object storage—with open standards and speed to match.
Welcome to the lakehouse era. 🚀
OLake
Achieve 5x speed data replication to Lakehouse format with OLake, our open source platform for efficient, quick and scalable big data ingestion for real-time analytics.