Run OLake Sync on Kubernetes Using Apache Airflow | Guide

At OLake, we're building tools to make data integration seamless. Today, we're excited to show you how to leverage your existing Apache Airflow setup to automate OLake data synchronization tasks directly on your Kubernetes cluster!
OLake is designed to efficiently sync data from various sources to your chosen destinations. This guide provides an Airflow DAG (Directed Acyclic Graph) that orchestrates the OLake sync command, handling dependencies like persistent storage and configuration management within Kubernetes.
This post assumes you already have:
- A running Apache Airflow instance.
Airflow Kubernetes Provider: The necessary provider must be installed in your Airflow environment. If not already installed, run:
# Activate your Airflow virtual environment first
pip install apache-airflow-providers-cncf-kubernetes

# Restart Airflow scheduler and webserver after installation
-
Access to a Kubernetes cluster.
-
Basic familiarity with Airflow concepts (UI, DAGs, Connections) and Kubernetes concepts (Namespaces, ConfigMaps, StorageClasses, PersistentVolumeClaims).
Let's dive in!
Setting the Stage
Before deploying the DAG, ensure the following are in place:
Airflow with LocalExecutor:
Crucially, your Airflow instance must be configured to use the LocalExecutor or SequentialExecutor.
Our DAG utilizes Airflow's PythonOperator to dynamically check for and create Kubernetes resources (like PersistentVolumeClaims) before running the main OLake task.
This Python code runs directly on the machine where the Airflow scheduler is running, which is how LocalExecutor and SequentialExecutor operate.
It will not work correctly out-of-the-box with the CeleryExecutor or KubernetesExecutor without modification.
You can verify this by checking the executor setting under the [core] section in your $AIRFLOW_HOME/airflow/airflow.cfg file. It should be set to either executor = LocalExecutor or executor = SequentialExecutor.
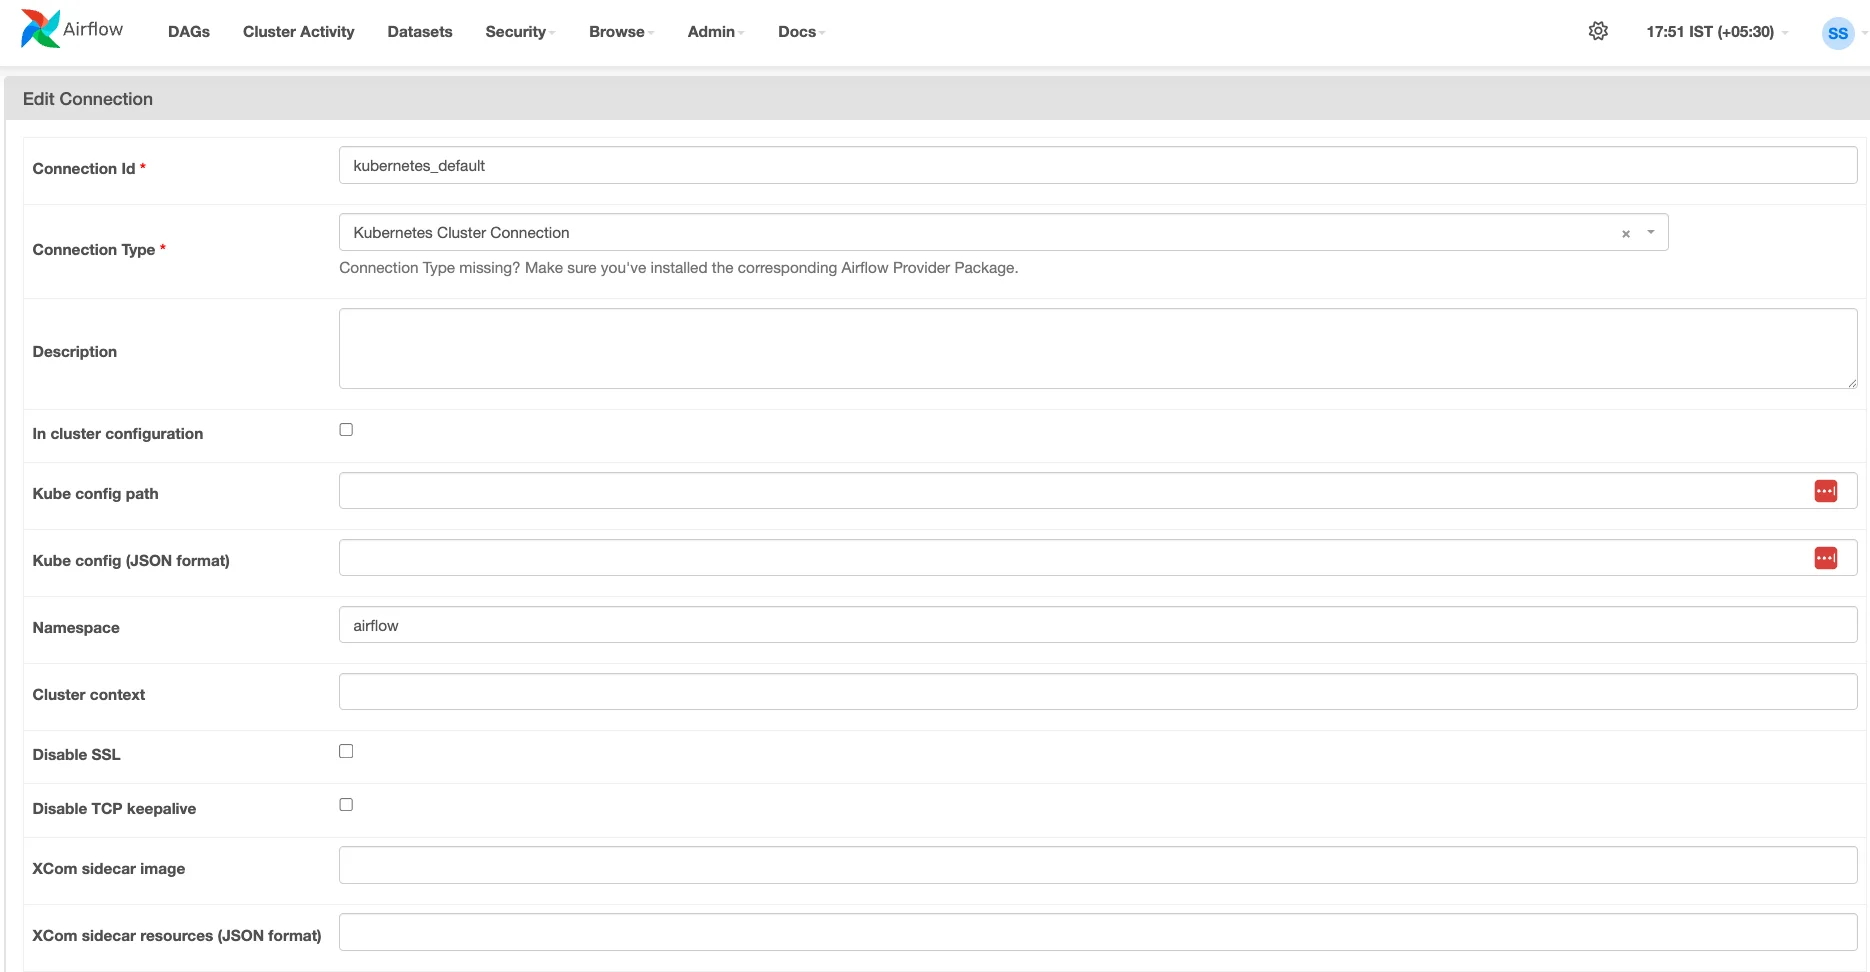
Kubernetes Connection in Airflow
You need an Airflow Connection configured to communicate with your Kubernetes cluster.
-
Go to
Admin->Connectionsin the Airflow UI. -
Add or identify a connection of type
Kubernetes. -
Configure it using either a Kubeconfig file (pasted JSON recommended for setups outside the cluster). To get the kubeconfig on your machine in JSON format. Please run:
kubectl config view --raw --flatten --output='json'
Note down the Connection Id - you'll need it for the DAG configuration.
Kubernetes Namespace
Choose or create a namespace in your Kubernetes cluster where OLake pods and related resources (like the PVC) will reside. You'll need the name of this namespace.
Kubernetes ConfigMaps
The OLake DAG relies on Kubernetes ConfigMaps to inject configuration. You must create three ConfigMaps in the target namespace before running the DAG:
-
olake-source-config: Containing your source configuration in a key named source.json.Download cm_olake-source-config.yaml
curl -Lo cm_olake-source-config.yaml https://raw.githubusercontent.com/datazip-inc/olake-docs/refs/heads/master/kubernetes/cm_olake-source-config.yaml
-
olake-destination-config: Containing your destination configuration in a key nameddestination.json.Download cm_olake-destination-config.yaml
curl -Lo cm_olake-destination-config.yaml https://raw.githubusercontent.com/datazip-inc/olake-docs/refs/heads/master/kubernetes/cm_olake-destination-config.yaml
-
olake-streams-config: Containing your OLake streams configuration in a key namedstreams.jsonDownload cm_olake-streams-config.yaml
curl -Lo cm_olake-streams-config.yaml https://raw.githubusercontent.com/datazip-inc/olake-docs/refs/heads/master/kubernetes/cm_olake-streams-config.yaml
This setup requires a streams.json generated beforehand using the OLake discover command against your source database.
- Streams Generation Guides:
- The content of this file will be placed within the
cm_olake-streams-config.yamlConfigMap.
Kubernetes StorageClass
OLake uses a state file to keep track of sync progress. To persist this state between runs, the DAG creates a PersistentVolumeClaim (PVC). You need a StorageClass in your Kubernetes cluster that supports ReadWriteMany (RWX) access mode.
At start of the sync, the state file just contains {}. OLake will update this file as it processes data.
Examples: azurefile on AKS, Google Cloud Filestore provisioner on GKE, AWS EFS provisioner on EKS, or an NFS provisioner.
Identify the name of a suitable StorageClass. You can often list available StorageClasses using kubectl get storageclass. Consult your Kubernetes administrator if unsure.
Getting the DAG File
You'll need the Python DAG file that defines the workflow. Download it here.
Configuring the DAG
Now, open the downloaded olake_sync_from_source.py file in a text editor. You need to customize a few variables at the top of the file to match your specific environment. Do not skip this step!
# --- Configuration ---
# !!! IMPORTANT: Set this to the ID of your configured Kubernetes connection in Airflow !!!
# This connection tells Airflow how to authenticate with your K8s cluster.
KUBERNETES_CONN_ID = "kubernetes_default" # <-- EDIT THIS LINE

# !!! IMPORTANT: Set this to the Kubernetes namespace where OLake pods should run !!!
# Ensure ConfigMaps and the PVC exist or will be created in this namespace.
TARGET_NAMESPACE = "olake" # <-- EDIT THIS LINE

# !!! IMPORTANT: Set this to the correct OLake image for your source database !!!
# Find images at: https://hub.docker.com/u/olakego
# Examples: "olakego/source-mongodb:latest", "olakego/source-mysql:latest", "olakego/source-postgres:latest"
OLAKE_IMAGE = "olakego/source-db:latest" # <-- EDIT THIS LINE

# !!! IMPORTANT: Set this to the name of a StorageClass in your K8s cluster !!!
# This StorageClass MUST support ReadWriteMany (RWX) access mode.
# Examples: "azurefile" (AKS), "standard-rwx" (GKE Filestore), an EFS provisioner (EKS)
STORAGE_CLASS_NAME = "default" # <-- EDIT THIS LINE

# --- Optional Node Affinity ---
# Set NODE_AFFINITY_LABEL_KEY and NODE_AFFINITY_LABEL_VALUE to target specific nodes.
# Set NODE_AFFINITY_REQUIRED to True for hard requirement, False for preference.
NODE_AFFINITY_REQUIRED = False # <-- EDIT THIS LINE (True/False)
NODE_AFFINITY_LABEL_KEY = "nodegroup_name" # <-- EDIT THIS LINE (e.g., "topology.kubernetes.io/zone")
NODE_AFFINITY_LABEL_VALUE = "olake" # <-- EDIT THIS LINE (e.g., "us-central1-a")

# --- Names of ConfigMaps ---
# Ensure ConfigMaps with these names exist in the TARGET_NAMESPACE
# containing your source, destination, and streams JSON configurations respectively.
SOURCE_CONFIG_MAP_NAME = "olake-source-config"
DESTINATION_CONFIG_MAP_NAME = "olake-destination-config"
STREAMS_CONFIG_MAP_NAME = "olake-streams-config"
Recap of values to change:
-
KUBERNETES_CONN_ID: Set this to the exact "Connection Id" of your Kubernetes connection in Airflow. -
TARGET_NAMESPACE: Set this to the Kubernetes namespace where you created the ConfigMaps and where the OLake pod/PVC should run. -
OLAKE_IMAGE: Crucially, change this to the specific OLake Docker image corresponding to your data source (e.g.,olakego/source-postgres:latest,olakego/source-mongodb:latest, etc). Check the OLake Docker Hub page for available images and tags. -
STORAGE_CLASS_NAME: Set this to the name of an availableReadWriteMany(RWX) StorageClass in your cluster. -
NODE_AFFINITY_*(Optional): Adjust these if you need to control pod placement onto specific Kubernetes nodes based on labels. LeaveNODE_AFFINITY_REQUIRED = Falseif you don't need strict node requirements. -
*_CONFIG_MAP_NAME(Optional): Only change these if you named your prerequisiteConfigMapsdifferently than the defaults.
Deploying the DAG to Airflow
-
Save your modified
olake_sync_from_source.pyfile. -
Place the file into the
dagsfolder recognized by your Airflow instance. The location of this folder depends on your Airflow setup. -
Airflow automatically scans this folder. Wait a minute or two, and the DAG named
olake_sync_from_sourceshould appear in the Airflow UI. You might need to unpause it (toggle button on the left) if it loads in a paused state.
Running Your OLake Sync
-
Navigate to the Airflow UI.
-
Find the
olake_sync_from_sourceDAG. -
Click the "Play" button (▶️) on the right side to trigger a manual run.

-
Click on the running DAG instance to view the Graph or Gantt chart.
-
The first task (
create_pvc) will run, checking for and creating theolake-shared-dataPVC if needed. -
Once that succeeds, the
sync_datatask will start. This task launches the actual OLake pod on your Kubernetes cluster. -
You can click on the
sync_datatask instance and view its logs to see the output from the OLake process itself.
How to set up OLake cron job scheduler
Modify the line #52 from the olake_sync_from_source.py DAG file (schedule=None) with the frequency you wish to setup.
with DAG(
    dag_id="olake_sync_from_source",
    start_date=dag_start_date,
    schedule="@daily",  # SAMPLE VALUE
    catchup=False,
    ...
For more information on how to add a schedule, refer Cron & Time Intervals docs.
That's it! You've successfully configured and run an OLake sync task orchestrated by your existing Airflow instance, leveraging the power of Kubernetes for execution. This setup provides a robust and automated way to manage your data synchronization pipelines.
Happy Syncing!
OLake
Achieve 5x speed data replication to Lakehouse format with OLake, our open source platform for efficient, quick and scalable big data ingestion for real-time analytics.