Run OLake Sync on EC2 with Apache Airflow Automation


At OLake, we're building tools to make data integration seamless. Today, we're excited to show you how to leverage your existing Apache Airflow setup to automate OLake data synchronization tasks directly on your EC2 Server!
Olake is designed to efficiently sync data from various sources to your chosen destinations. This guide provides an Airflow DAG (Directed Acyclic Graph) that orchestrates the Olake sync command by provisioning a dedicated EC2 instance, executing Olake within a Docker container and handling configuration and state persistence through Amazon S3.
This post assumes you already have:
- A running Apache Airflow instance.
- Access to an AWS account with permissions to manage EC2 instances, S3 buckets, and IAM roles.
- Basic familiarity with Airflow concepts (UI, DAGs, Connections) and AWS concepts (EC2, S3, IAM Roles, VPC, Security Groups, AMIs).
Let's dive in!
Setting the Stage
Before deploying the DAG, ensure the following are in place:
1. Airflow Environment & Providers:
-
This DAG relies on the AWS and SSH providers to interact with Amazon EC2 and to execute commands on the dynamically created instances. Ensure these are installed in your Airflow environment:
pip install apache-airflow-providers-amazon apache-airflow-providers-sshRemember to restart your Airflow components (scheduler, webserver) after installation.
2. Airflow Connections:
- AWS Connection (
AWS_CONNECTION_IDin the DAG): This Airflow connection must be configured with AWS credentials that have permissions to manage the lifecycle of EC2 instances. Specifically, it needs to be able to: - Create, describe, and terminate EC2 instances.
- Pass an IAM role to the EC2 instances it creates (this is the
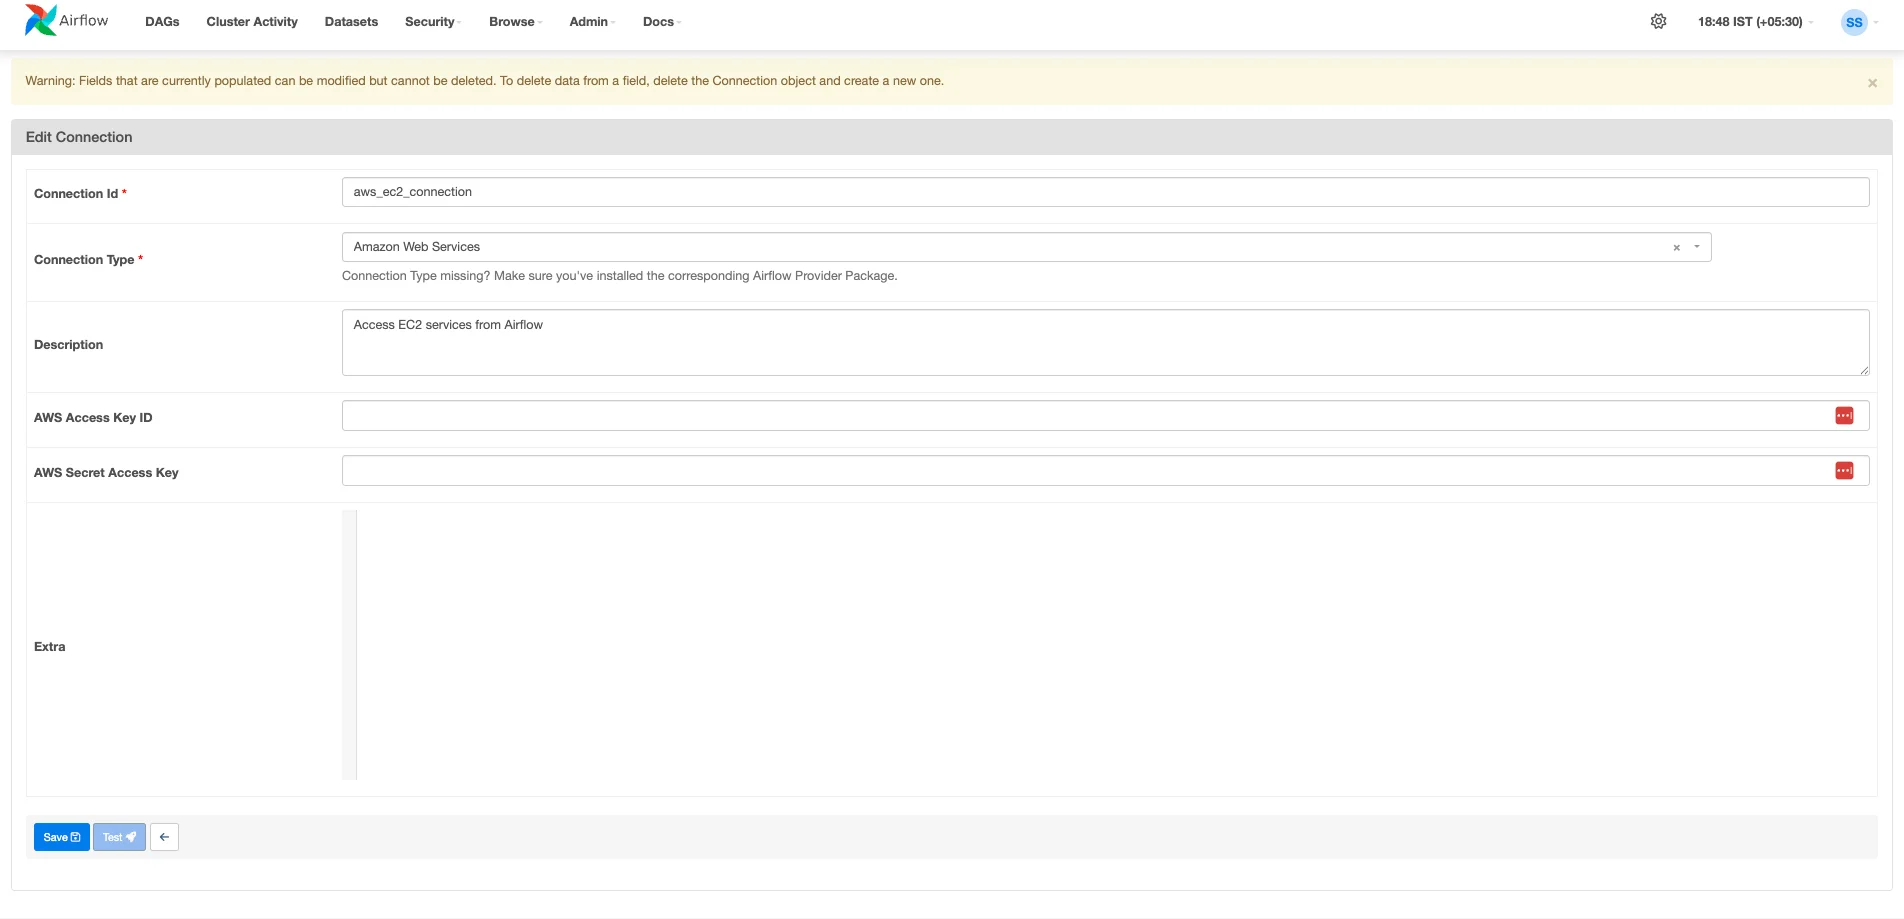
iam:PassRolepermission for the specific role defined byIAM_ROLE_NAMEin the DAG). - In order to create the connection, head over to the Airflow UI.
- Click on the
Admindropdown menu and selectConnections - Click on the + icon to
Add a new record - Select the
Connection Typeto beAmazon Web Services - Enter a
Connection Id(this would be later used inAWS_CONNECTION_IDvariable in the DAG) - (Important) Either enter
AWS Access Key IdandAWS Secret Access Keyor user can just attach an AWS IAM Role to the Airflow instance (with sufficient permissions as below code snippet). If no Access Keys are used, default boto3 behaviour is used. - Click Save.
- Click on the
{
    "Version": "2012-10-17",
    "Statement": [
        {
            "Sid": "EC2DescribeActions",
            "Effect": "Allow",
            "Action": [
                "ec2:DescribeInstances",
                "ec2:DescribeInstanceStatus",
                "ec2:DescribeIamInstanceProfileAssociations",
                "ec2:DescribeKeyPairs",
                "ec2:DescribeSecurityGroups",
                "ec2:DescribeSubnets",
                "ec2:DescribeImages",
                "ec2:DescribeVpcs"
            ],
            "Resource": "*"
        },
        {
            "Sid": "EC2RunInstances",
            "Effect": "Allow",
            "Action": [
                "ec2:RunInstances",
                "ec2:CreateTags",
                "ec2:AssociateIamInstanceProfile",
                "ec2:AttachVolume",
                "ec2:CreateNetworkInterface"
            ],
            "Resource": [
                "arn:aws:ec2:AWS_REGION:YOUR_AWS_ACCOUNT_ID:instance/*",
                "arn:aws:ec2:AWS_REGION:YOUR_AWS_ACCOUNT_ID:volume/*",
                "arn:aws:ec2:AWS_REGION:YOUR_AWS_ACCOUNT_ID:network-interface/*",
                "arn:aws:ec2:AWS_REGION:YOUR_AWS_ACCOUNT_ID:key-pair/*",
                "arn:aws:ec2:AWS_REGION:YOUR_AWS_ACCOUNT_ID:image/*",
                "arn:aws:ec2:AWS_REGION:YOUR_AWS_ACCOUNT_ID:subnet/*",
                "arn:aws:ec2:AWS_REGION:YOUR_AWS_ACCOUNT_ID:security-group/*",
                "arn:aws:iam::YOUR_AWS_ACCOUNT_ID:role/*"
            ]
        },
        {
            "Sid": "EC2TerminateInstances",
            "Effect": "Allow",
            "Action": "ec2:TerminateInstances",
            "Resource": "arn:aws:ec2:AWS-REGION:YOUR_AWS_ACCOUNT_ID:instance/*",
            "Condition": {
                "StringEquals": {
                    "ec2:ResourceTag/ManagedBy": "Airflow"
                }
            }
        },
        {
            "Sid": "EC2CreateTags",
            "Effect": "Allow",
            "Action": "ec2:CreateTags",
            "Resource": "arn:aws:ec2:AWS-REGION:YOUR_AWS_ACCOUNT_ID:*/*",
            "Condition": {
                "StringEquals": {
                    "ec2:CreateAction": "RunInstances"
                }
            }
        },
        {
            "Sid": "PassRoleToEC2",
            "Effect": "Allow",
            "Action": "iam:PassRole",
            "Resource": "arn:aws:iam::YOUR_AWS_ACCOUNT_ID:role/INSTANCE_IAM_PROFILE_NAME",
            "Condition": {
                "StringEquals": {
                    "iam:PassedToService": "ec2.amazonaws.com"
                }
            }
        }
    ]
}
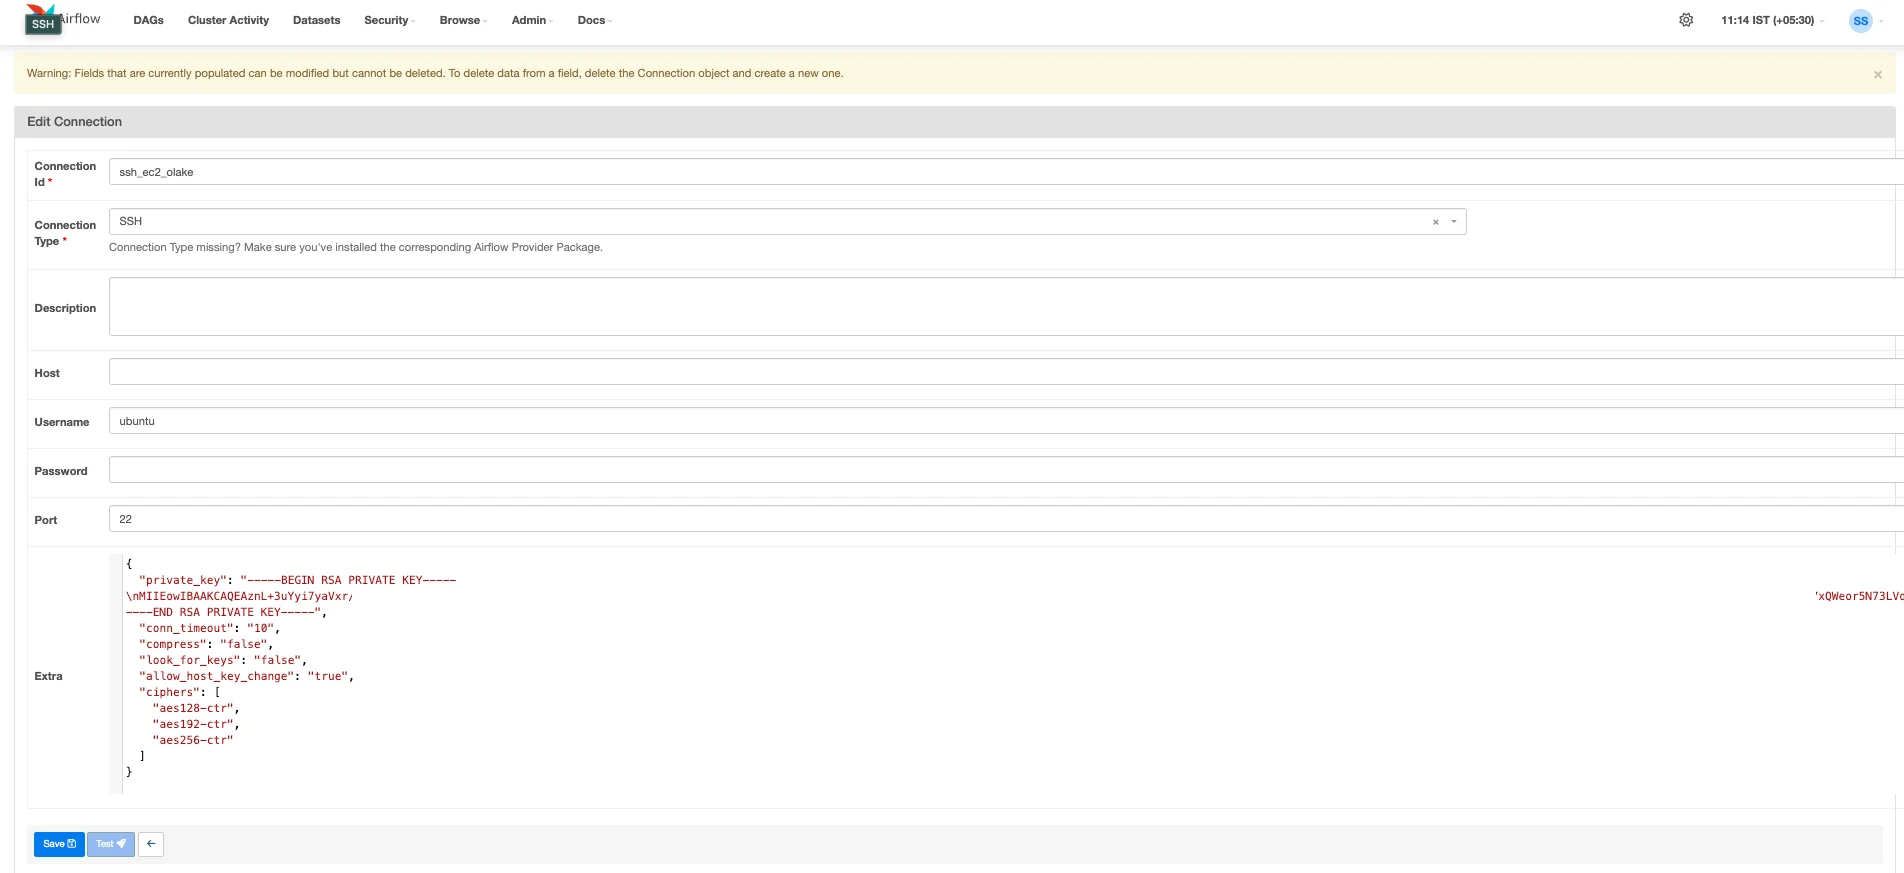
- SSH Connection (
SSH_CONNECTION_IDin the DAG): This connection allows Airflow to securely connect to the dynamically created EC2 instance to execute the Olake setup and run commands.- Still in the Airflow UI (
Admin->Connections), click the+icon to add another new record. - Set the Connection Type to SSH.
- Enter a Connection Id (e.g.,
ssh_ec2_olake). This exact ID will be used for theSSH_CONNECTION_IDvariable in your DAG. - Host(Optional): You can leave this field blank or enter a placeholder like
dynamic_ec2_host. The DAG's Python code (run_olake_docker_via_sshfunction usingSSHHook) will dynamically provide the correct host IP address of the newly created EC2 instance at runtime. - Username(Required): Enter the default username for the AMI you are using (specified as
DEFAULT_EC2_USERin the DAG, e.g.,ubuntufor Ubuntu AMIs). In our case, useubuntu - Port: Typically
22, unless you have a custom SSH port configured on your instances. - In the Extra field, we would need to add the Private RSA Key of the EC2 Key Pair we plan to attach to our worker node. The user is advised to create an EC2 Key Pair manually from AWS Console.
- Still in the Airflow UI (
{
  "private_key": "-----BEGIN RSA PRIVATE KEY-----\n.....MIIyTbqSiYld8MGH1P6rui7V3eN.....\n-----END RSA PRIVATE KEY-----",
  "conn_timeout": "10",
  "compress": "false",
  "look_for_keys": "false",
  "allow_host_key_change": "true",
  "ciphers": [
    "aes128-ctr",
    "aes192-ctr",
    "aes256-ctr"
  ]
}
-
To generate the suitable string format for private_key field below please run the following:
python -c 'import re, sys; print(re.sub("\r?\n", "\\\\n", sys.stdin.read()))' < /path/to/your/key -
Click Save.
3. Amazon S3 Setup for Olake Configurations and State:
-
S3 Bucket (
S3_BUCKET_NAMEin the DAG): Create an S3 bucket where Olake's configuration files and persistent state file will be stored. -
S3 Prefix for Configurations (
S3_PREFIXin the DAG): Decide on a "folder" (S3 prefix) within your bucket where your Olake configuration files will reside (e.g.,olake/projectA/configs/). -
Upload Olake Configuration Files: Before running the DAG, you must upload your Olake
source.json,streams.json, anddestination.jsonfiles to the S3 bucket under the prefix you defined. The DAG's SSH script will sync these files to the EC2 instance. Please visit OLake Docs website to learn how the source and destinations can be set up.
We need to generate streams.json beforehand using the OLake discover command against your source database.
-
Streams Generation Guides:
-
The content of this file will be placed within the
streams.jsonfile.
4. EC2 Instance IAM Role (IAM_ROLE_NAME in the DAG):
The EC2 instances launched by Airflow (which will act as the worker nodes for Olake) need their own set of permissions to perform their tasks. This is achieved by assigning them an IAM Instance Profile. This instance profile must have an attached IAM policy granting permissions to:
- Access Amazon S3 to download Olake configuration files.
- Access Amazon S3 to read and write the Olake state file.
# s3_access_policy.json
{
    "Version": "2012-10-17",
    "Statement": [
        {
            "Sid": "S3ConfigAndStateAccess",
            "Effect": "Allow",
            "Action": [
                "s3:GetObject",
                "s3:PutObject",
                "s3:DeleteObject",
                "s3:ListBucket"
            ],
            "Resource": [
              "arn:aws:s3:::S3_BUCKET_NAME",
              "arn:aws:s3:::S3_BUCKET_NAME/*"
            ]
        }
    ]
}
After creating the IAM Policy we need to create an IAM Role and associate an IAM Instance Profile which will be passed to the DAG.
aws iam create-role \
    --role-name OLakeEC2S3AccessRole \
    --assume-role-policy-document '{
        "Version": "2012-10-17",
        "Statement": [
            {
                "Effect": "Allow",
                "Principal": {
                    "Service": "ec2.amazonaws.com"
                },
                "Action": "sts:AssumeRole"
            }
        ]
    }'
aws iam put-role-policy \
    --role-name OLakeEC2S3AccessRole \
    --policy-name S3ConfigAndStateAccessPolicy \
    --policy-document file://s3_access_policy.json
aws iam create-instance-profile --instance-profile-name OLakeEC2S3AccessRole
aws iam add-role-to-instance-profile \
    --instance-profile-name OLakeEC2S3AccessRole \
    --role-name OLakeEC2S3AccessRole
Getting the DAG File
You'll need the Python DAG file that defines the workflow. Download it here.
Configuring the DAG
Now, open the downloaded olake_sync_from_source_ec2.py file in a text editor. You need to customize a few variables at the top of the file to match your specific environment. Do not skip this step!
# --- Global Configuration ---
AWS_CONN_ID = "AWS_CONNECTION_ID"   # Connection ID for AWS
AWS_REGION_NAME = "AWS_REGION"  	# AWS Region
SSH_CONN_ID = "SSH_CONNECTION_ID"   # SSH connection ID for connecting to instances


# EC2 Instance Configuration
AMI_ID = "ami-000ff0b5b095afd18"        	# AMI ID for container-ready image
INSTANCE_TYPE = "ARM_INSTANCE_TYPE"     	# Instance size based on workload requirements
KEY_NAME = "EC2_KEY_PAIR_NAME"          	# SSH key pair name
SUBNET_ID = "VPC_SUBNET_ID"
SECURITY_GROUP_ID = "VPC_SECUROTY_GROUP"	# Ensure required ports are open
IAM_ROLE_NAME = "INSTANCE_IAM_PROFILE_NAME" # IAM role for cloud storage access


DEFAULT_EC2_USER = "ubuntu"  # Default user for SSH connection


# ETL Configuration
S3_BUCKET = "S3_BUCKET_NAME"
S3_PREFIX = "S3_BUCKET_PREFIX"

# Find images at: https://hub.docker.com/u/olakego
# Examples: "olakego/source-mongodb:latest", "olakego/source-mysql:latest", "olakego/source-postgres:latest"
OLAKE_IMAGE = "DOCKER_IMAGE_NAME"
Recap of Values to Change:
To ensure the DAG runs correctly in your environment, you must update the following placeholder variables in the olake_sync_from_source_ec2.py (or your DAG file name) with your specific AWS and Olake details:
Airflow Connection & AWS Region:
AWS_CONN_ID: Set this to the Connection Id of the AWS connection you configured in the Airflow UI (e.g.,aws_default,my_aws_connection).AWS_REGION_NAME: Specify the AWS Region where your EC2 instances will be launched and where your S3 bucket resides (e.g.,us-east-1,ap-south-1).SSH_CONN_ID: Set this to the Connection Id of the SSH connection you configured in Airflow for connecting to the EC2 instances (e.g.,ssh_ec2_olake).
EC2 Instance Configuration:
AMI_ID: Replace with the actual AMI ID of a container-ready image (with Docker/containerd, aws-cli, jq) in your chosenAWS_REGION_NAME.INSTANCE_TYPE: (Optional) Select an appropriate EC2 instance type based on your Olake workload's resource needs (e.g.,t3.medium,m5.large, or an ARM equivalent liket4g.medium).
The AMI tag we have hardcoded is EKS supported Ubuntu image with containerd and aws-cli pre-installed which are very crucial for the DAG to work. Another point to note is that since Graviton powered machines are cheaper compared to x86 machines, so the AMI already uses ARM architecture AMI.KEY_NAME: Enter the name of the EC2 Key Pair you want to associate with the launched instances. This is the same key we have used while setting up the SSH Connection.SUBNET_ID: Provide the ID of the VPC subnet where the EC2 instance should be launched.SECURITY_GROUP_ID: Specify the ID of the Security Group that will be attached to the instance.IAM_ROLE_NAME: Enter the name (not the ARN) of the IAM Instance Profile that grants the EC2 instance necessary permissions (primarily S3 access).DEFAULT_EC2_USER: Change this if the default SSH username for your chosenAMI_IDis different fromubuntu(e.g.,ec2-userfor Amazon Linux).
ETL Configuration (S3 & Olake):
S3_BUCKET_NAME: The name of your S3 bucket where Olake configurations and state will be stored.S3_BUCKET_PREFIX: The "folder" path (prefix) within your S3 bucket for Olake files (e.g.,olake/projectA/configs/). Remember the trailing slash if it's part of your intended structure.OLAKE_IMAGE: The full name of the Olake Docker image you want to use (e.g.,olakego/source-postgres:latest,olakego/source-mysql:latest,olakego/source-mongodb:latest).
Deploying the DAG to Airflow
- Save your modified
olake_sync_from_source_ec2.pyfile. - Place the file into the
dagsfolder recognized by your Airflow instance. The location of this folder depends on your Airflow setup. - Airflow automatically scans this folder. Wait a minute or two, and the DAG named
olake_sync_from_sourceshould appear in the Airflow UI. You might need to unpause it (toggle button on the left) if it loads in a paused state.
Running Your Dynamic Olake Sync on EC2
- Access Airflow UI: Navigate to your Airflow web UI.
- Find and Unpause DAG: Locate the DAG, likely named
olake_sync_from_source(or whateverdag_idyou've set). If it's paused, click the toggle to unpause it. - Trigger the DAG: Click the "Play" button (▶️) on the right side of the DAG listing to initiate a manual run. You can also configure a schedule string in the DAG file for automatic runs.
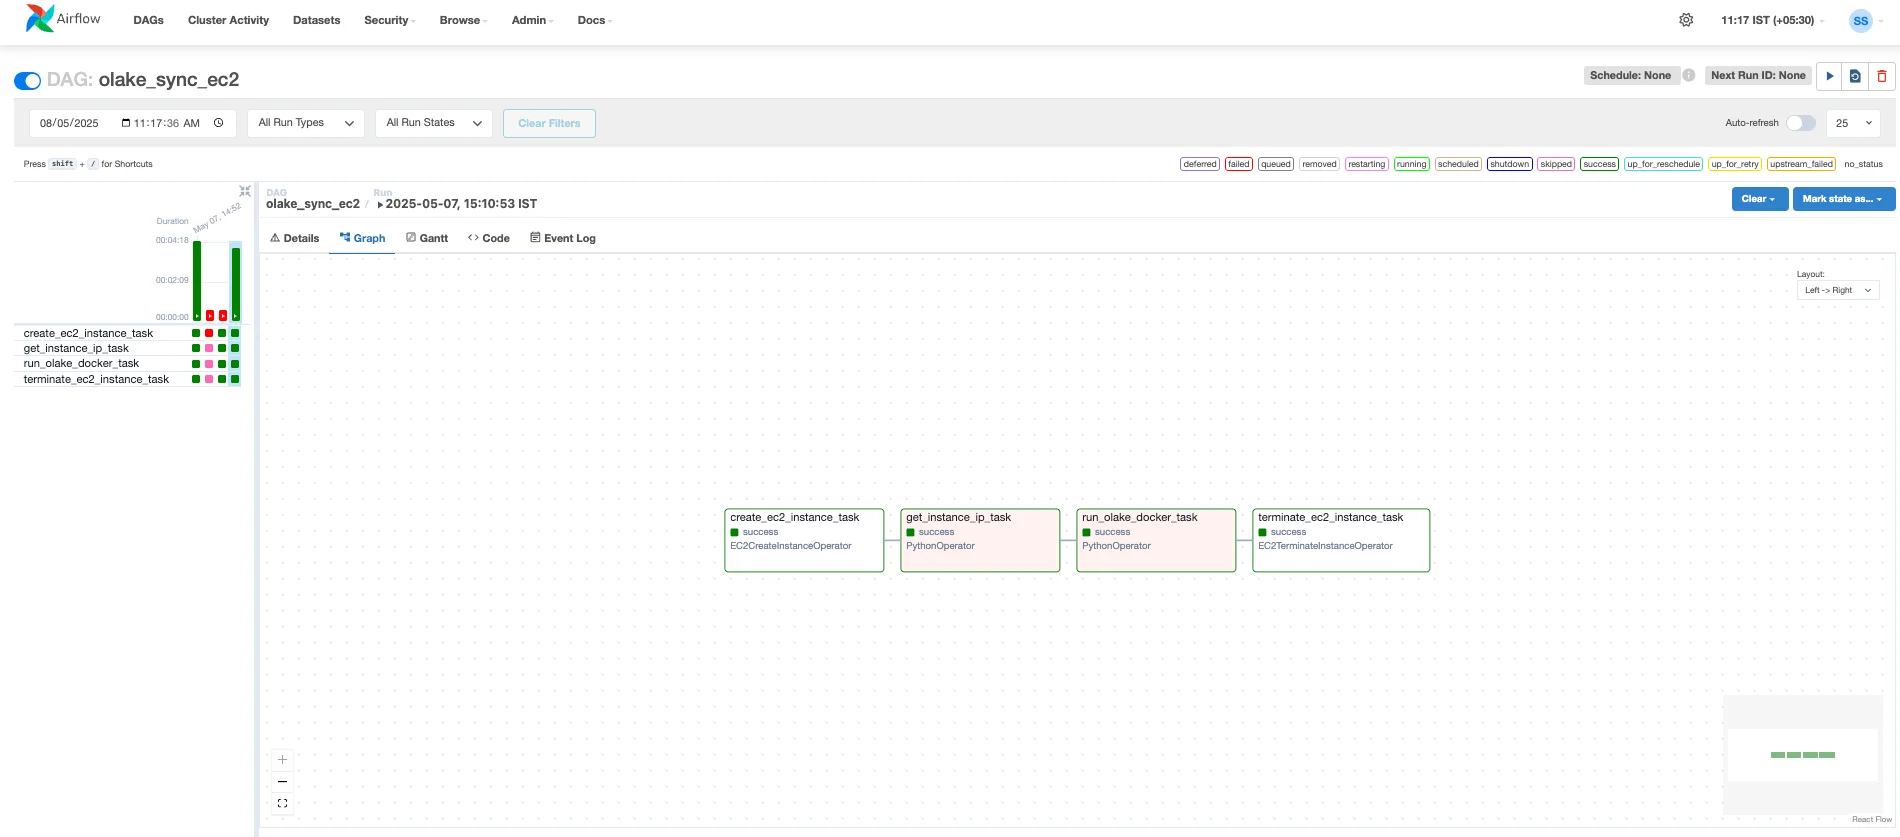
- Monitor the Run: Click on the DAG run instance to view its progress in the Graph, Gantt, or Tree view. You will see the following sequence of tasks:
create_ec2_instance_task: This task will begin first, using the AWS connection to launch a new EC2 instance according to your DAG's configuration (AMI, instance type, networking, IAM role). Airflow will wait for this instance to be in a 'running' state.get_instance_ip_task: Once the instance is running, this Python task will execute. It queries AWS to get the IP address or DNS name of the new EC2 instance, making it available for the next task. It also includes a pause to allow the SSH service on the new instance to become fully available.run_olake_docker_task: This is the core task where Olake runs. It will:- Connect to the newly created EC2 instance via SSH using the configured SSH connection.
- Execute the shell commands defined in
olake_ssh_commandwithin your DAG. This script prepares the EC2 instance by:- Creating necessary directories.
- Downloading your Olake configuration files and the latest state file from S3.
- Pulling the specified Olake Docker image using
ctr image pull. - Running the Olake
syncprocess inside a Docker container usingctr run ... /home/olake sync .... - Uploading the updated state file back to S3 upon successful completion.
- You can click on this task instance in the Airflow UI and view its logs. These logs will contain the real-time STDOUT and STDERR from the SSH session on the EC2 instance, including the output from the Olake Docker container. This is where you'll see Olake's synchronization progress and any potential errors from the Olake process itself.
terminate_ec2_instance_task: After therun_olake_docker_taskcompletes (whether it succeeds or fails, due totrigger_rule=TriggerRule.ALL_DONE), this final task will execute. It securely terminates the EC2 instance that was launched for this DAG run, ensuring you don't incur unnecessary AWS charges.
How to set up OLake cron job scheduler
Modify the line #52 from the olake_sync_from_source.py DAG file (schedule=None) with the frequency you wish to setup.
with DAG(
	dag_id="olake_sync_from_source",
	start_date=dag_start_date,
	schedule="@daily",  # SAMPLE VALUE
	catchup=False,
	...
For more information on how to add a schedule, refer Cron & Time Intervals docs.
That's it! You've successfully configured and run an OLake sync task orchestrated by your existing Airflow instance, leveraging the power of Kubernetes for execution. This setup provides a robust and automated way to manage your data synchronization pipelines.
Happy Syncing!
OLake
Achieve 5x speed data replication to Lakehouse format with OLake, our open source platform for efficient, quick and scalable big data ingestion for real-time analytics.