Snowpipe Streaming: The Ultimate Guide
17 min read
Snowpipe Streaming is Snowflake's service for writing rows straight into tables, with no files to stage first. Rows become queryable in as little as 5 seconds, and a single table can take up to 20 GB/s of uncompressed data, according to Snowflake's documentation.
This guide walks through how Snowpipe Streaming works, how the high-performance architecture changed it, what it costs, how to set it up with the Python SDK and where it falls short. If your pipeline already writes files to cloud storage, classic Snowpipe is still the better fit, but if your data starts out as events, Kafka messages or database changes, read on.
What Is Snowpipe Streaming?
Snowpipe Streaming is a serverless ingestion service that loads rows into Snowflake tables or Snowflake-managed Apache Iceberg tables as they are produced. It is built for data that arrives as a continuous flow of records, such as Kafka topics, IoT readings, clickstream events and change data capture (CDC) feeds, rather than as files dropped into a bucket.
The key difference from file-based loading is that there is nothing to stage. A client application sends rows over the network, Snowflake buffers and commits them, and they show up in the target table within seconds.
Classic vs high-performance architecture
Snowpipe Streaming has gone through two generations, and most older tutorials describe the first one. The classic architecture used the snowflake-ingest-java SDK, opened channels directly against tables and handled schema checks on the client.
The high-performance architecture became generally available on AWS on September 23, 2025 and later reached Azure and GCP. It adds a server-side PIPE object, a Rust-based client core, SDKs for Java, Python and Node.js, and a flat price per gigabyte. Snowflake's documentation now treats it as the default, so the rest of this guide covers the high-performance architecture unless it says otherwise.
How Does Snowpipe Streaming Work?
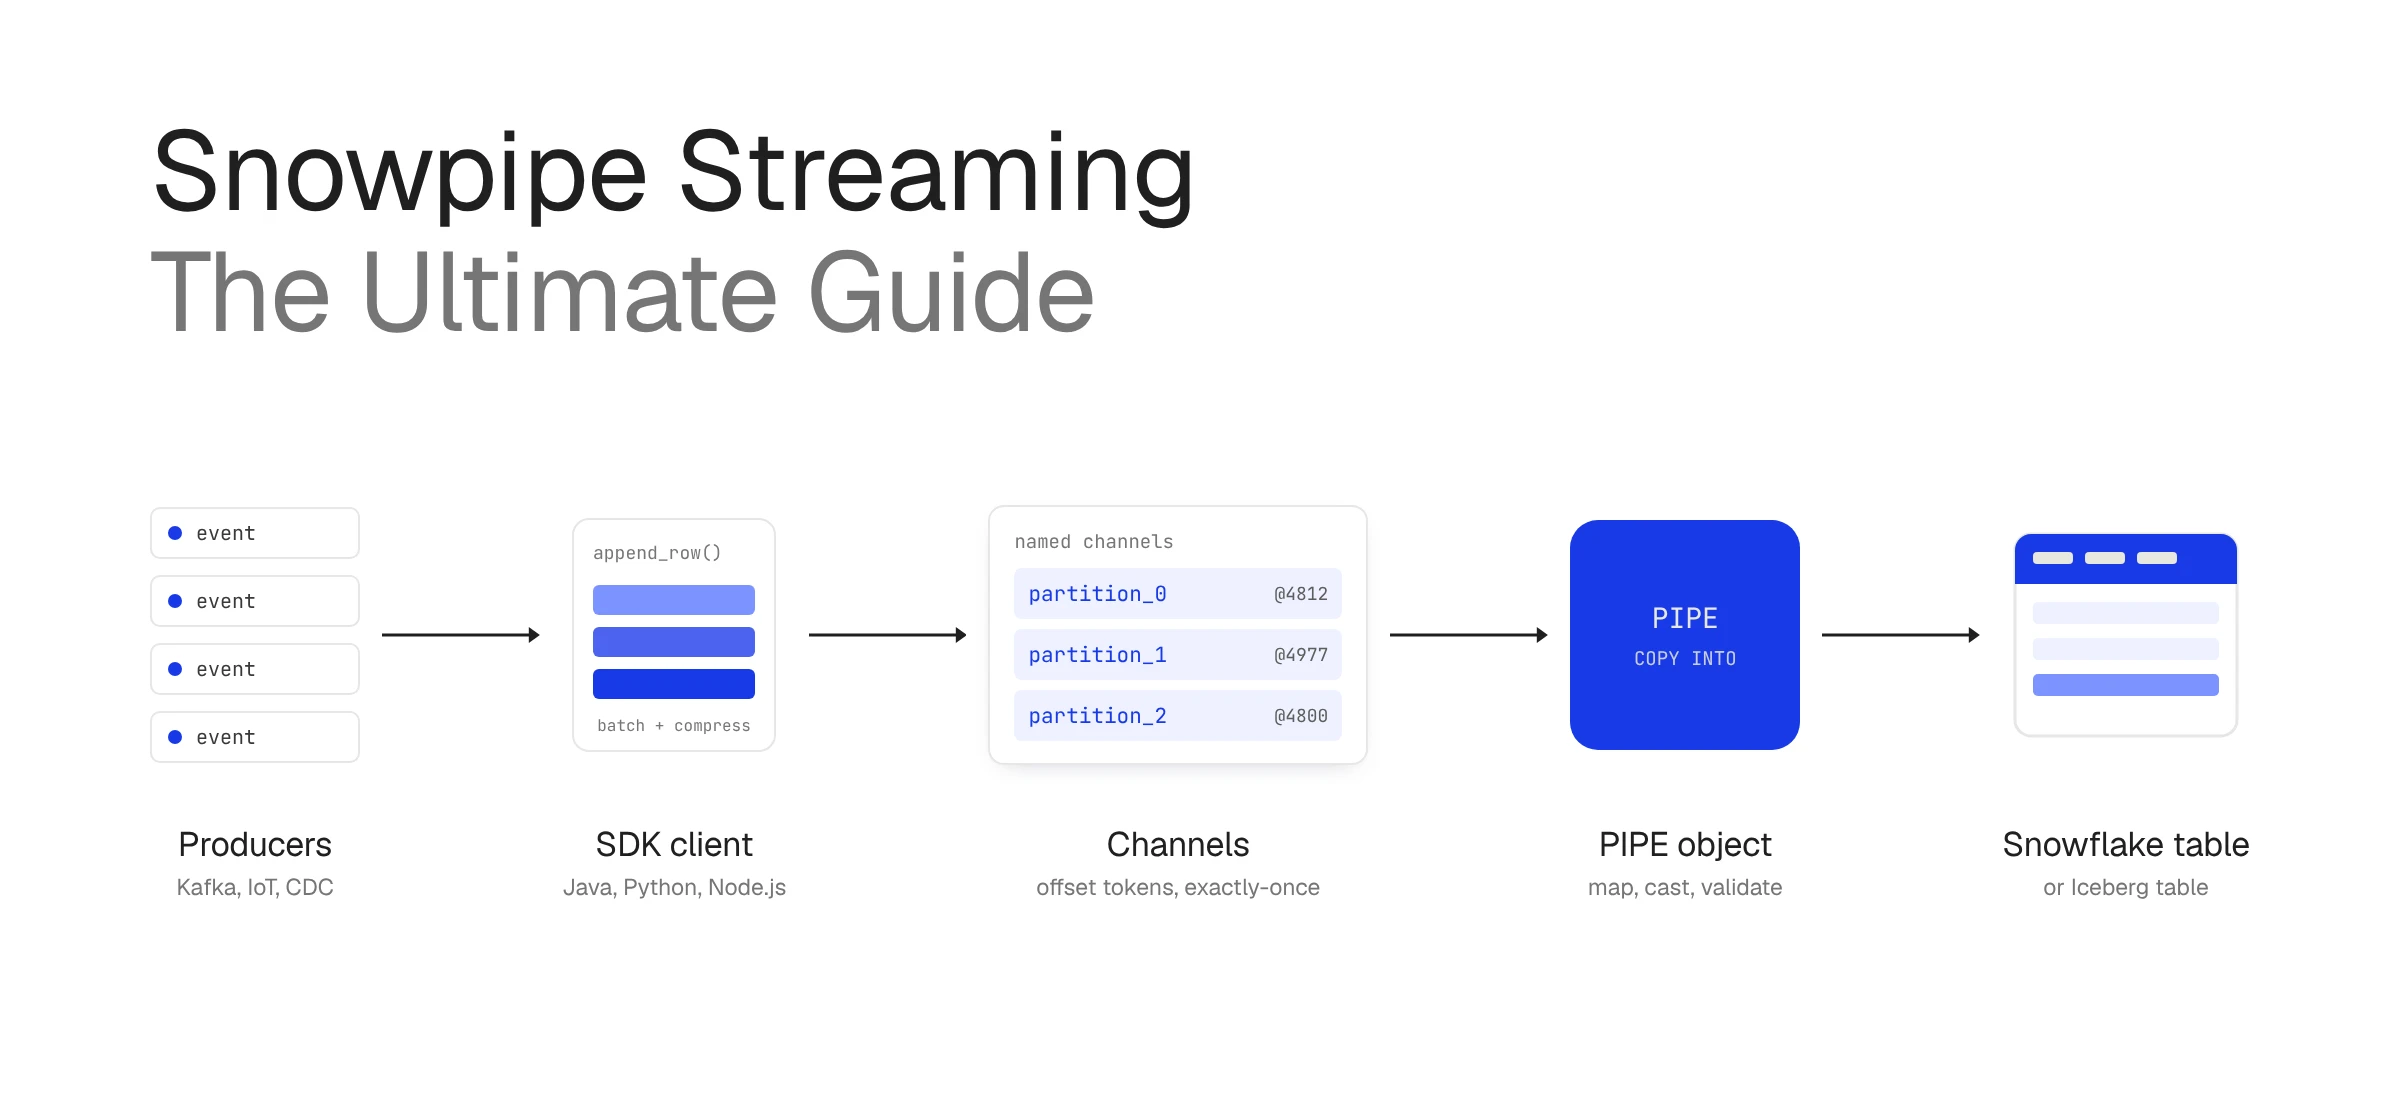
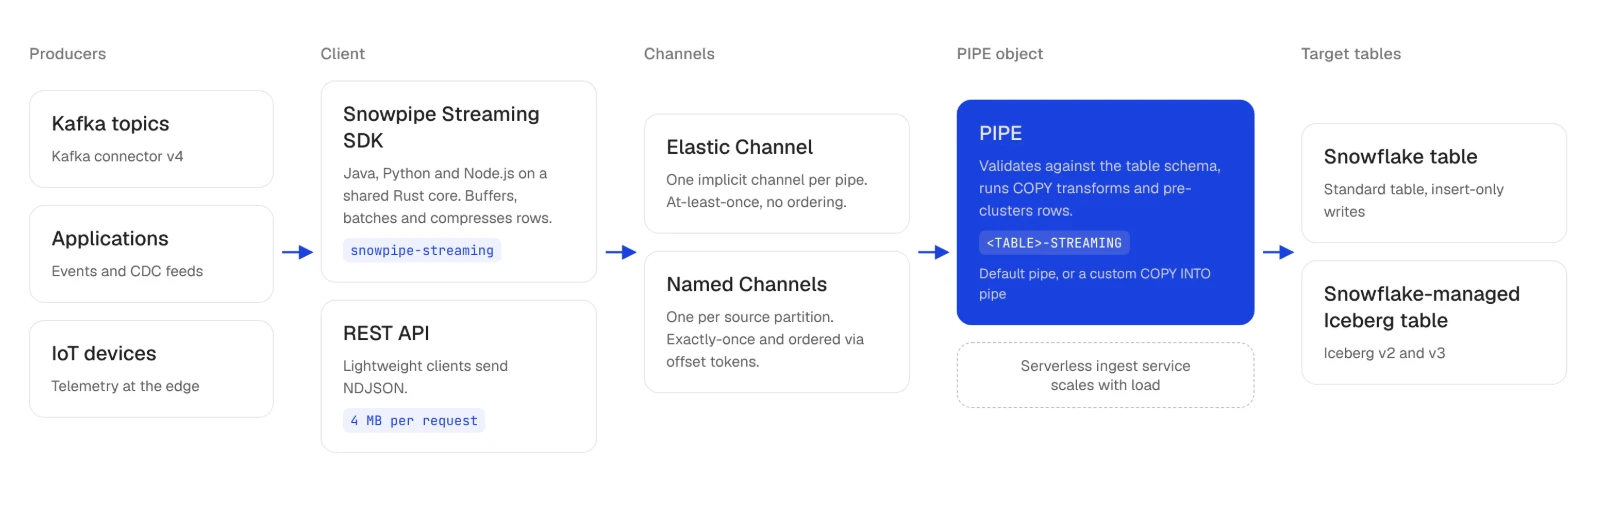
At its simplest, Snowpipe Streaming moves rows along one path: a producer hands rows to a client, the client sends them through a channel, a PIPE object processes them and the rows land in a table. Each piece has a specific job, and knowing those jobs explains most of the service's behavior.
- The client is either one of the SDKs or a direct REST caller. The SDKs buffer rows, batch them by time and size thresholds, compress them and send them to Snowflake, so application code only has to call an append method.
- The channel is a logical path that carries rows through a pipe to a target table. It is not a queue and not a separate table, so rows do not sit in a channel waiting to be read by anything else.
- The PIPE object lives on the server and decides what happens to rows before they are written: column mapping, type casts, validation against the table schema and optional sorting for clustered tables.
Two kinds of channels
Snowpipe Streaming offers two channel types, and choosing between them is the most important design decision in a streaming pipeline. The choice comes down to whether your data needs strict ordering and exactly-once delivery.
| Consideration | Elastic Channels | Named Channels |
|---|---|---|
| Delivery guarantee | At-least-once | Exactly-once within a channel |
| Ordering | Not guaranteed | Preserved within each channel, not across channels |
| Who manages channels | Snowflake, through one implicit channel per pipe | Your application, usually one channel per source partition |
| Progress tracking | Durable acknowledgement per append | Committed offset tokens |
| Typical workloads | IoT readings, telemetry, logs | CDC, billing, inventory, Kafka partitions |
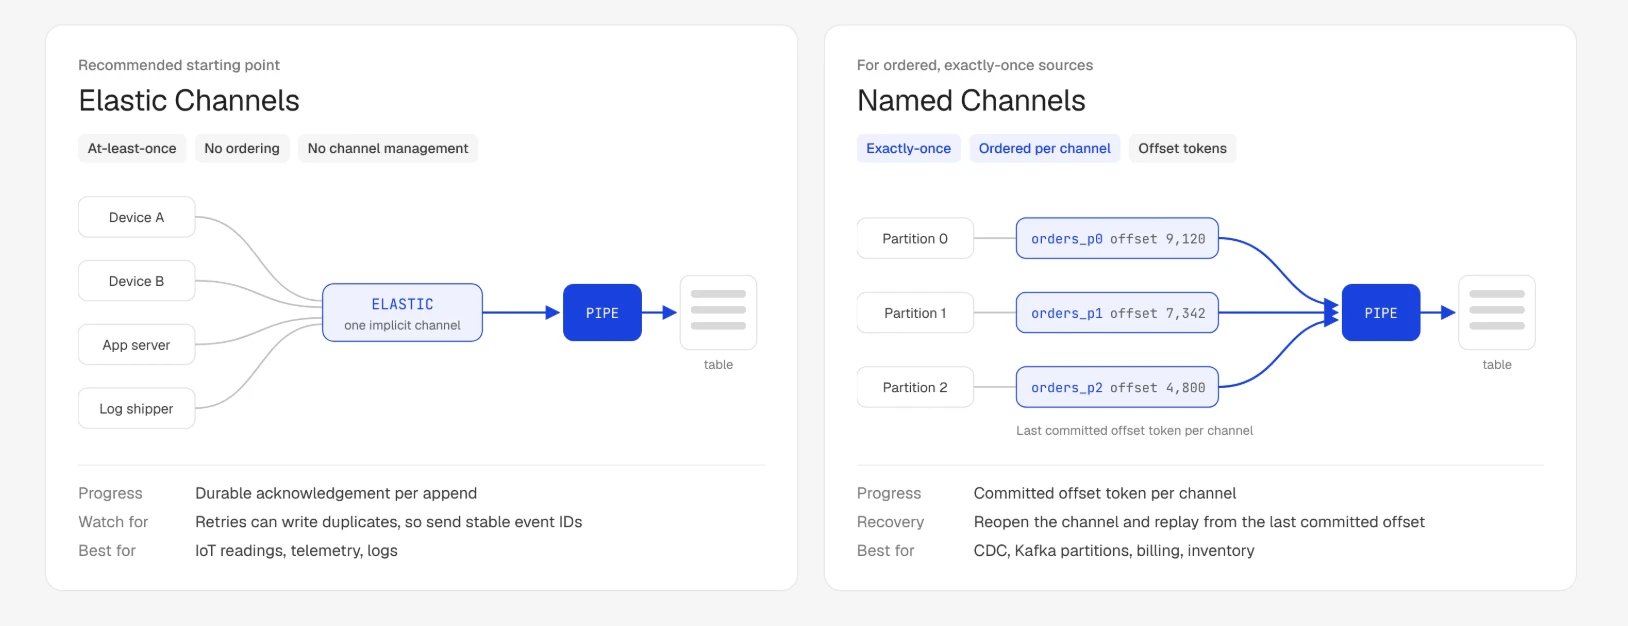
Snowflake recommends Elastic Channels as the starting point for most new applications, and they became generally available on September 15, 2026. Since a retried append can be written twice, give each event a stable ID if duplicates matter downstream.
How offset tokens give exactly-once delivery
With Named Channels, every row or batch your application appends carries an offset token, such as a Kafka offset or a log line number. Snowflake records the last token it has committed for each channel, so after a crash or restart the application reopens the channel, reads that token and replays only the records that came after it.
This only works if the source can replay those records. Kafka can, since it keeps messages for a retention period, but an in-memory buffer cannot, which is why Snowflake's guidance is to keep records in the source or in durable storage until their offset is committed.
Snowpipe Streaming Architecture
The high-performance architecture has four layers: the client, the PIPE object, a serverless ingest service and the target table. Most of the logic that used to run inside the client now runs on the Snowflake side, which is where the lower client resource usage comes from.
Client layer: SDKs and REST API
Snowflake ships three SDKs that share one Rust-based client core:
- Java SDK (
com.snowflake:snowpipe-streamingon Maven Central), Java 11 or later, aimed at high-throughput custom applications - Python SDK (
pip install snowpipe-streaming), Python 3.9 or later - Node.js SDK, Node.js 20 or later, for JavaScript and TypeScript applications
The REST API is the lighter option for IoT devices and edge deployments where a full SDK is too heavy. REST clients send rows as newline-delimited JSON (NDJSON) and handle compression themselves, and each request is capped at 4 MB after compression. Snowflake recommends the SDK wherever it can run, since it takes care of batching and retries.
The PIPE object
In the classic architecture, clients wrote straight into tables. Now every write goes through a PIPE object, which holds a COPY INTO definition that reads from a streaming source instead of a stage.
You do not always need to create one. Snowflake provides a default pipe for every table, named <TABLE_NAME>-STREAMING, and creates it the first time a client opens a channel against that table. The default pipe maps fields by column name, applies DEFAULT column values and pre-clusters data for tables with clustering keys, but it cannot run transformations. When you need casts, reordered columns or expressions, you create a custom pipe.
Serverless ingest and target tables
Behind the pipe, Snowflake runs the ingest service and scales it as producers add load, so there is nothing to provision. Rows can land in standard Snowflake tables or in Snowflake-managed Iceberg tables, in both Iceberg v2 and v3 formats. For Iceberg tables, Snowflake cites latency as low as 5 seconds when queried in Snowflake and 30 seconds when queried from an external engine.
What changed from the classic architecture
| Area | Classic | High-performance |
|---|---|---|
| SDK | snowflake-ingest-java | snowpipe-streaming (Java, Python, Node.js) |
| Entry point | Channels open directly against tables | Channels open against a PIPE object |
| Schema checks and transforms | On the client | On the server, in the pipe definition |
| Billing | Serverless compute plus active client connections | Credits per uncompressed GB ingested |
| Iceberg support | Iceberg v2 only | Iceberg v2 and v3 |
Key Features of Snowpipe Streaming
The features below are the ones that shape how you design a pipeline around Snowpipe Streaming. Actual numbers depend on row size, table width, batching, concurrency and transformations, so treat the published figures as upper bounds.
- Throughput and latency: up to 20 GB/s of uncompressed data per table, and data queryable in as little as 5 seconds after ingestion.
- Exactly-once, ordered delivery: Named Channels use offset tokens to commit progress and keep rows in order within each channel.
- Elastic Channels: many producers can write to one implicit channel per pipe without opening, naming or tracking channels.
- In-flight transformations: custom pipes accept
COPYsyntax, so you can reorder columns, cast types and apply expressions before rows are written. - Pre-clustering: when a table has clustering keys, the pipe can sort data at ingest time, which helps query pruning later.
- Schema evolution: on tables with
ENABLE_SCHEMA_EVOLUTION = TRUE, Snowflake adds columns for new top-level fields it detects in the stream. - Iceberg support: rows can stream into Snowflake-managed Iceberg tables, including partitioned tables and Iceberg v3.
- Error handling and monitoring: rejected rows can go to error tables for inspection or reprocessing, and event table telemetry tracks ingestion progress, processing time and channel errors.
Snowpipe Streaming Pricing
Pricing is throughput-based: Snowflake charges a flat rate per uncompressed gigabyte of data received, and the current rate listed on the Snowpipe Streaming product page is 0.0037 credits per GB. Only data values are metered, so JSON keys and other structural elements are not billed.
As a worked example, a steady stream of 1 MB/s comes to 3.6 GB an hour, which is about 0.013 credits an hour or roughly 0.32 credits a day. Credit prices vary by edition and region, so check the Snowpipe Streaming cost documentation and your contract before turning credits into a budget.
How to Set Up Snowpipe Streaming
This walkthrough streams order events into a Snowflake table with the Python SDK, a Named Channel and the default pipe. It follows Snowflake's getting started tutorial and the official SDK examples repository, with object names changed to fit the example.
Step 1: Generate a key pair
The SDK authenticates with RSA key-pair (JWT) authentication by default, and SDK version 1.4.0 and later also accepts OAuth and programmatic access tokens. Generate an unencrypted private key and its public key with OpenSSL:
openssl genrsa 2048 | openssl pkcs8 -topk8 -inform PEM -out rsa_key.p8 -nocrypt
openssl rsa -in rsa_key.p8 -pubout -out rsa_key.pub
Keep rsa_key.p8 out of version control, since anyone holding it can write to your tables.
Step 2: Create the user, role, table and grants
Run the following as a role that can create users and roles, such as ACCOUNTADMIN or USERADMIN. Paste the public key as a single line, without the BEGIN and END lines.
CREATE ROLE IF NOT EXISTS STREAMING_ROLE;
CREATE USER IF NOT EXISTS STREAMING_USER TYPE = SERVICE DEFAULT_ROLE = STREAMING_ROLE;
GRANT ROLE STREAMING_ROLE TO USER STREAMING_USER;
ALTER USER STREAMING_USER SET RSA_PUBLIC_KEY = 'MIIBIjANBgkqh...';

CREATE DATABASE IF NOT EXISTS DEMO_DB;
CREATE SCHEMA IF NOT EXISTS DEMO_DB.RAW;

CREATE OR REPLACE TABLE DEMO_DB.RAW.ORDERS (
  order_id NUMBER,
  status   STRING,
  payload  VARIANT,
  event_ts TIMESTAMP_NTZ
);

GRANT USAGE  ON DATABASE DEMO_DB            TO ROLE STREAMING_ROLE;
GRANT USAGE  ON SCHEMA   DEMO_DB.RAW        TO ROLE STREAMING_ROLE;
GRANT INSERT ON TABLE    DEMO_DB.RAW.ORDERS TO ROLE STREAMING_ROLE;
These three privileges are all the default pipe needs. If you turn on schema evolution, the role also needs EVOLVE SCHEMA or OWNERSHIP on the table.
Step 3 (optional): Create a custom pipe
Skip this step if the default pipe is enough. Create a custom pipe when you need transformations or want clustering at ingest time, and grant OPERATE on it, which custom pipes require and default pipes do not.
CREATE OR REPLACE PIPE DEMO_DB.RAW.ORDERS_PIPE
  AS COPY INTO DEMO_DB.RAW.ORDERS
  FROM TABLE (DATA_SOURCE(TYPE => 'STREAMING'))
  MATCH_BY_COLUMN_NAME = CASE_INSENSITIVE;

GRANT OPERATE ON PIPE DEMO_DB.RAW.ORDERS_PIPE TO ROLE STREAMING_ROLE;
Step 4: Configure the client profile
Create a profile.json file in your project root. The SDK reads connection details from it.
{
  "user": "STREAMING_USER",
  "account": "<account_identifier>",
  "url": "https://<account_identifier>.snowflakecomputing.com:443",
  "private_key_file": "rsa_key.p8",
  "role": "STREAMING_ROLE"
}
Step 5: Install the SDK and stream rows
Install the Python SDK with pip install snowpipe-streaming, then run the script below. It reads the last committed offset first, so a restart picks up where the previous run stopped instead of writing the same orders twice.
from datetime import datetime
from snowflake.ingest.streaming import StreamingIngestClient

BATCH = 100

with StreamingIngestClient(
    client_name="orders_client",
    db_name="DEMO_DB",
    schema_name="RAW",
    pipe_name="ORDERS-STREAMING",  # default pipe for the ORDERS table
    profile_json="profile.json",
) as client:
    with client.open_channel("orders_partition_0")[0] as channel:
        last = channel.get_channel_status().latest_committed_offset_token
        start = int(last) + 1 if last else 1
        end = start + BATCH - 1

        for order_id in range(start, end + 1):
            channel.append_row(
                {
                    "order_id": order_id,
                    "status": "created",
                    "payload": {"source": "checkout", "items": 2},  # dict, not a JSON string
                    "event_ts": datetime.now(),
                },
                str(order_id),  # offset token
            )

        channel.wait_for_commit(
            lambda token: token is not None and int(token) >= end,
            timeout_seconds=60,
        )
Within a few seconds, SELECT * FROM DEMO_DB.RAW.ORDERS returns the new rows. Keep in mind that the SDK always works in UTC, so convert local timestamps before you append them. For a Java project, add the com.snowflake:snowpipe-streaming dependency from Maven Central, and the calls map one to one (openChannel, appendRow, waitForCommit).
Snowpipe Streaming Data Ingestion Process
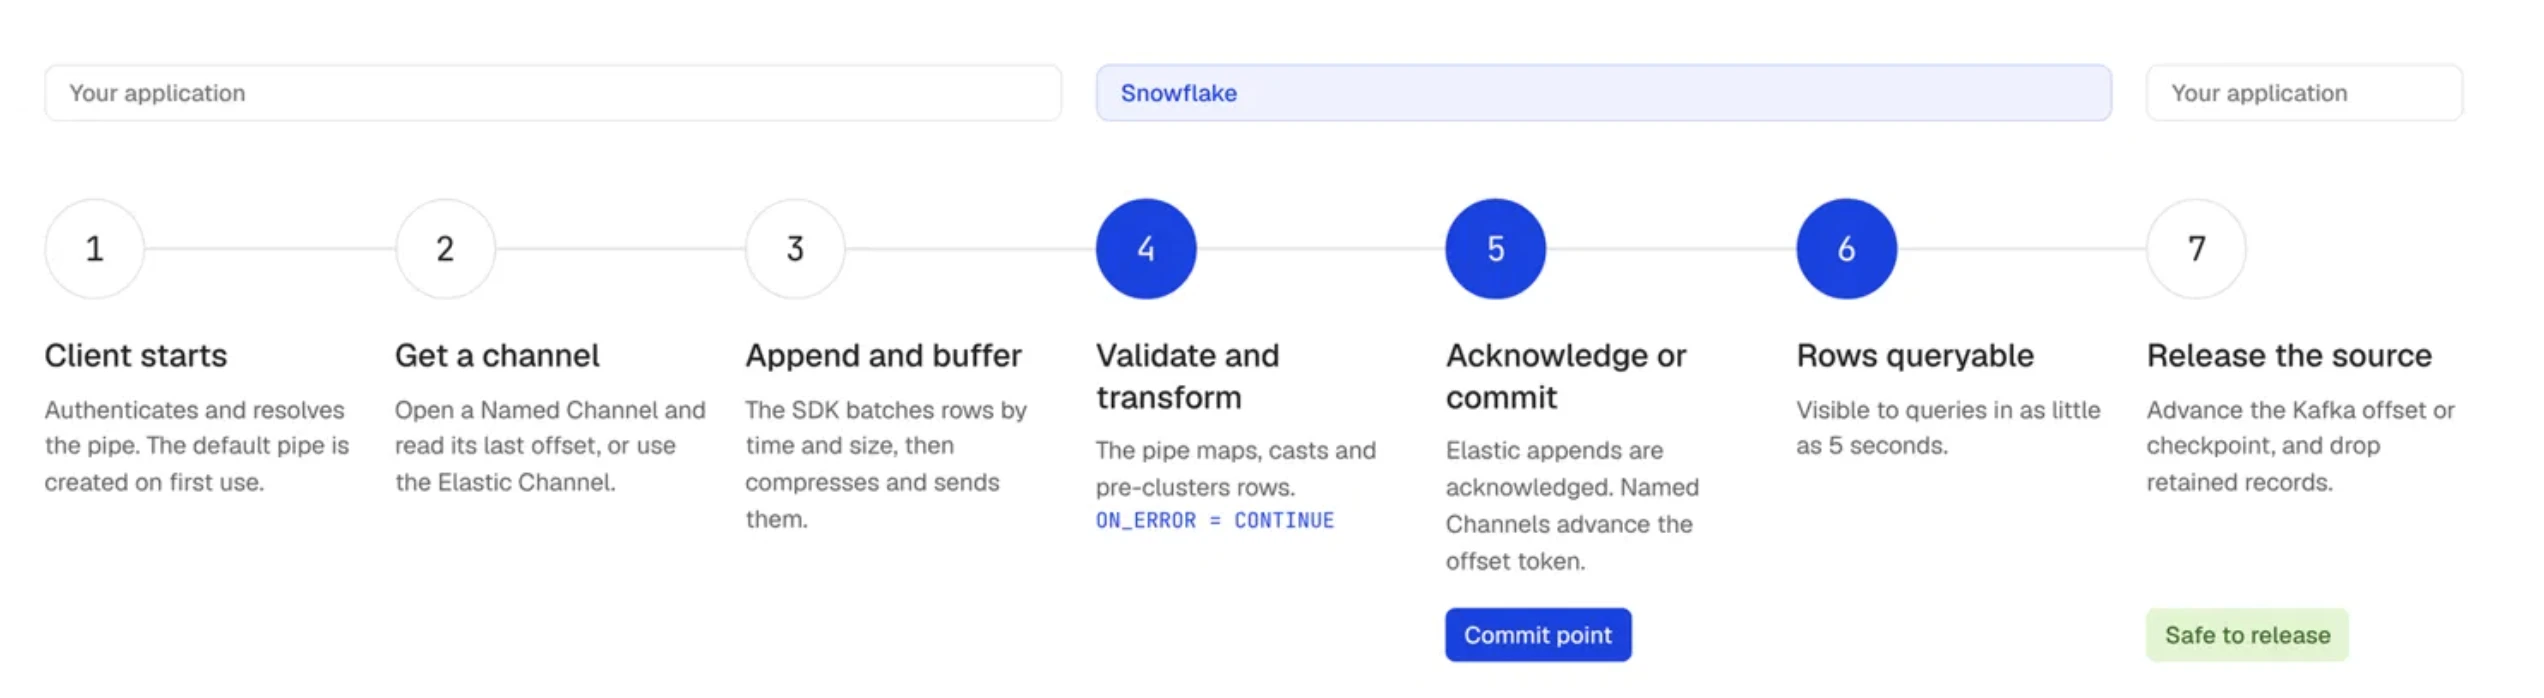
Every row follows the same lifecycle from the producer to a queryable table. Knowing the order of these steps tells you when it is safe to advance a source checkpoint and where to look when rows go missing.
- The client starts and resolves the pipe. The client authenticates and looks up the target pipe, and if you are using the default pipe, Snowflake creates it on this first call.
- The application gets a channel. With Named Channels it opens a channel by name and reads the last committed offset token, and with Elastic Channels it asks for the pipe's implicit channel.
- Rows are appended and buffered. The SDK collects appended rows and sends them in compressed batches once time or size thresholds are reached.
- The pipe validates and transforms. On the server, the pipe maps fields to columns, applies any transformations and pre-clusters rows if the table has clustering keys. A row that fails validation is skipped, since
ON_ERRORonly supportsCONTINUE, and it can be captured in an error table if error logging is on. - Snowflake acknowledges or commits. An Elastic Channel append gets a durable acknowledgement, and a Named Channel advances its committed offset token.
- Rows become queryable. Durable progress and query visibility are separate events, and rows typically show up in queries within seconds of the commit.
- The source releases its copy. Only now should the producer delete retained records or advance its checkpoint, such as a Kafka consumer offset.
Recovering from a crash
Take a consumer reading a Kafka topic with three partitions. The usual pattern is one Named Channel per partition, using the Kafka offset as the offset token.
If the consumer crashes after appending offsets up to 5,000 on partition 2, but Snowflake has committed only through 4,800, the restarted consumer reopens the partition 2 channel, reads 4,800 as the last committed token and seeks Kafka back to offset 4,801. Rows 4,801 through 5,000 are then written once, not twice, and nothing is lost because Kafka still holds them.
Monitoring what landed
Call get_channel_status() for a quick check from code: it returns the latest committed offset token, rows inserted, rows errored, average server processing latency and the last error message. To record when each row was committed, turn on row timestamps and read METADATA$ROW_LAST_COMMIT_TIME, because functions like CURRENT_TIMESTAMP in a pipe are evaluated once when the pipe's copy statement compiles, not per row.
Two habits keep throughput high. Keep channels open for the life of the ingestion task instead of opening and closing them repeatedly, and call wait_for_commit only at checkpoints, handoffs or shutdown rather than after every append.
Snowpipe Streaming vs Snowpipe
Snowpipe Streaming and Snowpipe do the same job from opposite ends: Snowpipe loads files that already exist in cloud storage, and Snowpipe Streaming loads rows before they ever become files. Snowflake describes the two as complementary rather than as replacements for each other.
| Category | Snowpipe Streaming | Snowpipe |
|---|---|---|
| Input | Rows sent from applications, devices or services | Files in a cloud storage stage |
| Latency | As low as 5 seconds to queryable | Micro-batches, typically within minutes |
| Ordering | Ordered within each Named Channel | Not guaranteed, since files can load out of creation order |
| Delivery | Exactly-once with Named Channels, at-least-once with Elastic Channels | Deduplicated by file, so the same file is not loaded twice |
| Setup | SDK or REST client, plus an optional custom pipe | Stage, pipe and cloud event notifications or REST calls |
| Pipe object | Default pipe per table, or a custom pipe | A pipe that queues and loads staged files |
| Load history | SNOWPIPE_STREAMING_FILE_MIGRATION_HISTORY view | COPY_HISTORY view and function |
| Pricing | 0.0037 credits per uncompressed GB | 0.0037 credits per GB (text files billed uncompressed, binary files at stored size) |
Since December 8, 2025, Snowpipe charges the same flat rate per gigabyte across all editions, so cost alone rarely decides the choice. One difference does matter: Snowpipe bills Parquet and Avro files at their stored size, while Snowpipe Streaming bills on uncompressed bytes.
Which one to choose
Pick Snowpipe Streaming when data is produced as events and the business cares about seconds, for example fraud signals, live dashboards, IoT telemetry or Kafka topics. Pick Snowpipe when an upstream system already writes files to S3, Azure Blob Storage or Google Cloud Storage and a delay of a few minutes is acceptable. Writing events to files only so that Snowpipe can load them adds a hop that Snowpipe Streaming removes.
Snowpipe Streaming Limitations
The limits below come from Snowflake's limitations page and table support page. Some are soft quotas that Snowflake Support can raise, and others are fixed parts of the design.
Insert-only writes
The biggest limitation for CDC is that Snowpipe Streaming only inserts rows. It cannot update or delete them, so change events from a database have to land in a raw staging table first, and a MERGE, Streams with Tasks or Dynamic Tables then apply them to the final table. That extra step costs warehouse compute and adds latency on top of the 5 seconds the ingest path itself takes.
Quotas and request limits
| Limit | Default | Can Support raise it? |
|---|---|---|
| Throughput per table | 20 GB/s uncompressed | No figure given |
| Throughput per Named Channel | 20 MB/s uncompressed | Yes |
| Requests per Named Channel | 10 per second | Yes |
| REST payload per request | 4 MB after compression | No, it is a hard cap |
| Active Named Channels per pipe | 2,000 | Yes |
| Pipes per table | 10 | Yes |
| Pipes per account | 50,000 | No figure given |
Delivery and data handling
- Elastic Channels are at-least-once, so a retry after a timeout or a 5xx error can create duplicate rows.
ON_ERRORsupports onlyCONTINUE, which means bad rows are skipped rather than failing the batch, and you need error logging to see them.- Time functions such as
CURRENT_TIMESTAMPandSYSDATE, including in columnDEFAULTvalues, are evaluated when the pipe compiles, not per row.
Tables, schemas and catalogs
- Schema evolution works only on standard Snowflake tables, not on Iceberg or external tables, and it cannot widen an existing column's precision, scale or length.
- Iceberg ingestion supports only Snowflake as the catalog, so externally managed Iceberg tables that use AWS Glue or Hive Metastore are not supported.
- The default pipe cannot run transformations, so any casting or reshaping needs a custom pipe.
Client environment
- The Rust core runs on x86_64 Linux, ARM64 Linux, ARM64 Mac and Windows, and Linux needs glibc 2.26 or later.
- The SDK always uses UTC, and the time zone cannot be changed.
Conclusion
Snowpipe Streaming is the right tool when events need to be in Snowflake within seconds and the data is append-only by nature, such as logs, telemetry, clickstreams and Kafka topics. The high-performance architecture made it easier to run, with server-side pipes, SDKs in three languages, a default pipe that removes most setup and a price that tracks the bytes you send.
The main design choice is the channel type. Use Elastic Channels when duplicates are tolerable and Named Channels with offset tokens when order and exactly-once delivery matter, and keep source records until Snowflake confirms them.
Where Snowpipe Streaming gets harder is database replication. Because it is insert-only, CDC from PostgreSQL, MySQL or MongoDB turns into raw change rows plus a MERGE step that runs on a warehouse. Teams that want those changes applied as row-level updates and deletes in an open format can use OLake Go, which replicates CDC into Apache Iceberg tables and can write deletion vectors registered in Snowflake Horizon Catalog, so Snowflake queries the current state of each table directly.