A Complete Detailed Walkthrough of How to Setup, Sync and Debug with Live Demo
If you're new to Data Engineering, Docker, or Golang, start with the Learning Modules page to learn the fundamentals before proceeding.
Setting up a Development Environment
Watch this comprehensive video tutorial that walks you through the entire process of setting up OLake, syncing data, and debugging with a live demonstration:
Pre-requisites:
Before setting up and running OLake, ensure you have all the following installed on your system:
- Java
- Golang
- Node.js
- Docker
- Maven
The version of Java required is 21.
- macOS
- Linux (Ubuntu)
- Windows
brew install openjdk@21
sudo apt update
sudo apt install openjdk-21-jdk
Please follow the link to install Java 21 on Windows: JDK 21
The version of Golang required is 1.25.
- macOS
- Linux (Ubuntu)
- Windows
brew install go@1.25
sudo snap install go --classic
# or download from https://go.dev/dl/ and follow installation instructions
Please follow the link to install Golang 1.25 on Windows: Go 1.25
The version of NodeJS required is 22.19.0.
- macOS
- Linux (Ubuntu)
- Windows
brew install node@22
curl -fsSL https://deb.nodesource.com/setup_22.x | sudo -E bash -
sudo apt-get install -y nodejs
Please follow the link to install Node.js 22.19.0 on Windows: Node.js 22.19.0
- macOS
- Linux (Ubuntu)
- Windows
brew install --cask docker
# Add Docker's official GPG key:
sudo apt-get update
sudo apt-get install ca-certificates curl
sudo install -m 0755 -d /etc/apt/keyrings
sudo curl -fsSL https://download.docker.com/linux/ubuntu/gpg -o /etc/apt/keyrings/docker.asc
sudo chmod a+r /etc/apt/keyrings/docker.asc

# Add the repository to Apt sources:
echo \
  "deb [arch=$(dpkg --print-architecture) signed-by=/etc/apt/keyrings/docker.asc] https://download.docker.com/linux/ubuntu \
  $(. /etc/os-release && echo "$VERSION_CODENAME") stable" | \
  sudo tee /etc/apt/sources.list.d/docker.list > /dev/null
sudo apt-get update

# Install Docker packages:
sudo apt-get install docker-ce docker-ce-cli containerd.io docker-buildx-plugin docker-compose-plugin
Please follow the link to install Docker on Windows: Docker Desktop
- macOS
- Linux (Ubuntu)
- Windows
brew install maven
sudo apt install maven -y
Please follow the link to install Maven on Windows: Maven
To better understand the workflow, let's walk through an example using Postgres as the source and the destination as Iceberg.
1. Source and Destination Setup
Use the following command to quickly spin up the source (Postgres/MongoDB/MySQL) and destination (Iceberg/Parquet Writer) services using Docker Compose. This will download the required docker-compose files and start the containers in the background.
sh -c 'curl -fsSL https://raw.githubusercontent.com/datazip-inc/olake-docs/master/docs/community/docker-compose.yml -o docker-compose.source.yml && \
curl -fsSL https://raw.githubusercontent.com/datazip-inc/olake/master/destination/iceberg/local-test/docker-compose.yml -o docker-compose.destination.yml && \
docker compose -f docker-compose.source.yml --profile postgres -f docker-compose.destination.yml up -d'
- To use MongoDB, replace
--profile postgreswith--profile mongo. - To use MySQL, replace
--profile postgreswith--profile mysql.
2. OLake CLI Setup
The diagram below illustrates the high-level architecture of OLake, showing how data flows from various sources to different destinations:
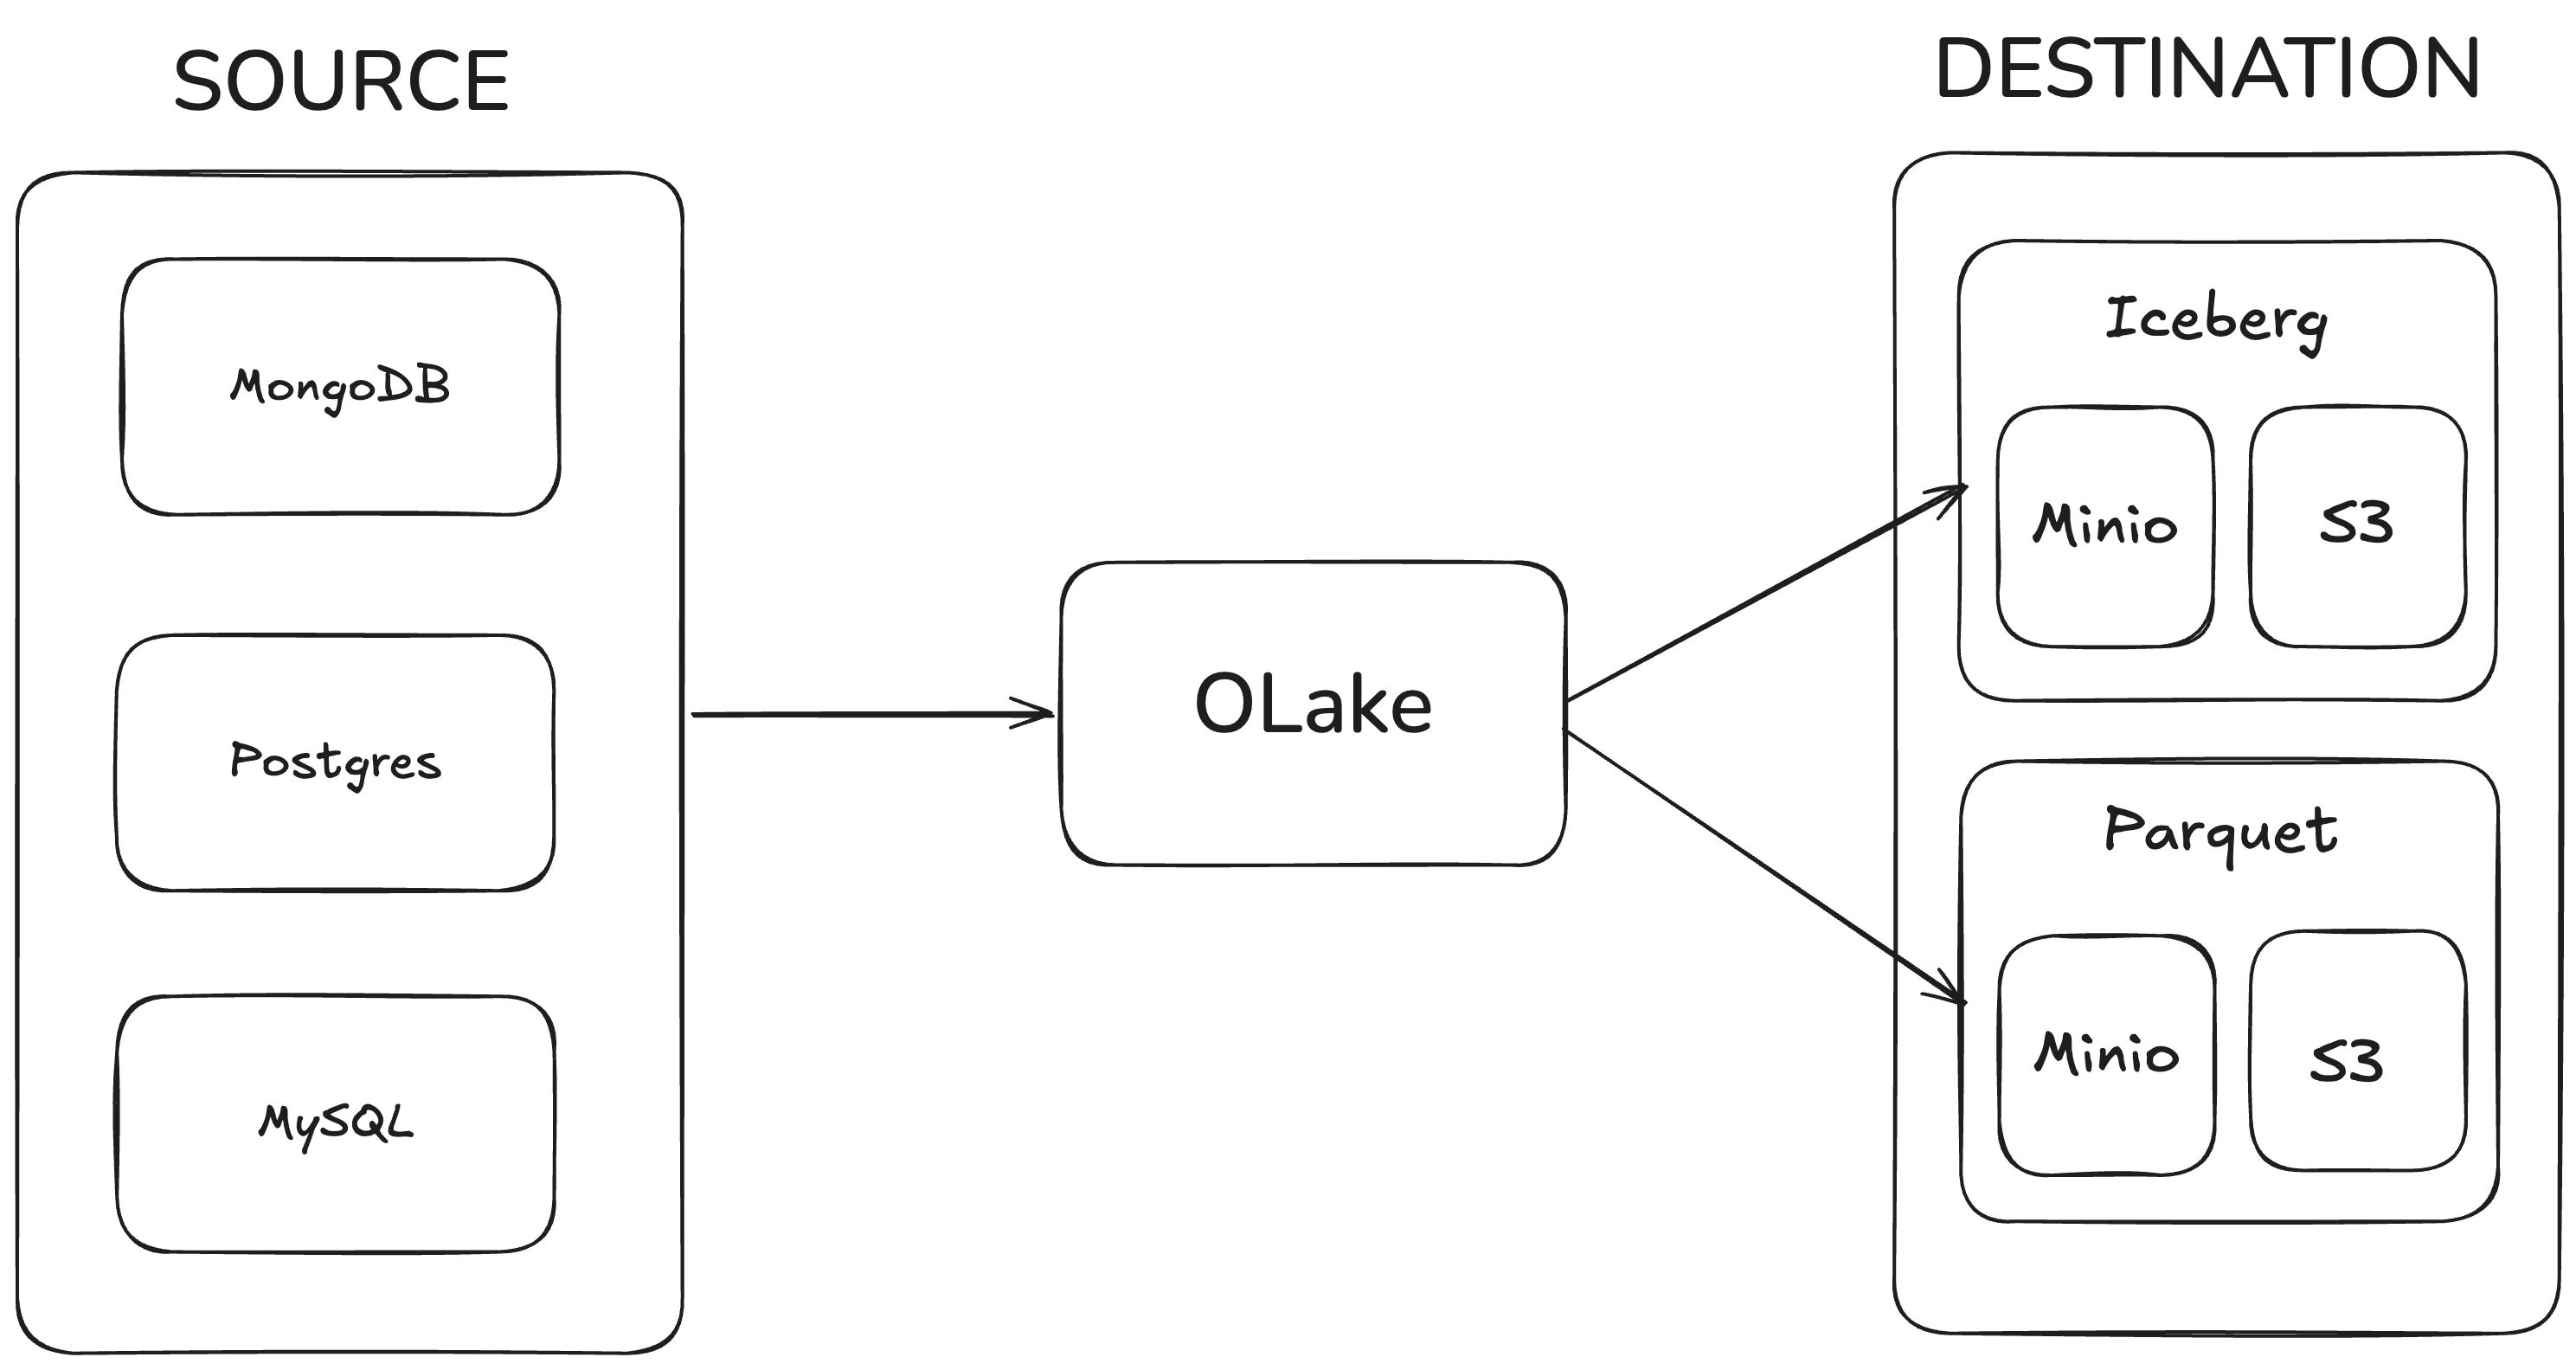
How this local OLake architecture works
The diagram represents a complete local OLake pipeline that you can run on your laptop using Docker Compose and the OLake CLI.
On the left side, you have your operational databases. In this setup, we provide three options:
- Postgres
- MySQL
- MongoDB
You choose which one to run by switching the Docker Compose --profile flag.
Each source container exposes a database with a dummy table pre-populated with sample data (for example, simple customer/order-style records), so that you can immediately run initial loads and incremental or change-data-capture (CDC) syncs without having to insert data manually.
In the middle of the diagram is OLake, which acts as the replication and transformation engine:
- It connects to the selected source using the settings you define in
source.json(host, port, credentials, CDC configuration, etc.). - It reads new rows and changes (inserts/updates/deletes) from the source in case of cdc or incremental syncs.
- It applies transformations on the data such as normalization and partitioning if applied by the user.
- It then routes that data to the configured destination using
destination.json, handling schema mapping and partitioning as needed.
On the right side of the diagram are the analytics destinations, where OLake writes the data:
-
Iceberg destination
- OLake writes rows into Apache Iceberg tables.
- In local mode, the Iceberg catalog is backed by MinIO (an S3-compatible object storage running locally), and in real deployments it can use Amazon S3 or any S3-compatible storage.
- OLake handles creating and updating Iceberg table files and metadata, so you can query these tables via the Spark + Iceberg service that is part of this local setup.
-
Parquet destination
- OLake writes data as plain Parquet files directly into a bucket. In local mode, the bucket is in MinIO (an S3-compatible object storage running locally), and in real deployments it can use Amazon S3 or any S3-compatible storage.
- This is useful when you want a simple folder of Parquet files for lightweight analytics or debugging, without the additional table-layer that Iceberg provides.
Putting it together, the image shows that OLake sits between your transactional databases (Postgres/MySQL/MongoDB) and your analytical storage (Iceberg tables or Parquet files on MinIO/S3).
You can swap sources and destinations just by changing the Docker profile and your source.json/destination.json, while OLake consistently takes care of moving and organizing the data from source to lakehouse.
Fork and Clone
Clone the OLake repository and navigate to the project directory:
git clone git@github.com:datazip-inc/olake.git && cd olake
- For contributing, you can fork the repository on GitHub first, then clone your fork.
- All OLake CLI commands mentioned below must be run from this root directory.
- You'll create
source.jsonanddestination.jsonconfiguration files in the steps below, store them in the root directory for simplicity.
Set up Source (source.json)
- Postgres
- MongoDB
- MySQL
- Oracle
- Kafka
This setup is using the above provided docker compose for Postgres.
{
  "host": "localhost",
  "port": 5431,
  "database": "main",
  "username": "main",
  "password": "password",
  "jdbc_url_params": {},
  "ssl": {
    "mode": "disable"
  },
  "update_method": {
    "replication_slot": "postgres_slot",
    "publication": "olake_publication",
    "initial_wait_time": 120
  },
  "reader_batch_size": 1000,
  "max_threads": 10
}
This setup is using the above provided docker compose for MongoDB.
{
  "hosts": ["localhost:27017"],
  "username": "admin",
  "password": "password",
  "authdb": "admin",
  "replica_set": "rs0",
  "read_preference": "secondaryPreferred",
  "srv": false,
  "database": "reddit",
  "max_threads": 5,
  "backoff_retry_count": 4,
  "chunking_strategy": "splitVector"
}
This setup is using the above provided docker compose for MySQL.
{
  "hosts": "localhost",
  "username": "root",
  "password": "password",
  "database": "main",
  "port": 3306,
  "update_method": {
    "initial_wait_time": 10
  },
  "tls_skip_verify": true,
  "max_threads": 5,
  "backoff_retry_count": 4
}
You can use your own Oracle configuration. The docker compose is WIP.
You can use your own Kafka configuration. The docker compose is WIP.
Set up Destination (destination.json)
- Iceberg
- S3 Parquet
This setup is using the above provided docker compose for Iceberg.
{
  "type": "ICEBERG",
  "writer": {
    "catalog_type": "jdbc",
    "jdbc_url": "jdbc:postgresql://localhost:5432/iceberg",
    "jdbc_username": "iceberg",
    "jdbc_password": "password",
    "iceberg_s3_path": "s3a://warehouse",
    "s3_endpoint": "http://localhost:9000",
    "s3_use_ssl": false,
    "s3_path_style": true,
    "aws_access_key": "admin",
    "aws_secret_key": "password",
    "iceberg_db": "olake_iceberg",
    "aws_region": "us-east-1"
  }
}
This setup is using the above provided docker compose for S3 Parquet.
{
  "type": "PARQUET",
  "writer": {
    "s3_bucket": "warehouse",
    "s3_region": "us-east-1",
    "s3_access_key": "admin",
    "s3_secret_key": "password",
    "s3_endpoint": "http://localhost:9000",
    "s3_path": ""
  }
}
3. Commands to run OLake code
You must review the Discover and Sync commands in the Commands and Flags page before proceeding. These sections contain essential information about all available flags and options:
Discover Command
Initially, you have to run the discover command which generates a streams.json file which contains all the possible streams. It requires the source name and source config path, with command type discover.
./build.sh driver-postgres discover --config $(pwd)/source.json
The following video provides a comprehensive guide on the streams.json file structure and how to configure it for your use case:
If you want to learn more about streams.json file and how to modify it. Refer to the Docker CLI guide.
Sync Command
The sync command is used to sync data from the source to the destination. OLake supports three different sync modes:
- Full Refresh
- Incremental Sync
- CDC (Change Data Capture)
Full Refresh syncs the entire dataset from the source to the destination. It performs a complete copy of all data present in the source to the destination, essentially replacing the destination data with a fresh copy from the source.
For the first full refresh, run the sync command without the --state flag:
./build.sh driver-postgres sync --config $(pwd)/source.json --catalog $(pwd)/streams.json --destination $(pwd)/destination.json
After this initial sync completes, a state.json and stats.json file are automatically generated. The state.json file contains the necessary resume tokens and metadata that OLake uses for CDC (Change Data Capture) or Incremental sync operations. Essentially, it tells OLake from where to resume or start the next sync.
Incremental Sync is an append-only operation that syncs only new records based on cursor fields. You configure a primary cursor field (and optionally a secondary cursor field) in your streams.json. On the first run, a full refresh occurs automatically. After that, OLake only syncs records where the cursor field value is greater than the maximum value stored from the previous sync.
Modifications or deletions to existing records in the source will not be reflected in the destination.
Run the sync command with the --state flag enabled:
./build.sh driver-postgres sync --config $(pwd)/source.json --catalog $(pwd)/streams.json --destination $(pwd)/destination.json --state $(pwd)/state.json
To learn how Incremental sync works in OLake, including how it tracks changes and resumes from previous sync points, watch the following video:
CDC (Change Data Capture) is an upsert mode operation that tracks and replicates all changes made in the source database to the destination. It checks for any inserts, updates, or deletes in the source and performs similar changes in the destination, ensuring the destination stays in sync with the source.
This ensures that OLake continues from where it left off, only syncing new or changed data since the last sync operation.
Run the sync command with the --state flag enabled:
./build.sh driver-postgres sync --config $(pwd)/source.json --catalog $(pwd)/streams.json --destination $(pwd)/destination.json --state $(pwd)/state.json
To learn how CDC sync works in OLake, including how it tracks changes and resumes from previous sync points, watch the comprehensive video tutorial above.
4. Query Data after the Sync
After running the sync command, you can query your data using the Spark Iceberg service available at localhost:8888.
For example, run the following SQL commands to explore your synced data:
%%sql
SELECT * FROM olake_iceberg.postgres_main_public.sample_data;
5. Demo workflow
You can follow these steps to try out CDC or Incremental sync functionality:
- For Incremental Sync: Only run the Insert Records operation (Step 1) below, as incremental sync only handles new records and does not track updates or deletes.
- For CDC: You can try out all operations below (Insert, Update, and Delete) as CDC tracks all changes including inserts, updates, and deletes.
- If you want to know more about OLake generated variables like
op_type, check out the OLake Generated Columns section.
When running sync with state mode enabled, you can verify Change Data Capture/Incremental functionality by following these example steps:
-
Insert Records: Insert 2 records in the source database and confirm that both records are replicated in the destination table. Run the following command:
docker exec -it primary_postgres psql -U main -d main -c "INSERT INTO public.sample_data (id, num_col, str_col) VALUES (10, 100, 'First record'), (20, 200, 'Second record');"Now run sync with state enabled:
./build.sh driver-postgres sync --config $(pwd)/source.json --catalog $(pwd)/streams.json --destination $(pwd)/destination.json --state $(pwd)/state.jsonAfter the sync is completed, execute the SQL query from the previous section on
localhost:8888. You should see 2 additional rows withop_typeindicating"c"for created. -
Update Record: Update 1 record in the source database and observe the corresponding update in the destination table. Run the following command:
sqldocker exec -it primary_postgres psql -U main -d main -c "UPDATE public.sample_data SET num_col = 150, str_col = 'First record updated' WHERE id = 1;"Now run sync with state enabled:
./build.sh driver-postgres sync --config $(pwd)/source.json --catalog $(pwd)/streams.json --destination $(pwd)/destination.json --state $(pwd)/state.jsonAfter the sync is completed, execute the SQL query from the previous section on
localhost:8888. You can notice that theop_typefor this record will indicate"u"for updated. -
Delete Records: Delete 2 records in the source database and confirm the records reflect the deletion in the destination. Run the following command:
sqldocker exec -it primary_postgres psql -U main -d main -c "DELETE FROM public.sample_data WHERE id IN (1, 10);"Now run sync with state enabled:
./build.sh driver-postgres sync --config $(pwd)/source.json --catalog $(pwd)/streams.json --destination $(pwd)/destination.json --state $(pwd)/state.jsonAfter the sync is completed, execute the SQL query from the previous section on
localhost:8888. You can notice that theop_typefor these records will indicate"d"for deleted (with other fields as NONE).
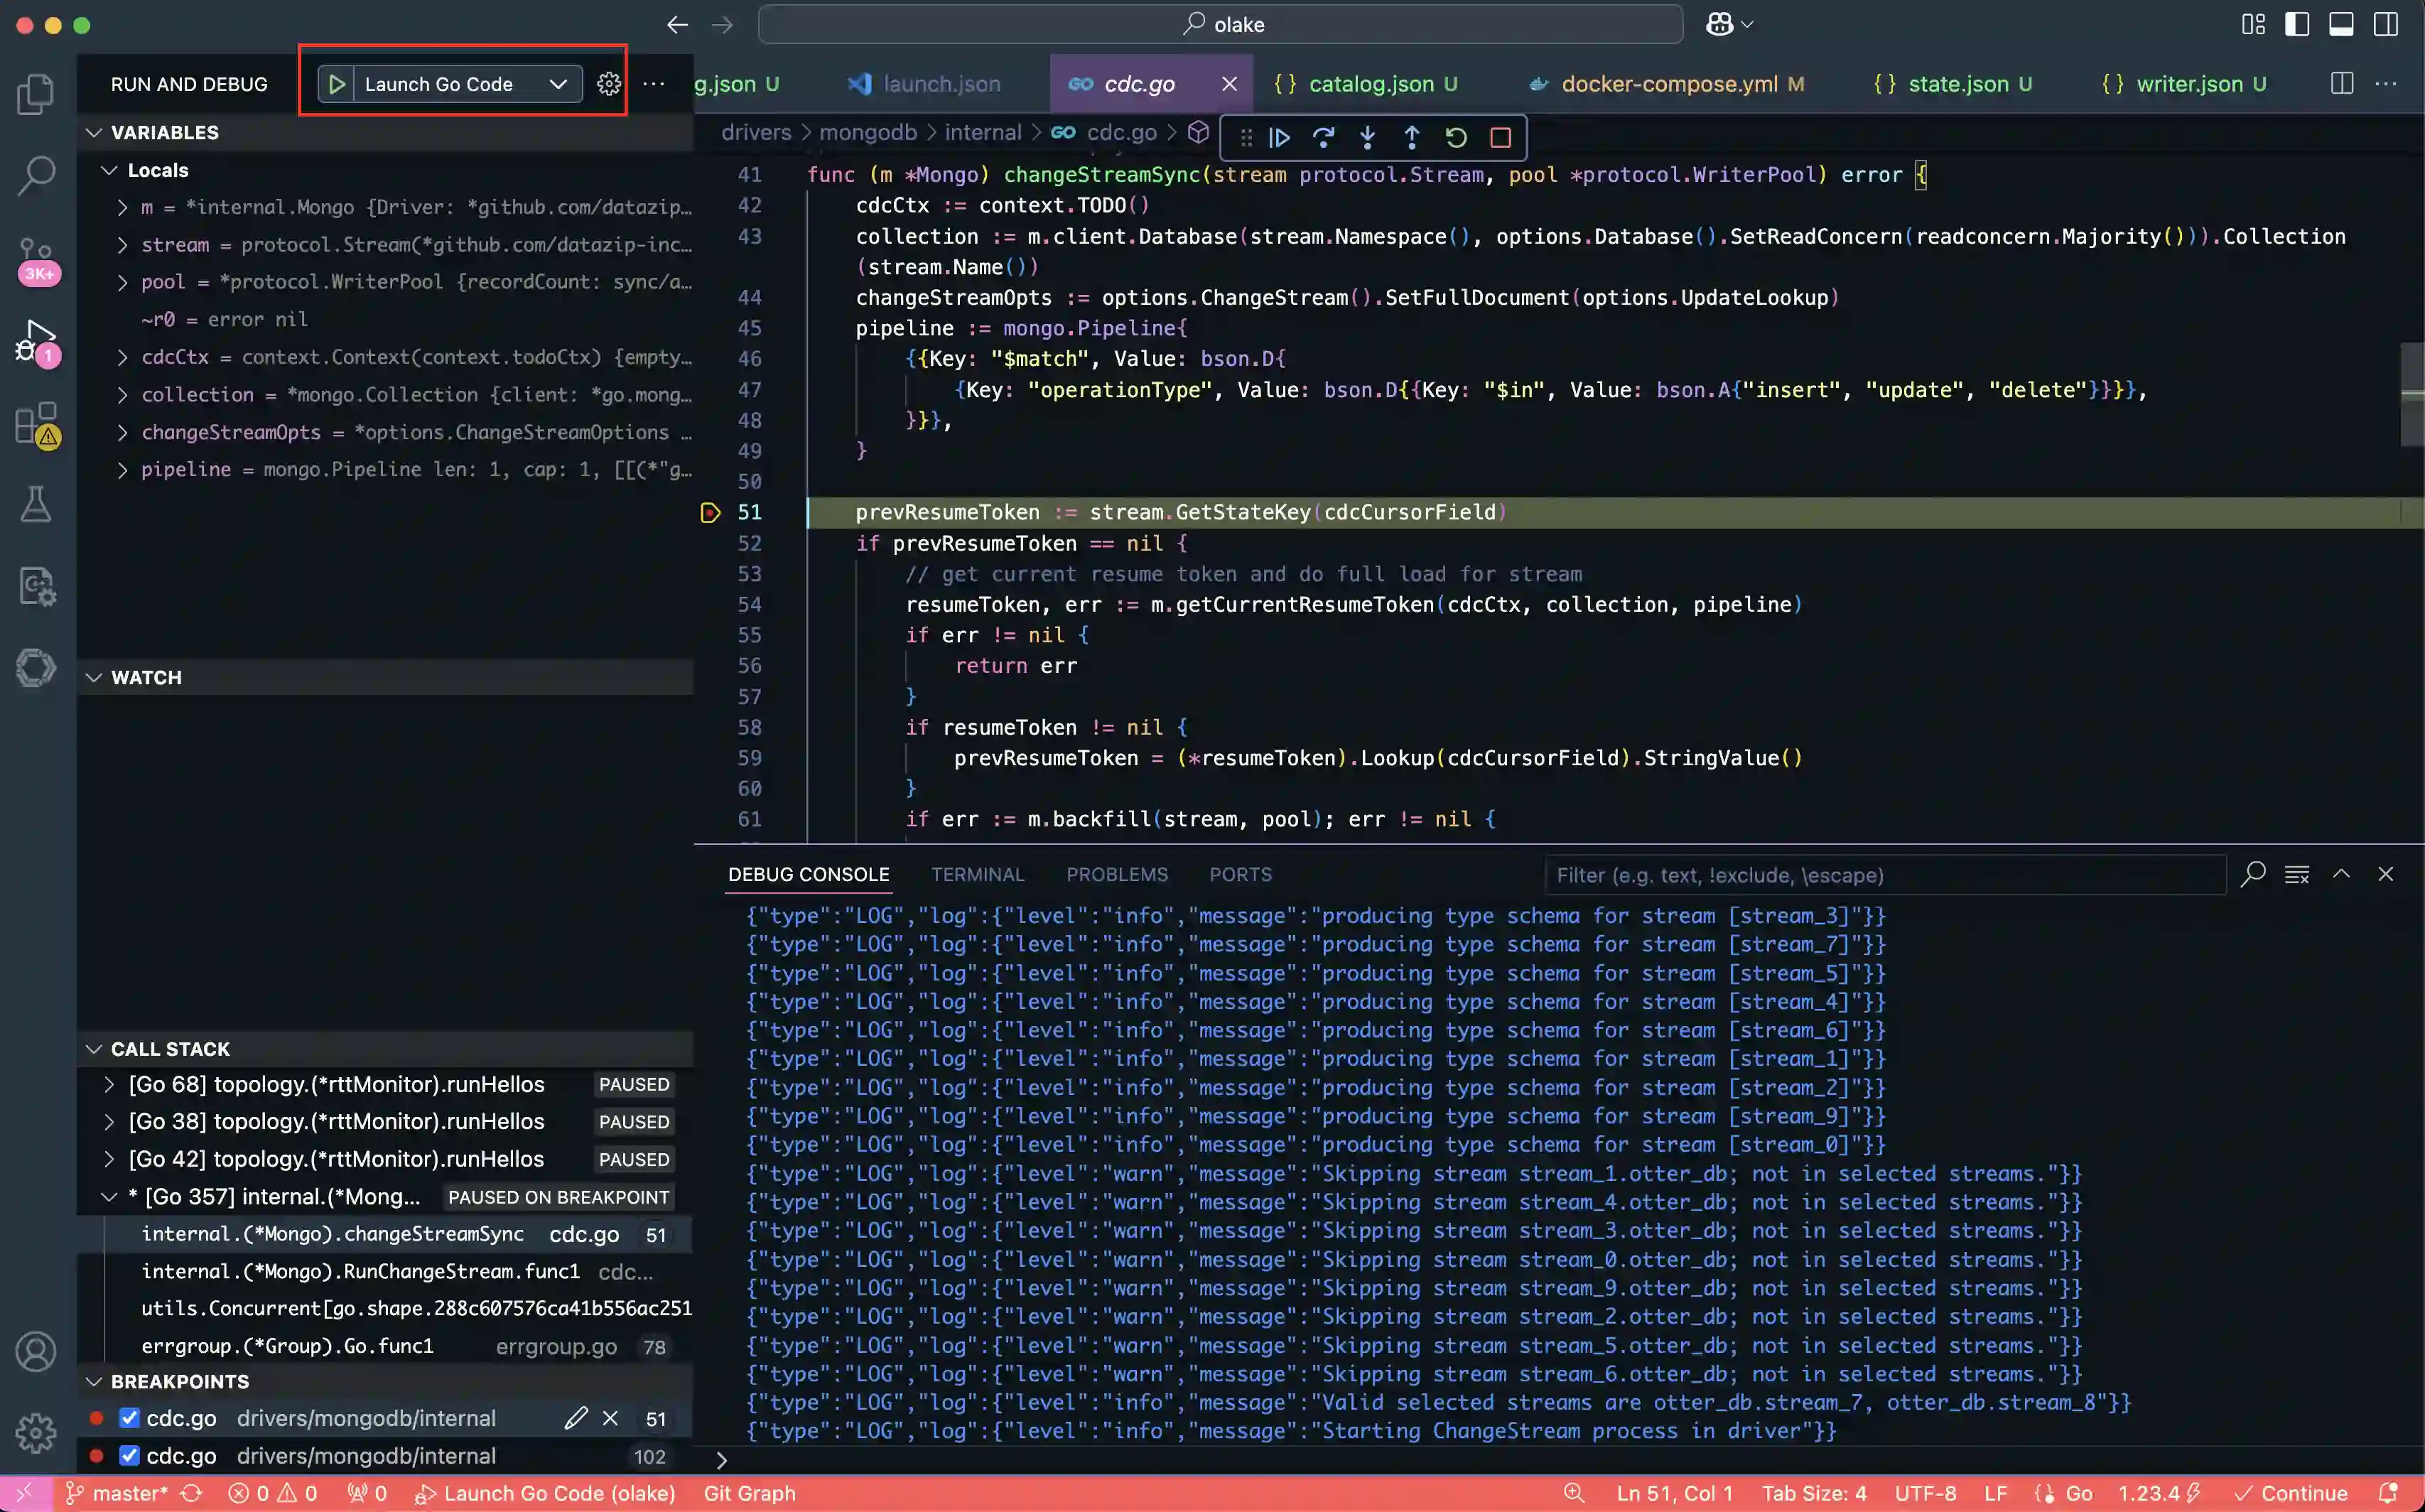
6. Debugging
While running the build command, you can add print statements to debug the flow. If you prefer using a debugger with VSCode, please follow the section below.
If you don't want to run the sync commands after every change, you can use this debugger mode for the Go side of the code.
If using Iceberg as destination, you need to generate the jar file for the Java side of code and move it to the correct location:
-
Generate the jar file by running the Maven command in the Java writer directory:
cd /[PATH_TO_OLAKE_CODE]/olake/destination/iceberg/olake-iceberg-java-writer
mvn clean package -DskipTests -
Move the generated jar file from the target directory to the iceberg destination directory:
cp /[PATH_TO_OLAKE_CODE]/olake/destination/iceberg/olake-iceberg-java-writer/target/olake-iceberg-java-writer-0.0.1-SNAPSHOT.jar /[PATH_TO_OLAKE_CODE]/olake/destination/iceberg/
Alternatively, you can generate the jar file by running the ./build.sh sync command once, which will automatically handle the jar generation process.
Steps to Debug
- Create a
.vscodedirectory inside the OLake project root if it doesn't already exist. - Create a file named
launch.jsoninside the.vscodedirectory and paste the below config.
Click to view .vscode/launch.json
{
  "version": "0.2.0",
  "configurations": [
      {
          "name": "MySQL: Check",
          "type": "go",
          "request": "launch",
          "program": "${workspaceFolder}/drivers/mysql/main.go",
          "mode": "auto",
          "args": [
              "check",
              "--config",
              "${workspaceFolder}/drivers/mysql/examples/config.json"
          ]
      },
      {
          "name": "MySQL: Discover",
          "type": "go",
          "request": "launch",
          "program": "${workspaceFolder}/drivers/mysql/main.go",
          "mode": "auto",
          "args": [
              "discover",
              "--config",
              "${workspaceFolder}/drivers/mysql/examples/config.json"
          ]
      },
      {
          "name": "MySQL: Sync (No State)",
          "type": "go",
          "request": "launch",
          "program": "${workspaceFolder}/drivers/mysql/main.go",
          "mode": "auto",
          "args": [
              "sync",
              "--config",
              "${workspaceFolder}/drivers/mysql/examples/config.json",
              "--catalog",
              "${workspaceFolder}/drivers/mysql/examples/streams.json",
              "--destination",
              "${workspaceFolder}/drivers/mysql/examples/write.json"
          ]
      },
      {
          "name": "MySQL: Sync (With State)",
          "type": "go",
          "request": "launch",
          "program": "${workspaceFolder}/drivers/mysql/main.go",
          "mode": "auto",
          "args": [
              "sync",
              "--config",
              "${workspaceFolder}/drivers/mysql/examples/config.json",
              "--catalog",
              "${workspaceFolder}/drivers/mysql/examples/streams.json",
              "--destination",
              "${workspaceFolder}/drivers/mysql/examples/write.json",
              "--state",
              "${workspaceFolder}/drivers/mysql/examples/state.json"
          ]
      },
      {
          "name": "MongoDB: Check",
          "type": "go",
          "request": "launch",
          "program": "${workspaceFolder}/drivers/mongodb/main.go",
          "mode": "auto",
          "args": [
              "check",
              "--config",
              "${workspaceFolder}/drivers/mongodb/examples/config.json"
          ]
      },
      {
          "name": "MongoDB: Discover",
          "type": "go",
          "request": "launch",
          "program": "${workspaceFolder}/drivers/mongodb/main.go",
          "mode": "auto",
          "args": [
              "discover",
              "--config",
              "${workspaceFolder}/drivers/mongodb/examples/config.json"
          ]
      },
      {
          "name": "MongoDB: Sync (No State)",
          "type": "go",
          "request": "launch",
          "program": "${workspaceFolder}/drivers/mongodb/main.go",
          "mode": "auto",
          "args": [
              "sync",
              "--config",
              "${workspaceFolder}/drivers/mongodb/examples/config.json",
              "--catalog",
              "${workspaceFolder}/drivers/mongodb/examples/streams.json",
              "--destination",
              "${workspaceFolder}/drivers/mongodb/examples/write.json"
          ]
      },
      {
          "name": "MongoDB: Sync (With State)",
          "type": "go",
          "request": "launch",
          "program": "${workspaceFolder}/drivers/mongodb/main.go",
          "mode": "auto",
          "args": [
              "sync",
              "--config",
              "${workspaceFolder}/drivers/mongodb/examples/config.json",
              "--catalog",
              "${workspaceFolder}/drivers/mongodb/examples/streams.json",
              "--destination",
              "${workspaceFolder}/drivers/mongodb/examples/write.json",
              "--state",
              "${workspaceFolder}/drivers/mongodb/examples/state.json"
          ]
      },
      {
          "name": "PostgreSQL: Check",
          "type": "go",
          "request": "launch",
          "program": "${workspaceFolder}/drivers/postgres/main.go",
          "mode": "auto",
          "args": [
              "check",
              "--config",
              "${workspaceFolder}/drivers/postgres/examples/config.json"
          ]
      },
      {
          "name": "PostgreSQL: Discover",
          "type": "go",
          "request": "launch",
          "program": "${workspaceFolder}/drivers/postgres/main.go",
          "mode": "auto",
          "args": [
              "discover",
              "--config",
              "${workspaceFolder}/drivers/postgres/examples/config.json"
          ]
      },
      {
          "name": "PostgreSQL: Sync (No State)",
          "type": "go",
          "request": "launch",
          "program": "${workspaceFolder}/drivers/postgres/main.go",
          "mode": "auto",
          "args": [
              "sync",
              "--config",
              "${workspaceFolder}/drivers/postgres/examples/config.json",
              "--catalog",
              "${workspaceFolder}/drivers/postgres/examples/streams.json",
              "--destination",
              "${workspaceFolder}/drivers/postgres/examples/write.json"
          ]
      },
      {
          "name": "PostgreSQL: Sync (With State)",
          "type": "go",
          "request": "launch",
          "program": "${workspaceFolder}/drivers/postgres/main.go",
          "mode": "auto",
          "args": [
              "sync",
              "--config",
              "${workspaceFolder}/drivers/postgres/examples/config.json",
              "--catalog",
              "${workspaceFolder}/drivers/postgres/examples/streams.json",
              "--destination",
              "${workspaceFolder}/drivers/postgres/examples/write.json",
              "--state",
              "${workspaceFolder}/drivers/postgres/examples/state.json"
          ]
      },
      {
          "name": "Oracle: Check",
          "type": "go",
          "request": "launch",
          "program": "${workspaceFolder}/drivers/oracle/main.go",
          "mode": "auto",
          "args": [
              "check",
              "--config",
              "${workspaceFolder}/drivers/oracle/examples/config.json"
          ]
      },
      {
          "name": "Oracle: Discover",
          "type": "go",
          "request": "launch",
          "program": "${workspaceFolder}/drivers/oracle/main.go",
          "mode": "auto",
          "args": [
              "discover",
              "--config",
              "${workspaceFolder}/drivers/oracle/examples/config.json"
          ]
      },
      {
          "name": "Oracle: Sync (No State)",
          "type": "go",
          "request": "launch",
          "program": "${workspaceFolder}/drivers/oracle/main.go",
          "mode": "auto",
          "args": [
              "sync",
              "--config",
              "${workspaceFolder}/drivers/oracle/examples/config.json",
              "--catalog",
              "${workspaceFolder}/drivers/oracle/examples/streams.json",
              "--destination",
              "${workspaceFolder}/drivers/oracle/examples/write.json"
          ]
      },
      {
          "name": "Oracle: Sync (With State)",
          "type": "go",
          "request": "launch",
          "program": "${workspaceFolder}/drivers/oracle/main.go",
          "mode": "auto",
          "args": [
              "sync",
              "--config",
              "${workspaceFolder}/drivers/oracle/examples/config.json",
              "--catalog",
              "${workspaceFolder}/drivers/oracle/examples/streams.json",
              "--destination",
              "${workspaceFolder}/drivers/oracle/examples/write.json",
              "--state",
              "${workspaceFolder}/drivers/oracle/examples/state.json"
          ]
      },
      {
          "name": "MySQL: Spec",
          "type": "go",
          "request": "launch",
          "program": "${workspaceFolder}/drivers/mysql/main.go",
          "mode": "auto",
          "args": [
              "spec"
          ]
      },
      {
          "name": "MongoDB: Spec",
          "type": "go",
          "request": "launch",
          "program": "${workspaceFolder}/drivers/mongodb/main.go",
          "mode": "auto",
          "args": [
              "spec"
          ]
      },
      {
          "name": "PostgreSQL: Spec",
          "type": "go",
          "request": "launch",
          "program": "${workspaceFolder}/drivers/postgres/main.go",
          "mode": "auto",
          "args": [
              "spec"
          ]
      },
      {
          "name": "Oracle: Spec",
          "type": "go",
          "request": "launch",
          "program": "${workspaceFolder}/drivers/oracle/main.go",
          "mode": "auto",
          "args": [
              "spec"
          ]
      }
  ]
}
Params:
| key | value(s) |
|---|---|
mode | auto, debug |
args | sync , discover, check |
Update workspaceFolder with the absolute path where the OLake project is located on your system. For example:
"program": "/Users/john/Desktop/projects/olake/drivers/mongodb/main.go",
...
    "--config",
    "/Users/john/Desktop/projects/olake/drivers/mongodb/examples/source.json",
...
Now, set up debug points in the codebase and click "Launch Go Code".
A Deep Dive into How to Debug OLake:
7. OLake UI Setup
UI setup: Please follow the setup instructions at https://github.com/datazip-inc/olake-ui/