Setup MySQL via Docker Compose (local)
This guide explains how to spawn a MySQL instance using Docker Compose for local development and testing. You can use it with OLake UI for a complete visual experience or with the CLI tools directly.
This compose file is not for production use. It is meant for local development and testing purposes only. It spawns a single MySQL instance with binary logging enabled. For production use, consider using a more robust setup with multiple nodes and proper replication configurations.
New! You can now use the OLake UI for a visual, web-based experience to create sources, configure jobs, and monitor data synchronization. The UI provides an intuitive alternative to CLI commands.
Navigate to ./drivers/mysql/config (if building locally) OR just create a directory (say OLAKE_DIRECTORY) anywhere in your system if you want to use Dockerized OLake and create these files:
docker-compose.ymlsource.jsondestination.json-> Refer the additional-references for details on writer file config.
1. Starting docker-compose.yml
This compose file does the following:
- Primary MySQL Service: Runs a MySQL instance with CDC enabled.
- Replication User Initialization: Creates a user with replication privileges.
- Data Loader: Loads sample data into the MySQL instance.
- Binlog Checker: Verifies the existence and functionality of MySQL binary logs.
- Network and Volume Configuration: Sets up a custom network and persistent volume for MySQL data.
version: "3.9" # Specify the Compose file format version.

services:
  # Primary MySQL service which acts as the main database server.
  primary_mysql:
    container_name: primary_mysql # Name the container "primary_mysql" for easy reference.
    image: mysql:8.0 # Use the MySQL 8.0 image.
    hostname: primary_mysql # Set the container hostname to "primary_mysql".
    ports:
      - "3306:3306" # Expose port 3306 on both host and container.
    environment:
      MYSQL_ROOT_PASSWORD: password # Root password for MySQL.
      MYSQL_DATABASE: main # Create a default database named "main" at startup.
    # Enable Change Data Capture (CDC) by setting necessary MySQL replication options.
    command:
      - "--server-id=1" # Set a unique server identifier for replication.
      - "--log-bin=mysql-bin" # Enable binary logging (needed for replication and CDC).
      - "--binlog-format=ROW" # Use ROW format to record every change in each row.
      # Optional — enable GTID only if you need microsecond precision for `_cdc_timestamp` column generated by OLake Go by default it is seconds-precision timestamp.
      # enforce_gtid_consistency must be set before gtid-mode.
      - "--enforce-gtid-consistency=ON"
      - "--gtid-mode=ON"
      - "--local-infile=1" # Enable local data loading for importing files.
      - "--binlog_expire_logs_seconds=604800" # Set binary log expiration to 7 days (604800 seconds).
      - "--skip-host-cache" # Disable host cache for DNS resolution.
      - "--skip-name-resolve" # Disable DNS host name resolution to improve performance.

    volumes:
      - mysql-data:/var/lib/mysql # Mount persistent storage volume for MySQL data.
    networks:
      - mysql-cluster # Connect the container to the custom network "mysql-cluster".
    healthcheck:
      test: [
          "CMD",
          "mysqladmin",
          "ping",
          "-h",
          "localhost",
          "-u",
          "root",
          "-ppassword",
        ] # Healthcheck command to ensure MySQL is responsive.
      interval: 10s # Check health every 10 seconds.
      timeout: 5s # Each health check attempt must complete within 5 seconds.
      retries: 10 # Allow up to 10 retries before marking the container as unhealthy.

  # Service to initialize the replication (CDC) user.
  init-cdc-user:
    image: mysql:8.0 # Use the same MySQL 8.0 image for consistency.
    container_name: init_cdc_user # Name the container "init_cdc_user" for identification.
    depends_on:
      - primary_mysql # Ensure the primary MySQL service starts before creating the user.
    entrypoint: >
      bash -c "echo 'Creating replication user...';
               sleep 10;               # Wait for MySQL to finish initial setup.
               mysql -h primary_mysql -P 3306 -u root -ppassword -e \"
                 CREATE USER IF NOT EXISTS 'cdc_user'@'%' IDENTIFIED BY 'cdc_password';
                 GRANT REPLICATION SLAVE, REPLICATION CLIENT ON *.* TO 'cdc_user'@'%';
                 FLUSH PRIVILEGES;\";
               echo 'Setting global binlog_row_metadata to FULL...';
               mysql -h primary_mysql -P 3306 -u root -ppassword -e \"SET GLOBAL binlog_row_metadata = 'FULL';\";
               echo 'Replication user created and global binlog_row_metadata set.'"
    networks:
      - mysql-cluster # Connect to the same MySQL network.
    restart: "no" # Do not restart this container automatically.

  # Service to load sample data into the main database.
  data-loader:
    image: ubuntu:20.04 # Use Ubuntu 20.04 for running the data loading commands.
    container_name: sample_data_loader # Name the container for clarity.
    depends_on:
      primary_mysql:
        condition: service_healthy # Wait until the primary MySQL container passes its healthcheck.
    entrypoint: >
      bash -c "apt-get update -qq && apt-get install -y mysql-client && \
      echo 'Waiting for MySQL to be ready...'; \
      until mysqladmin ping -h primary_mysql -P 3306 -u root -ppassword; do echo 'Waiting...'; sleep 2; done; \
      echo 'Creating table sample_table...'; \
      mysql -h primary_mysql -P 3306 -u root -ppassword main -e 'CREATE TABLE IF NOT EXISTS sample_table (id INT AUTO_INCREMENT PRIMARY KEY, name VARCHAR(255));'; \
      echo 'Inserting sample data...'; \
      mysql -h primary_mysql -P 3306 -u root -ppassword main -e 'INSERT INTO sample_table (name) VALUES (\"sample_data\");'; \
      echo 'Data insertion complete!'; \
      tail -f /dev/null"

    restart: "no" # Do not restart this container after execution.
    networks:
      - mysql-cluster # Use the same network for connectivity.

  # Service to check for the existence and functionality of MySQL binary logs.
  binlog-checker:
    image: ubuntu:20.04 # Use Ubuntu 20.04 to run the binary log checking commands.
    container_name: binlog_checker # Name this container for identification.
    depends_on:
      - primary_mysql # Ensure primary MySQL is running before checking binlogs.
    entrypoint: >
      bash -c "export DEBIAN_FRONTEND=noninteractive && \
               apt-get update -qq && \
               apt-get install -y mysql-server-core-8.0 && \
               # Terminate any automatically started mysqld process in this container (if present).
               pkill mysqld || true && \
               sleep 10 && \
               echo 'Listing MySQL binaries in /usr/bin:' && ls -l /usr/bin/mysql* && \
               echo 'Attempting to run mysqlbinlog:' && \
               # Attempt to execute mysqlbinlog command on the first binary log file.
               /usr/bin/mysqlbinlog /var/lib/mysql/mysql-bin.000001 || echo 'mysqlbinlog not found!'"  # If mysqlbinlog is unavailable, print a message.
    volumes:
      - mysql-data:/var/lib/mysql # Mount the MySQL data volume to access binary logs.
    networks:
      - mysql-cluster # Connect to the same custom network.
    restart: "no" # Do not restart this container automatically.

# Define the custom network for MySQL services.
networks:
  mysql-cluster:

# Define persistent volumes to store MySQL data.
volumes:
  mysql-data:
MySQL 8.0.1 or higher for microsecond-precision timestamp support
- Using OLake UI
- Using Dockerized OLake
- Using Local build OLake
2. Starting MySQL
To start the MySQL container, run the following command from your project directory:
docker compose up -d
3. Setup OLake UI
Follow the OLake UI setup guide to run the complete OLake stack with UI:
-
Clone the OLake UI repository:
bashgit clone https://github.com/datazip-inc/olake-ui.gitcd olake-ui -
Start the OLake UI stack:
bashdocker compose up -d -
Access the UI:
- Navigate to http://localhost:8000
- Login with credentials:
admin/password
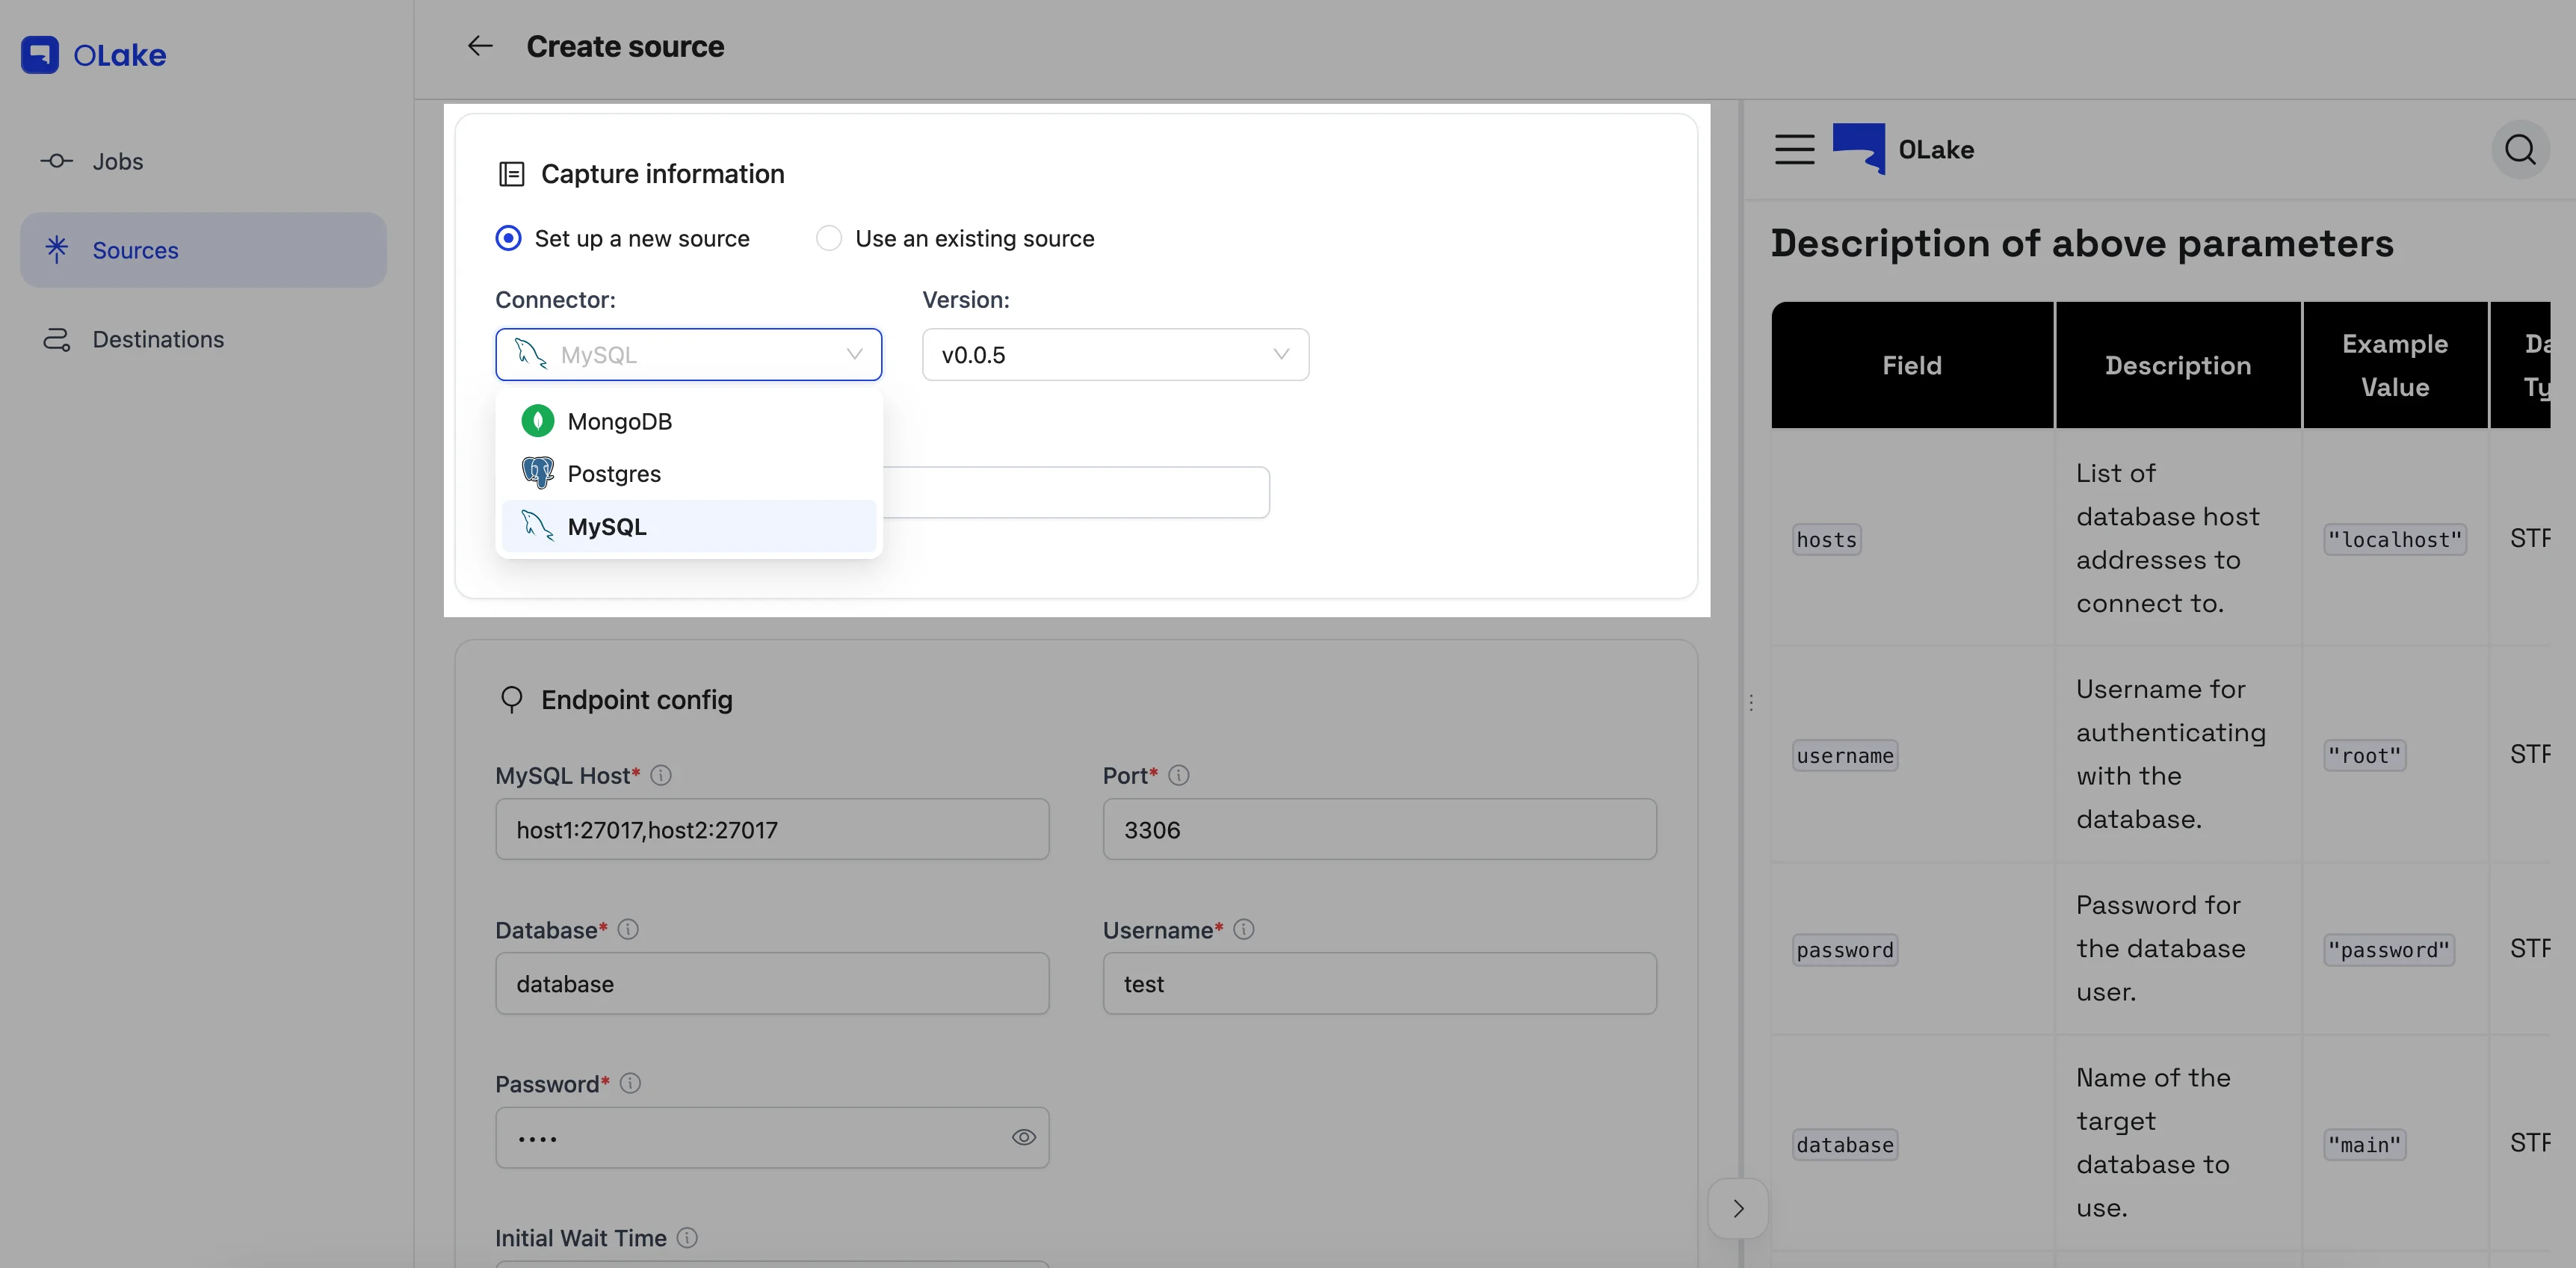
4. Create MySQL Source in OLake UI
- Navigate to the Sources tab
- Click + Create Source
- Select MySQL as the connector type
- Fill in the connection details:
- Host:
host.docker.internal - Port:
3306 - Database:
main - Username:
root - Password:
password - TLS: Disable for local testing
- Host:
- Click Create →
5. Create a Job
Once your source is created, you can create a job to sync data. See Creating First Pipeline for detailed instructions.
2. Starting MySQL
To start the MySQL container, run the following command from your project directory:
docker compose up -d
3. OLake Integration
Update your source configuration file (source.json) to connect to MySQL as follows:
{
    "hosts": "host.docker.internal",
    "username": "root",
    "password": "password",
    "database": "main",
    "port": 3306,
    "update_method": {
      "initial_wait_time": 10
    },
    "tls_skip_verify": true,
    "max_threads": 5,
    "backoff_retry_count": 4
}
1. Copy the content from the above docker-compose.yml file to your local directory.
Clone the OLake repository if you want to build OLake locally, or skip to the part to use Dockerized OLake.
GitHub repository
git clone git@github.com:datazip-inc/olake.git
2. Starting MySQL
To start the MySQL container, run the following command from your project directory:
docker compose -f ./drivers/mysql/config/docker-compose.yml up -d
3. OLake Integration
Update your source configuration file (source.json) to connect to MySQL as follows:
{
    "hosts": "localhost",
    "username": "root",
    "password": "password",
    "database": "main",
    "port": 3306,
    "update_method": {
      "initial_wait_time": 10
    },
    "tls_skip_verify": true,
    "max_threads": 5,
    "backoff_retry_count": 4
}
Now that you have configured the local database, you can either follow the streams configuration to start syncing data or review the broader MySQL connector overview to understand the complete ELT flow with OLake.
4. Perform DDL and DML operations to test OLake (optional)
-
To check the status of the container, perform:
bashdocker psThis will list all running containers. Look for
primary_mysqlandinit_cdc_userin the list. -
Container Logs:
Check container logs using to see if everything is working as expected:bashdocker logs primary_mysql -
To bash into the MySQL container, perform:
bashdocker exec -it primary_mysql /bin/bash -
To access MySQL CLI, perform:
bashmysql -u root -p
Enter the password when prompted, in this case, its password and then you can use any of the below commands to interact and sync data with again to see if updates, deletes, and inserts are working as expected.
SHOW DATABASES; // to list all databases
USE main; // to use a particular database
SHOW TABLES; // to see all the tables of selected database
DESCRIBE sample_table; // discover schema of a table
SELECT * FROM sample_table; // to view all the data of a particular table
INSERT INTO sample_table (name) VALUES ("sample_data_2"); // to insert data into a table
EXIT; // to quit the mysql session
Check if binlogs are enabled
Binary Logging Status:
SHOW VARIABLES LIKE 'log_bin';
Expect the value to be ON. If it’s OFF, binary logging is disabled.
Binlog Format:
SHOW VARIABLES LIKE 'binlog_format';
You should see ROW if CDC is configured correctly.
Binlog Row Image:
SHOW VARIABLES LIKE 'binlog_row_image';
Should return FULL to capture complete row data.
GTID Mode (Optional):
Enable GTID only if you need microsecond precision for _cdc_timestamp column generated by OLake Go by default it is seconds-precision timestamp
SHOW VARIABLES LIKE 'enforce_gtid_consistency';
SHOW VARIABLES LIKE 'gtid_mode';
If enabled, both should return ON.
Troubleshooting GTID:
If the MySQL container crashes during startup, check the logs with docker logs primary_mysql. If you see:
[ERROR] [MY-010912] GTID_MODE = ON requires ENFORCE_GTID_CONSISTENCY = ON.
[ERROR] [MY-010119] Aborting
This means you tried to enable --gtid-mode=ON without setting --enforce-gtid-consistency=ON first. In the docker-compose.yml, ensure --enforce-gtid-consistency=ON is set before --gtid-mode=ON in the command list.
Check binlog_row_metadata:
It controls the amount of metadata written to the binary log when using row-based replication (--binlog-format=ROW).
Check if the setting got enabled or not:
SHOW VARIABLES LIKE 'binlog_row_metadata';
Should return FULL for complete metadata logging.
Inspect a Binary Log
If you want to see the events written to the binlog, exit the MySQL shell and run the following command from your host (or inside the container):
docker exec -it primary_mysql mysqlbinlog /var/lib/mysql/mysql-bin.000001
This will print the contents of the first binary log file. Look for recent DML operations (like your INSERT statements) to confirm that changes are being logged.
Check for Replication User and Permissions
If you’re using a CDC tool, ensure that the replication user was created properly. Back in the MySQL shell, run:
SELECT user, host FROM mysql.user WHERE user = 'cdc_user';
Then check its privileges with:
SHOW GRANTS FOR 'cdc_user'@'%';
The replication user should have the REPLICATION SLAVE and REPLICATION CLIENT privileges.
In some edge cases you might need to pass in the below command.
SET GLOBAL binlog_row_metadata = 'FULL';
It controls the amount of metadata written to the binary log when using row-based replication (--binlog-format=ROW). After you change these settings, you may need to restart the docker container.
Check if it got enabled or not:
SHOW VARIABLES LIKE 'binlog_row_metadata';
5. Stop the Container
- Using Dockerized OLake
- Using Local build OLake
-
To stop the container, perform:
bashdocker compose down --remove-orphans -vThis will stop and remove all containers defined in the
docker-compose.ymlfile, along with any orphaned containers and associated volumes.
-
To stop the container, perform:
bashdocker compose -f ./drivers/mysql/config/docker-compose.yml down --remove-orphans -vThis will stop and remove all containers defined in the
docker-compose.ymlfile, along with any orphaned containers and associated volumes.
-
To remove the container, perform:
bashdocker rm -f primary_mysqlThis will forcefully remove the specified container by its ID.
-
To remove the image, perform:
bashdocker rmi -f IMAGE_IDThis will forcefully remove the specified image by its ID.
Additional References
-
Configuration Files: Refer to the following documentation for configuration details:
-
Viewing Parquet Files: : Use the VS Code extension - Parquet Explorer to view Parquet files in your editor.