Setup Postgres via Docker Compose (local)
This guide explains how to spawn a Postgres instance using Docker Compose for local development and testing. You can use it with OLake UI for a complete visual experience or with the CLI tools directly.
This compose file is not for production use. It is meant for local development and testing purposes only. It spawns a single Postgres instance with logical replication enabled. For production use, consider using a more robust setup with multiple nodes and proper replication configurations.
New! You can now use the OLake UI for a visual, web-based experience to create sources, configure jobs, and monitor data synchronization. The UI provides an intuitive alternative to CLI commands.
Navigate to ./drivers/postgres/config (if building locally) OR just create a directory (say OLAKE_DIRECTORY) anywhere in your system if you want to use Dockerized OLake and create these files:
docker-compose.ymlsource.jsondestination.json-> Refer the additional-references for details on writer file config.

1. Starting docker-compose.yml
This compose file does the following:
- Primary Postgres Service: Runs a Postgres container with logical replication enabled (pgoutput is built-in; no plugin install required).
- Data Loader Service: Loads sample data into the Postgres database and creates a logical replication slot.
- Network: Sets up a custom network for the Postgres services.
- Volume: Uses a named volume to persist Postgres data across container restarts.
version: "3.9"  # Specify the Compose file format version.

services:
  # Primary Postgres service acting as the main database server.
  primary_postgres:
    container_name: primary_postgres               # Set an explicit name for the container.
    image: postgres:15                             # Use the official Postgres version 15 image.
    hostname: primary_postgres                     # Define the hostname within the network.
    ports:
      - "5431:5432"                               # Map port 5432 inside the container to 5431 on the host.
    environment:
      POSTGRES_USER: main                          # Set the default Postgres username.
      POSTGRES_PASSWORD: password                  # Set the password for the Postgres user.
      POSTGRES_DB: main                            # Create a default database named "main".
    # Start Postgres with logical replication enabled (pgoutput is native, no plugin install needed).
    command: >
      bash -c "exec docker-entrypoint.sh postgres -c wal_level=logical -c max_wal_senders=10 -c max_replication_slots=10 -c wal_sender_timeout=0"
    # Explanation of the command:
      # 1. Use exec to run the default docker-entrypoint script provided by the Postgres image.
      # 2. Start Postgres with additional configuration parameters:
      #    - wal_level=logical: Enable logical replication.
      #    - max_wal_senders=10: Allow up to 10 concurrent WAL sender processes.
      #    - max_replication_slots=10: Allow up to 10 replication slots for logical decoding.
      #    - wal_sender_timeout=0: Disable sender timeout so long-running snapshots do not drop the connection.
    volumes:
      - pg-data:/var/lib/postgresql/data          # Use a named volume (pg-data) to persist Postgres data.
    networks:
      - pg-cluster                                 # Connect the container to the custom network "pg-cluster".
    healthcheck:
      test: ["CMD", "pg_isready", "-U", "main", "-d", "main"]  # Healthcheck command to check if Postgres is ready.
      interval: 10s                                # Run the healthcheck every 10 seconds.
      timeout: 5s                                  # Set a timeout of 5 seconds for the healthcheck command.
      retries: 10                                  # Retry the healthcheck up to 10 times before declaring unhealthy.

  # Data loader service to perform operations against the Postgres database.
  data-loader:
    image: postgres:15                             # Use the same version of Postgres to ensure compatible client tools.
    container_name: sample_data_loader             # Set a custom name for clarity.
    environment:
      PGUSER: main                                 # Set the default Postgres user for the client.
      PGPASSWORD: password                         # Set the password for the Postgres user.
      PGDATABASE: main                             # Connect to the "main" database.
    depends_on:
      primary_postgres:
        condition: service_healthy               # Wait until the primary_postgres service passes its health check.
    entrypoint: >
      bash -c "
        echo \"Waiting for Postgres to be ready...\";
        # Poll until Postgres is reachable.
        until pg_isready -h primary_postgres -p 5432 -U main -d main; do
          echo \"Waiting...\";
          sleep 2;
        done;
        echo \"Creating test table sample_data...\";
        # Execute a SQL command to create a table if it doesn't exist.
        psql -h primary_postgres -U main -d main -c \"CREATE TABLE IF NOT EXISTS sample_data (id SERIAL PRIMARY KEY, str_col TEXT, num_col INT);\";
        echo \"Inserting one test row...\";
        # Insert a sample row into the table.
        psql -h primary_postgres -U main -d main -c \"INSERT INTO sample_data (str_col, num_col) VALUES ('Hello world', 123);\";
        echo \"Creating publication and logical replication slot...\";
        # Create a publication and a logical replication slot using the pgoutput plugin.
        psql -h primary_postgres -U main -d main -c \"CREATE PUBLICATION olake_publication FOR ALL TABLES WITH (publish = 'insert,update,delete,truncate');\";
        psql -h primary_postgres -U main -d main -c \"SELECT * FROM pg_create_logical_replication_slot('postgres_slot', 'pgoutput');\";
        echo \"Done. Data and replication slot should now exist.\"
      "
    # Explanation of the entrypoint:
    # - Wait until Postgres is ready to accept connections using pg_isready.
    # - Create a table named "sample_data" with three columns: id, str_col, and num_col.
    # - Insert a sample row into the table.
    # - Create a publication and a logical replication slot named "postgres_slot" using the pgoutput plugin.
    restart: "no"                                  # Do not automatically restart the container after completion.
    networks:
      - pg-cluster                                # Connect to the same custom network "pg-cluster".

# Define a custom network for Postgres services.
networks:
  pg-cluster:

# Define a volume to persist Postgres data.
volumes:
  pg-data:
- Using OLake UI
- Using Dockerized OLake
- Using Local build OLake
2. Starting Postgres
To start the Postgres container, run the following command from your project directory:
docker compose up -d
3. Setup OLake UI
Follow the OLake UI setup guide to run the complete OLake stack with UI:
-
Clone the OLake UI repository:
git clone https://github.com/datazip-inc/olake-ui.git
cd olake-ui -
Start the OLake UI stack:
docker compose up -d -
Access the UI:
- Navigate to http://localhost:8000
- Login with credentials:
admin/password
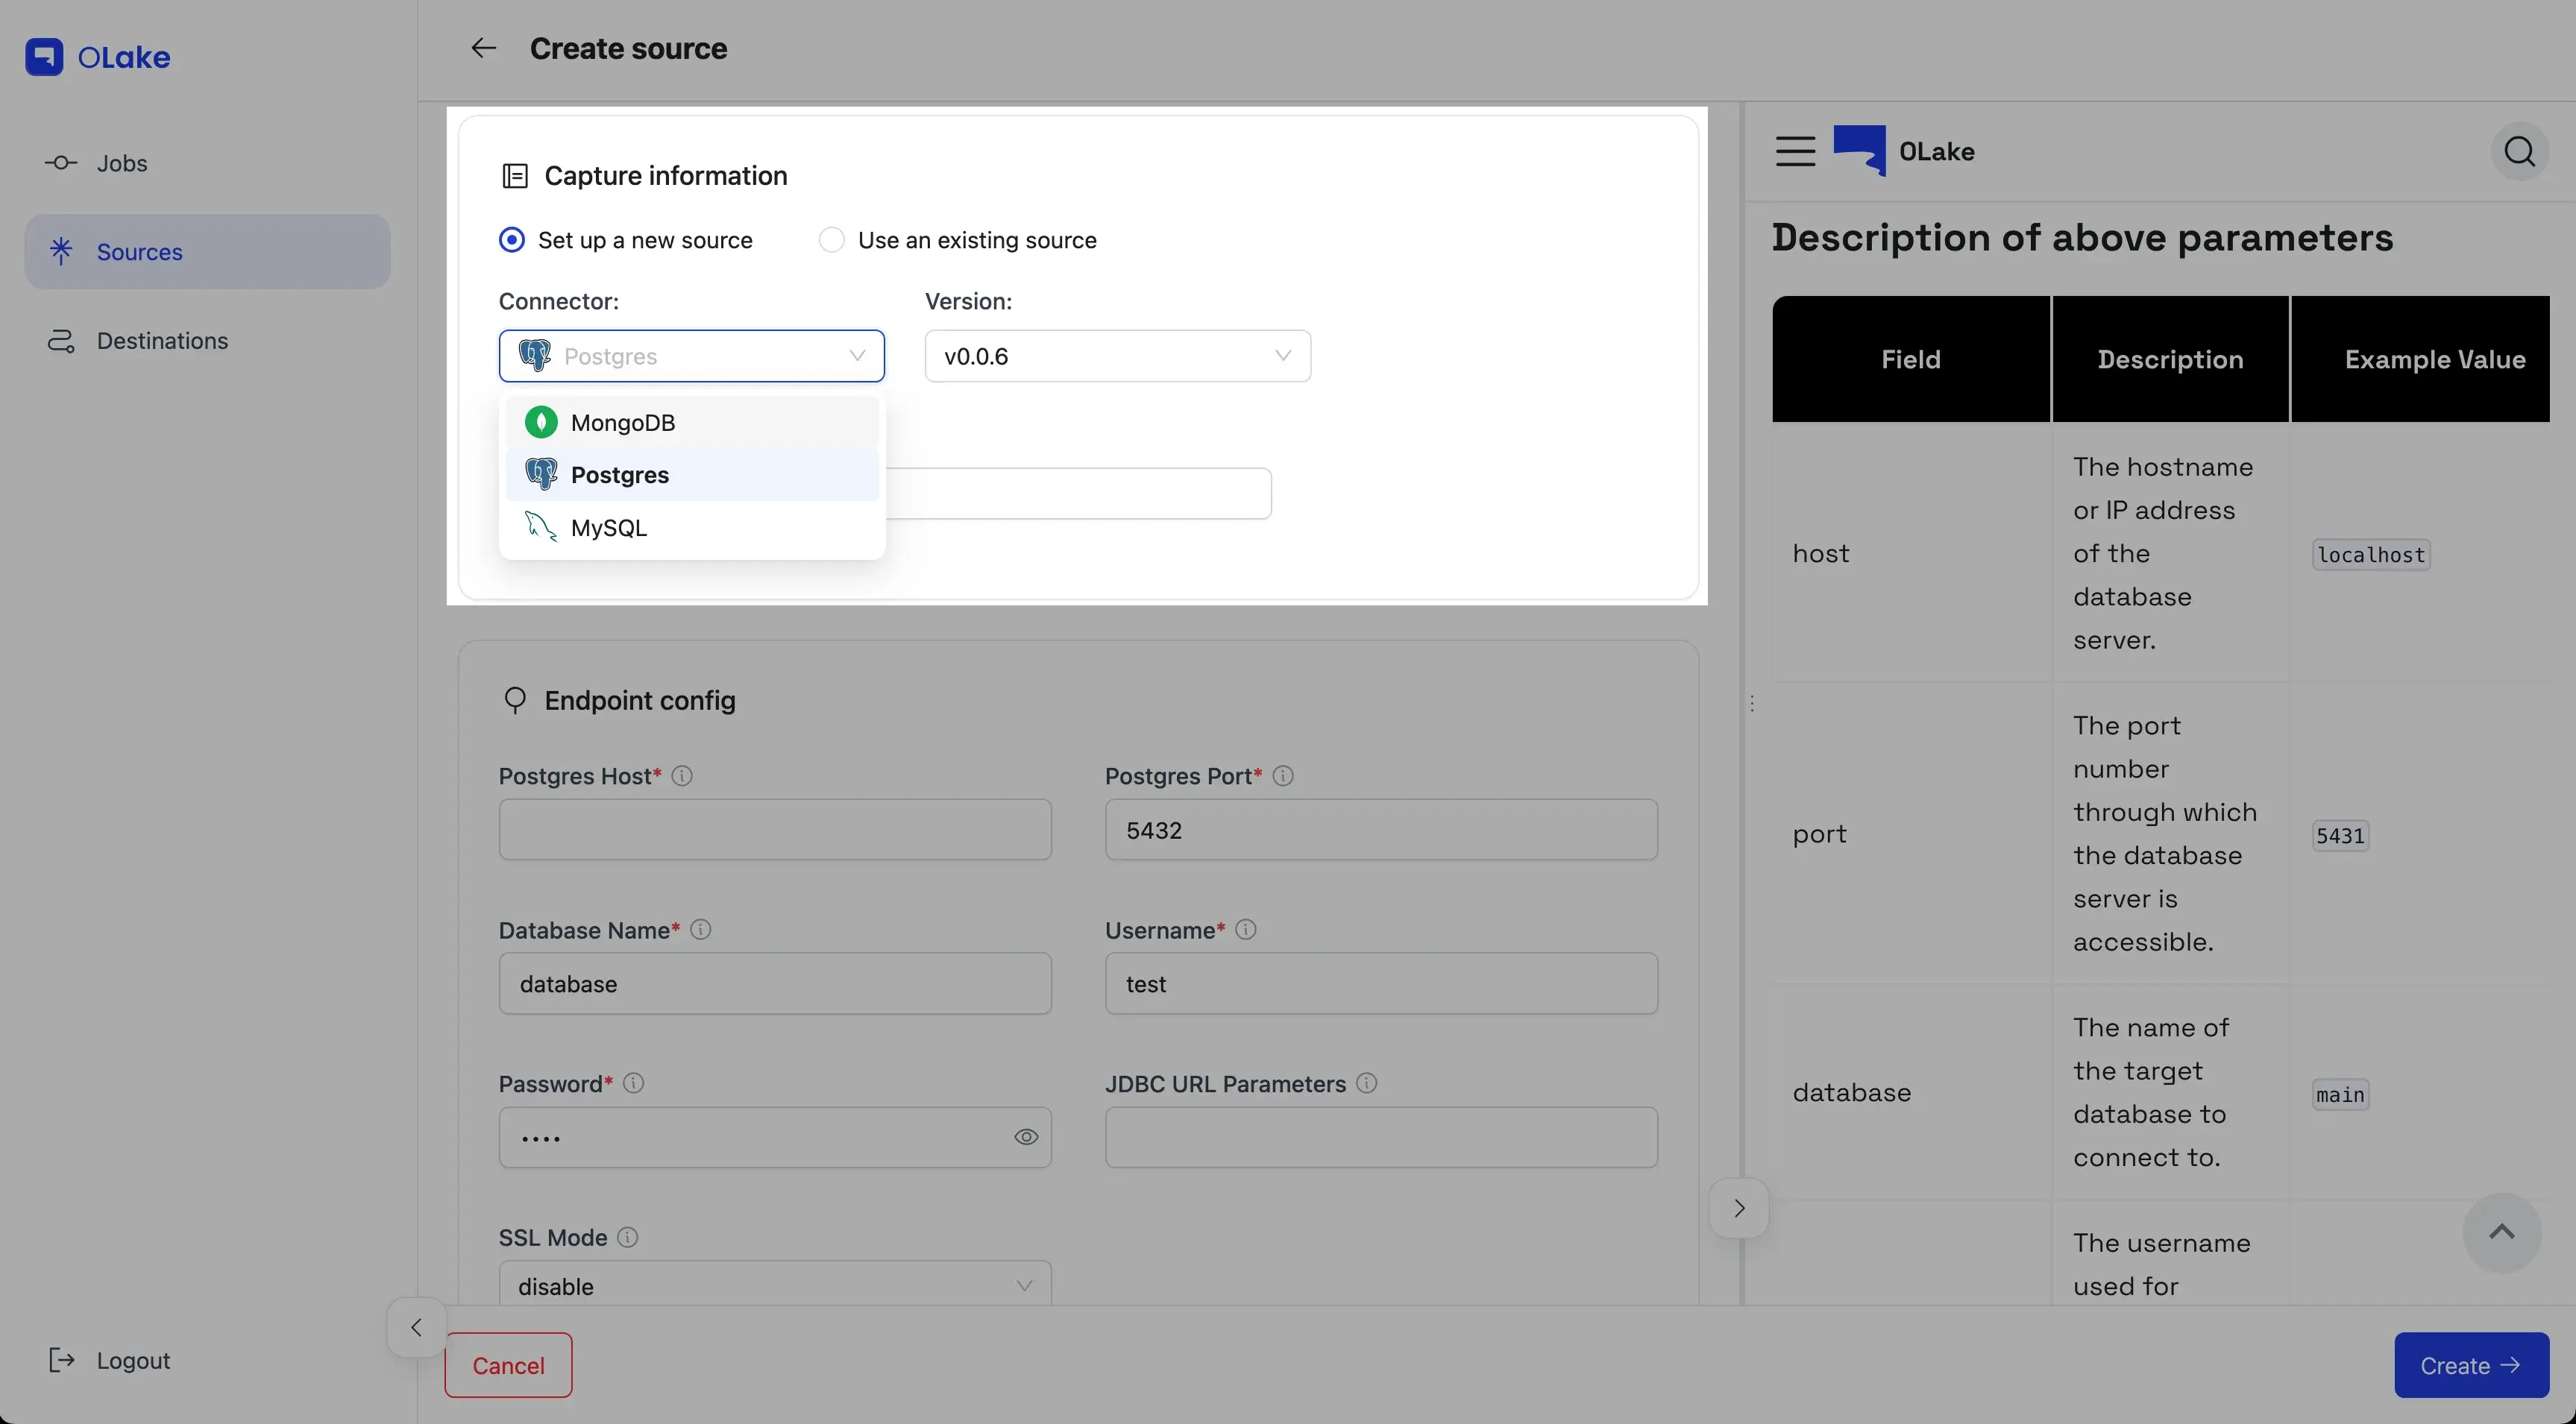
4. Create Postgres Source in OLake UI
- Navigate to the Sources tab
- Click + Create Source
- Select Postgres as the connector type
- Fill in the connection details:
- Host:
host.docker.internal - Port:
5431 - Database:
main - Username:
main - Password:
password - SSL Mode:
disable
- Host:
- For CDC, configure the Update Method:
- Update Method:
CDC - Replication Slot:
postgres_slot(or your chosen slot name) - Publication:
olake_publication(or your chosen publication name)
- Update Method:
- Click Create →
5. Create a Job
Once your source is created, you can create a job to sync data. See Creating First Pipeline for detailed instructions.
2. Starting Postgres
To start the Postgres container, run the following command from your project directory:
docker compose up -d
3. OLake Integration
Update your source configuration file (source.json) to connect to Postgres as follows:
{
    "host": "host.docker.internal",
    "port": 5431,
    "database": "main",
    "username": "main",
    "password": "password",
    "jdbc_url_params": {},
    "ssl": {
        "mode": "disable"
    },
    "update_method": {
        "replication_slot": "postgres_slot",
        "publication": "olake_publication",
        "initial_wait_time": 10
    },
    "reader_batch_size": 100000,
    "max_threads": 5
}
1. Copy the content from the above docker-compose.yml file to your local directory.
Clone the OLake repository.
GitHub repository:
git clone git@github.com:datazip-inc/olake.git
2. Starting Postgres
To start the Postgres container, run the following command from your project directory:
docker compose -f ./drivers/postgres/config/docker-compose.yml up -d
3. OLake Integration
Update your source configuration file (source.json) to connect to Postgres as follows:
{
    "host": "localhost",
    "port": 5431,
    "database": "main",
    "username": "main",
    "password": "password",
    "jdbc_url_params": {},
    "ssl": {
        "mode": "disable"
    },
    "update_method": {
        "replication_slot": "postgres_slot",
        "publication": "olake_publication",
        "initial_wait_time": 10
    },
    "reader_batch_size": 100000,
    "max_threads": 5
}
Now that you have configured the local database, you can either follow the streams configuration to start syncing data or review the broader PostgreSQL connector overview to understand the complete ELT flow with OLake.
4. Perform DDL and DML operations to test OLake (optional)
You can perform some basic DDL and DML operations to test your OLake setup. Here are some commands you can run in the Postgres container.
-
To check the status of the container, perform:
docker psThis will list all running containers. Look for the container with the name
primary_postgres. -
Container Logs:
Check container logs for Postgres using:docker logs primary_postgres -
To bash into the Postgres container, perform:
docker exec -it primary_postgres /bin/bash -
To connect to the Postgres database, perform:
psql -h localhost -U main
Enter the password when prompted, in this case, its password and then you can use any of the below commands to interact.
Insert a row to test CDC
Run this one-liner inside the Postgres container or any psql connected to the container DB:
INSERT INTO sample_data (str_col, num_col) VALUES ('CDC test row', 456);
5. Sync the data again
After running the commands in "4. Perform DDL and DML operations to test OLake":
- Using OLake UI: open your Postgres job and click "Sync Now" to run an incremental CDC sync.
- Using Docker CLI: follow the Streams + State steps in the CLI guide and re-run the sync to capture the new changes. See: /docs/install/docker-cli#streams-config.
6. Stop the Container
-
To stop the container, perform:
docker compose -f ./drivers/postgres/config/docker-compose.yml down --remove-orphans -v
OR
-
To stop the container, perform:
docker compose down --remove-orphans -v
depending upon the directory you are in.
This will stop and remove all containers defined in the docker-compose.yml file, along with any orphaned containers and associated volumes.
-
To remove the container, perform:
docker rm -f primary_postgres
This will forcefully remove the specified container by its ID.
-
To remove the image, perform:
docker rmi -f IMAGE_ID
This will forcefully remove the specified image by its ID.