REST Catalog
The REST catalog is a standardized API designed to simplify the management of Apache Iceberg tables across diverse engines and programming languages. By providing a unified client interface, it eliminates the need for separate catalog integrations for engines like Spark, Flink, Trino, or languages like Java.
Built on an OpenAPI specification, the REST catalog offers a modern, flexible alternative to the Hive Metastore's Thrift interface, tailored specifically for Iceberg's architecture.
- Generic
- Lakekeeper
- Nessie
- S3 Tables
- Unity
- Apache Polaris
The Generic REST Catalog is the default implementation of the Apache Iceberg REST Catalog API. It provides a standard, engine-agnostic way to manage Iceberg tables without depending on a specific catalog service like Nessie, Polaris, or Unity.
Prerequisites
Required services:
- Object store – e.g., S3, MinIO, or another S3-compatible storage for table data and metadata.
- Metadata database – typically PostgreSQL, with a dedicated database and user for Iceberg.
- REST service – the Iceberg REST Catalog service.
Permissions:
- The REST Catalog service user needs read and write permissions on the object store buckets used by Iceberg tables.
- The catalog user should have full DDL and DML privileges on the Iceberg metadata database and tables.
Configuration
- OLake UI
- OLake CLI
Before setting up the destination, make sure you have successfully set up the source.
After setting up the source, configure your destination with REST Catalog.
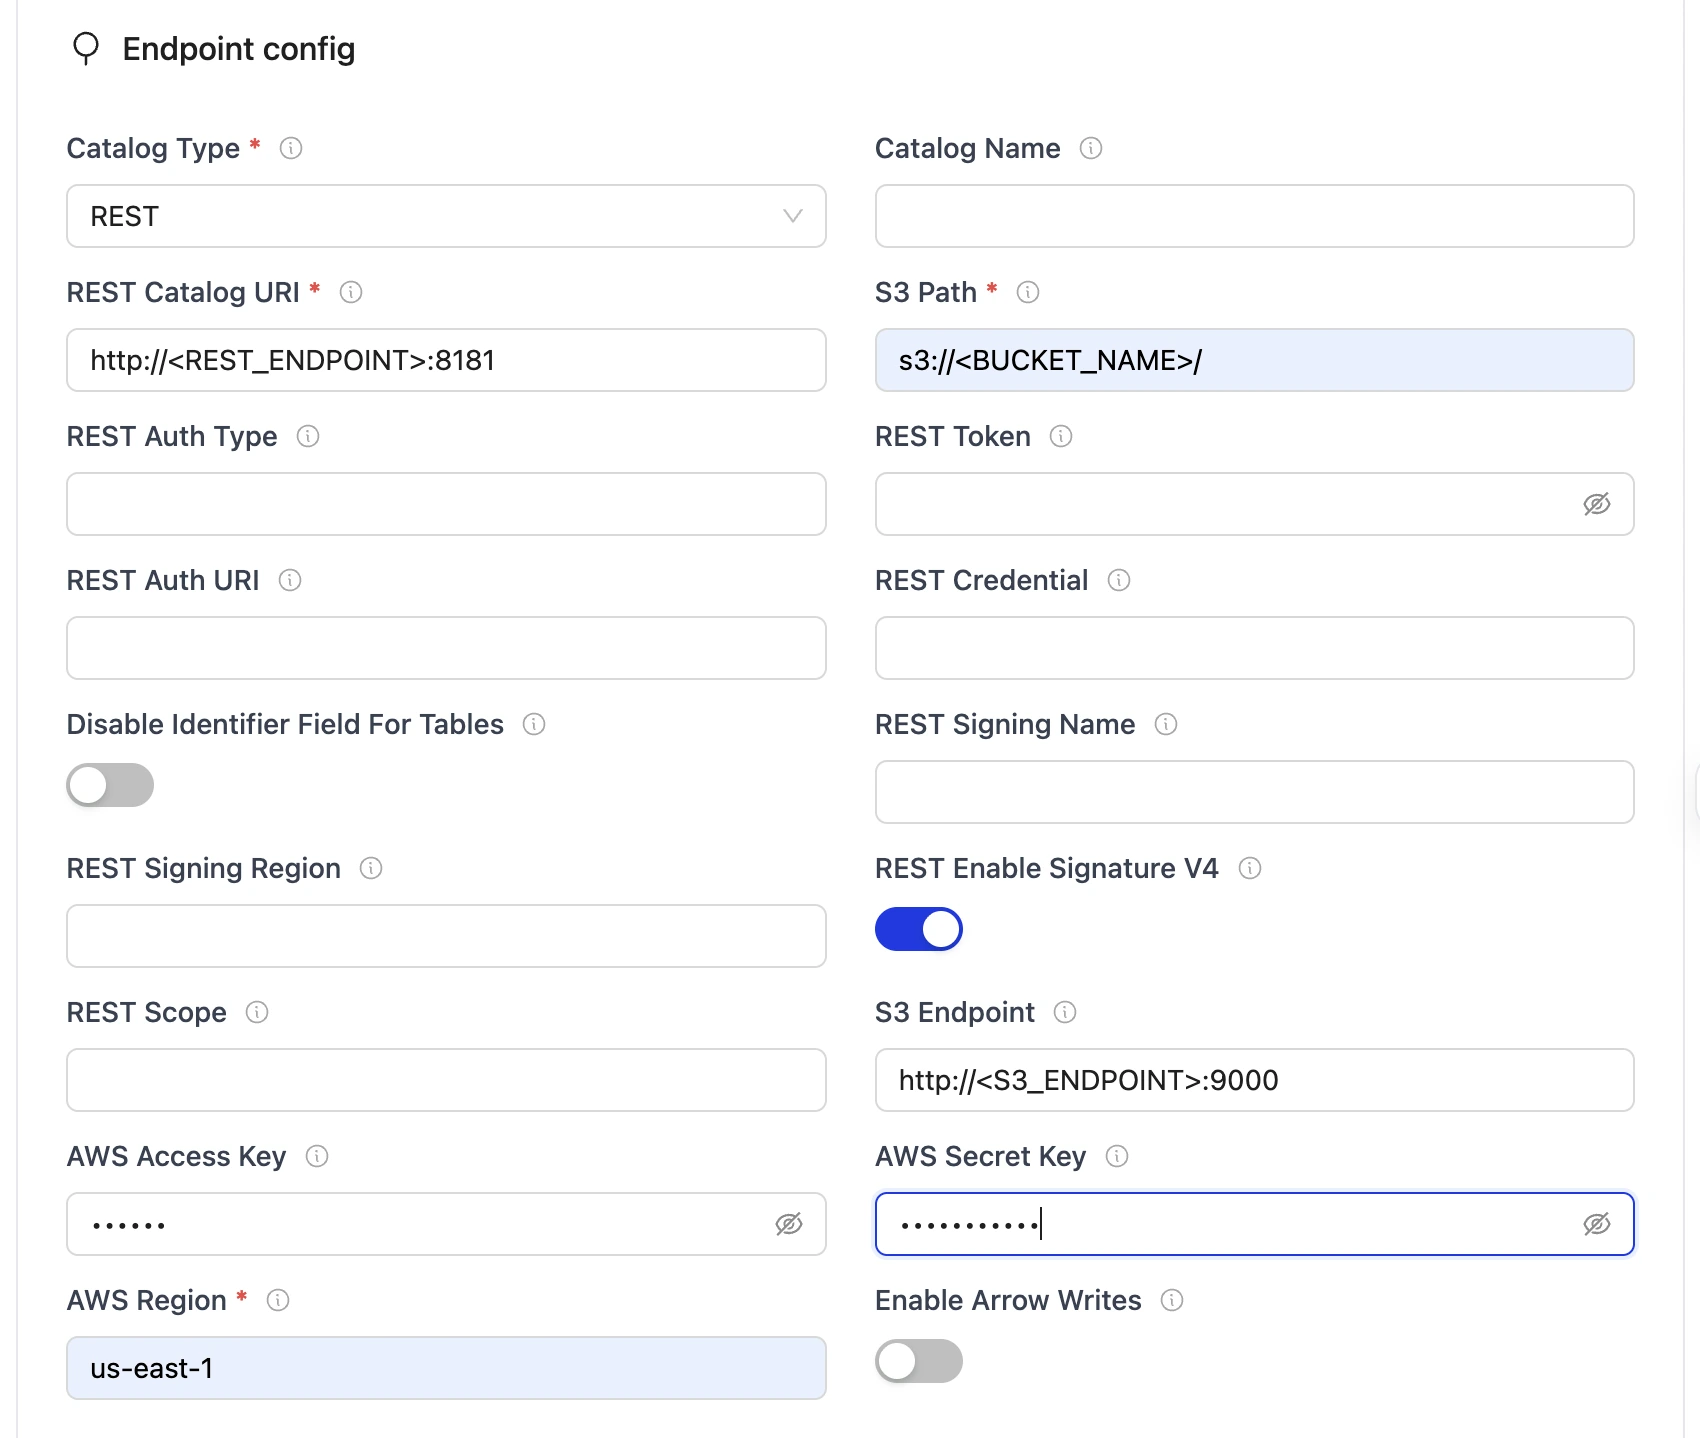
REST Configuration Parameters
| Parameter | Sample Value | Description |
|---|---|---|
| REST Catalog URL | http://<REST_ENDPOINT>:8181 | Specifies the endpoint URL for the REST catalog service that the writer will connect to. |
| Catalog Name | olake_iceberg | Enter a name for your catalog. |
| Iceberg S3 Path | s3://<BUCKET_NAME> | Determines the S3 path or storage location for Iceberg data. "warehouse" represents the designated storage directory. |
| S3 Endpoint | http://<S3_ENDPOINT>:9000 | Endpoint for the S3 service. |
| AWS Region | <S3_REGION> | Specifies the AWS region associated with the S3 bucket where the data is stored. |
| AWS Access Key | <S3_ACCESS_KEY> | AWS access key (Optional). |
| AWS Secret Key | <S3_SECRET_KEY> | AWS secret key (Optional). |
| Enable Arrow Writes | false | Writes data and delete files using Apache Arrow based writer and registers them in Iceberg. |
For the catalog name, OLake only supports lowercase letters and underscores. Spaces and special characters are not supported.
Authentication Fields (optional)
| Parameter | Sample Value | Description |
|---|---|---|
| Token | abc...xyz | Specifies the Bearer token sent in the Authorization header for authenticating with the REST catalog service. |
| OAuth2 Auth URI | https://auth.server.com/oauth/token | OAuth2 server URI for OAuth2 authentication. |
| REST Auth Type | oauth2 | Authentication type (e.g., "oauth2"). |
| Credential (OAuth2) | your_id:your_secret | Specifies the client ID and secret for OAuth2, formatted as client_id:client_secret. |
| Scope (OAuth2) | api.read api.write | OAuth2 scopes (space-separated). |
| REST Signing Name | s3tables | Service name for AWS Signature V4 (e.g., "s3tables"). |
| REST Signing Region | us-east-1 | Region for AWS Signature V4 signing. |
| REST Enable Signature V4 | true | Enable AWS Signature V4 signing (boolean). |
| Disable Identifier Tables | false | Needed to set true for Databricks Unity Catalog as it doesn't support identifier fields |
After you have successfully set up the destination: Configure your streams
Create a destination.json with the following configuration:
{
  "type": "ICEBERG",
  "writer": {
    "catalog_type": "rest",
    "catalog_name": "olake_iceberg",
    "rest_catalog_url": "http://<REST_ENDPOINT>:8181",
    "iceberg_s3_path": "s3://<BUCKET_NAME>",
    "s3_endpoint": "http://<S3_ENDPOINT>:9090",
    "aws_region": "<AWS_REGION>",
    "aws_access_key": "<AWS_ACCESS_KEY>",
    "aws_secret_key": "<AWS_SECRET_KEY>",
    "arrow_writes": false
  }
}
Configuration Fields
| Parameter | Sample Value | Description |
|---|---|---|
| catalog_type | rest | Defines the catalog type used by the writer. "rest" means the writer interacts with a RESTful catalog service. |
| rest_catalog_url | http://<REST_ENDPOINT>:8181 | Specifies the endpoint URL for the REST catalog service that the writer will connect to. |
| catalog_name | olake_iceberg | Enter a name for your catalog. |
| iceberg_s3_path | s3://<BUCKET_NAME> | Determines the S3 path or storage location for Iceberg data. |
| s3_endpoint | http://<S3_ENDPOINT>:9000 | Endpoint for the S3 service (Minio in this case). |
| aws_region | <S3_REGION> | Specifies the AWS region associated with the S3 bucket where the data is stored. |
| aws_access_key | <S3_ACCESS_KEY> | AWS access key (Optional). |
| aws_secret_key | <S3_SECRET_KEY> | AWS secret key (Optional). |
| arrow_writes | false | Writes data and delete files using Apache Arrow based writer and registers them in Iceberg. |
For the catalog name, OLake only supports lowercase letters and underscores. Spaces and special characters are not supported.
Authentication Fields (optional)
| Parameter | Sample Value | Description |
|---|---|---|
| token | abc...xyz | Specifies the Bearer token sent in the Authorization header for authenticating with the REST catalog service. |
| oauth2_uri | https://auth.server.com/oauth/token | OAuth2 server URI for OAuth2 authentication. |
| rest_auth_type | oauth2 | Authentication type (e.g., "oauth2"). |
| credential | your_id:your_secret | Specifies the client ID and secret for OAuth2, formatted as client_id:client_secret. |
| scope | api.read api.write | OAuth2 scopes (space-separated). |
| rest_signing_name | s3tables | Service name for AWS Signature V4 (e.g., "s3tables"). |
| rest_signing_region | us-east-1 | Region for AWS Signature V4 signing. |
| rest_signing_v_4 | true | Enable AWS Signature V4 signing (boolean). |
| no_identifier_fields | false | Needed to set true for Databricks Unity Catalog as it doesn't support identifier fields |
After you have successfully set up the destination: Run the Discover command
Setup For Local Testing
Save the following docker-compose.yml which will start the following services required for an Iceberg REST Catalog.
- REST Catalog Service (Tabular image) – Provides the REST API for managing Iceberg tables.
- PostgreSQL – Serves as the metadata database to track Iceberg table metadata and schema evolution.
- MinIO + MinIO Client – An S3-compatible object store used to store table data and snapshots.
version: "3.9"

services:
  rest:
    image: tabulario/iceberg-rest
    container_name: iceberg-rest
    ports:
      - 8181:8181
    volumes:
      - catalog-data:/catalog
    environment:
      AWS_ACCESS_KEY_ID: admin
      AWS_SECRET_ACCESS_KEY: password
      AWS_REGION: us-east-1
      CATALOG_WAREHOUSE: s3://warehouse/
      CATALOG_IO__IMPL: org.apache.iceberg.aws.s3.S3FileIO
      CATALOG_S3_ENDPOINT: http://minio:9090
      CATALOG_URI: jdbc:postgresql://postgres:5432/iceberg
      CATALOG_JDBC_USER: iceberg
      CATALOG_JDBC_PASSWORD: password
    networks:
      - iceberg_net
    depends_on:
      postgres:
        condition: service_healthy
      mc:
        condition: service_completed_successfully

  postgres:
    image: postgres:15
    container_name: postgres
    networks:
      - iceberg_net
    environment:
      POSTGRES_USER: iceberg
      POSTGRES_PASSWORD: password
      POSTGRES_DB: iceberg
    healthcheck:
      test: [ "CMD", "pg_isready", "-U", "iceberg", "-d", "password" ]
      interval: 2s
      timeout: 10s
      retries: 3
      start_period: 10s
    ports:
      - 5432:5432
    volumes:
      - ./data/postgres-data:/var/lib/postgresql/data

  minio:
    image: minio/minio
    hostname: minio
    container_name: minio
    ports:
      - 9090:9090
      - 9091:9091
    volumes:
      - minio-data:/data
    environment:
      MINIO_ACCESS_KEY: admin
      MINIO_SECRET_KEY: password
      MINIO_DOMAIN: minio
    command: server --address ":9090" --console-address ":9091" /data
    networks:
      iceberg_net:
        aliases:
          - warehouse.minio

  mc:
    image: minio/mc
    container_name: mc
    environment:
      AWS_ACCESS_KEY_ID: admin
      AWS_SECRET_ACCESS_KEY: password
      AWS_REGION: us-east-1
    entrypoint: >
      /bin/sh -c "
      until (/usr/bin/mc alias set minio http://minio:9090 admin password) do echo '...waiting...' && sleep 1; done;
      echo 'Ensuring warehouse bucket exists and is public...';
      if /usr/bin/mc stat minio/warehouse > /dev/null 2>&1; then
        echo 'Warehouse bucket exists, removing for fresh start...';
        /usr/bin/mc rm -r --force minio/warehouse || echo 'Failed to remove warehouse, proceeding...';
      fi;
      /usr/bin/mc mb minio/warehouse;
      /usr/bin/mc anonymous set public minio/warehouse;
      echo 'Minio warehouse bucket setup complete.';
      "
    networks:
      - iceberg_net
    depends_on:
      - minio

volumes:
  catalog-data:
  minio-data:

networks:
  iceberg_net:
Start the services:
docker-compose up -d
All services involved in the sync OLake, REST Catalog Service, MinIO, and Postgres must run in the same Docker network.
Troubleshooting
-
Your authentication credentials are invalid ... unauthorized_client
- Fix:
- Ensure the correct OAuth/token or DB username/password is provided.
- Re-issue new tokens or refresh secrets if expired.
- Check using this command:
curl -H "Authorization: Bearer <token>" https://<catalog-endpoint>/v1/config
- Fix:
-
User:
<ARN>is not authorized to perform: sts:AssumeRole- Fix:
- Make sure the correct IAM role is assigned.
- Validate role trust relationships and necessary permissions to S3 and Catalog.
- Check using this command:
aws sts assume-role --role-arn <S3_role_arn> --role-session-name test-session
- Fix:
The Lakekeeper REST Catalog is a catalog service that provides a unified view of all your Iceberg tables and data lakes.
It implements the Apache Iceberg REST Catalog API, with extensions for governance and monitoring.
Using Lakekeeper, you can manage tables across different storage systems while exposing them to engines in a consistent way.
Prerequisites
Required services:
- Lakekeeper Server – The REST catalog service for Iceberg tables.
- Object Store – e.g., AWS S3, MinIO, or any S3-compatible storage for table data and snapshots.
- Metadata Database – PostgreSQL, used internally by Lakekeeper to store catalog state and metadata.
Permissions:
- Lakekeeper must have read/write access to the object store bucket(s).
- The PostgreSQL user must have DDL/DML rights to manage catalog metadata tables.
Configuration
- OLake UI
- OLake CLI
Before setting up the destination, make sure you have successfully set up the source.
After setting up the source, configure your destination with Lakekeeper as the REST Catalog.
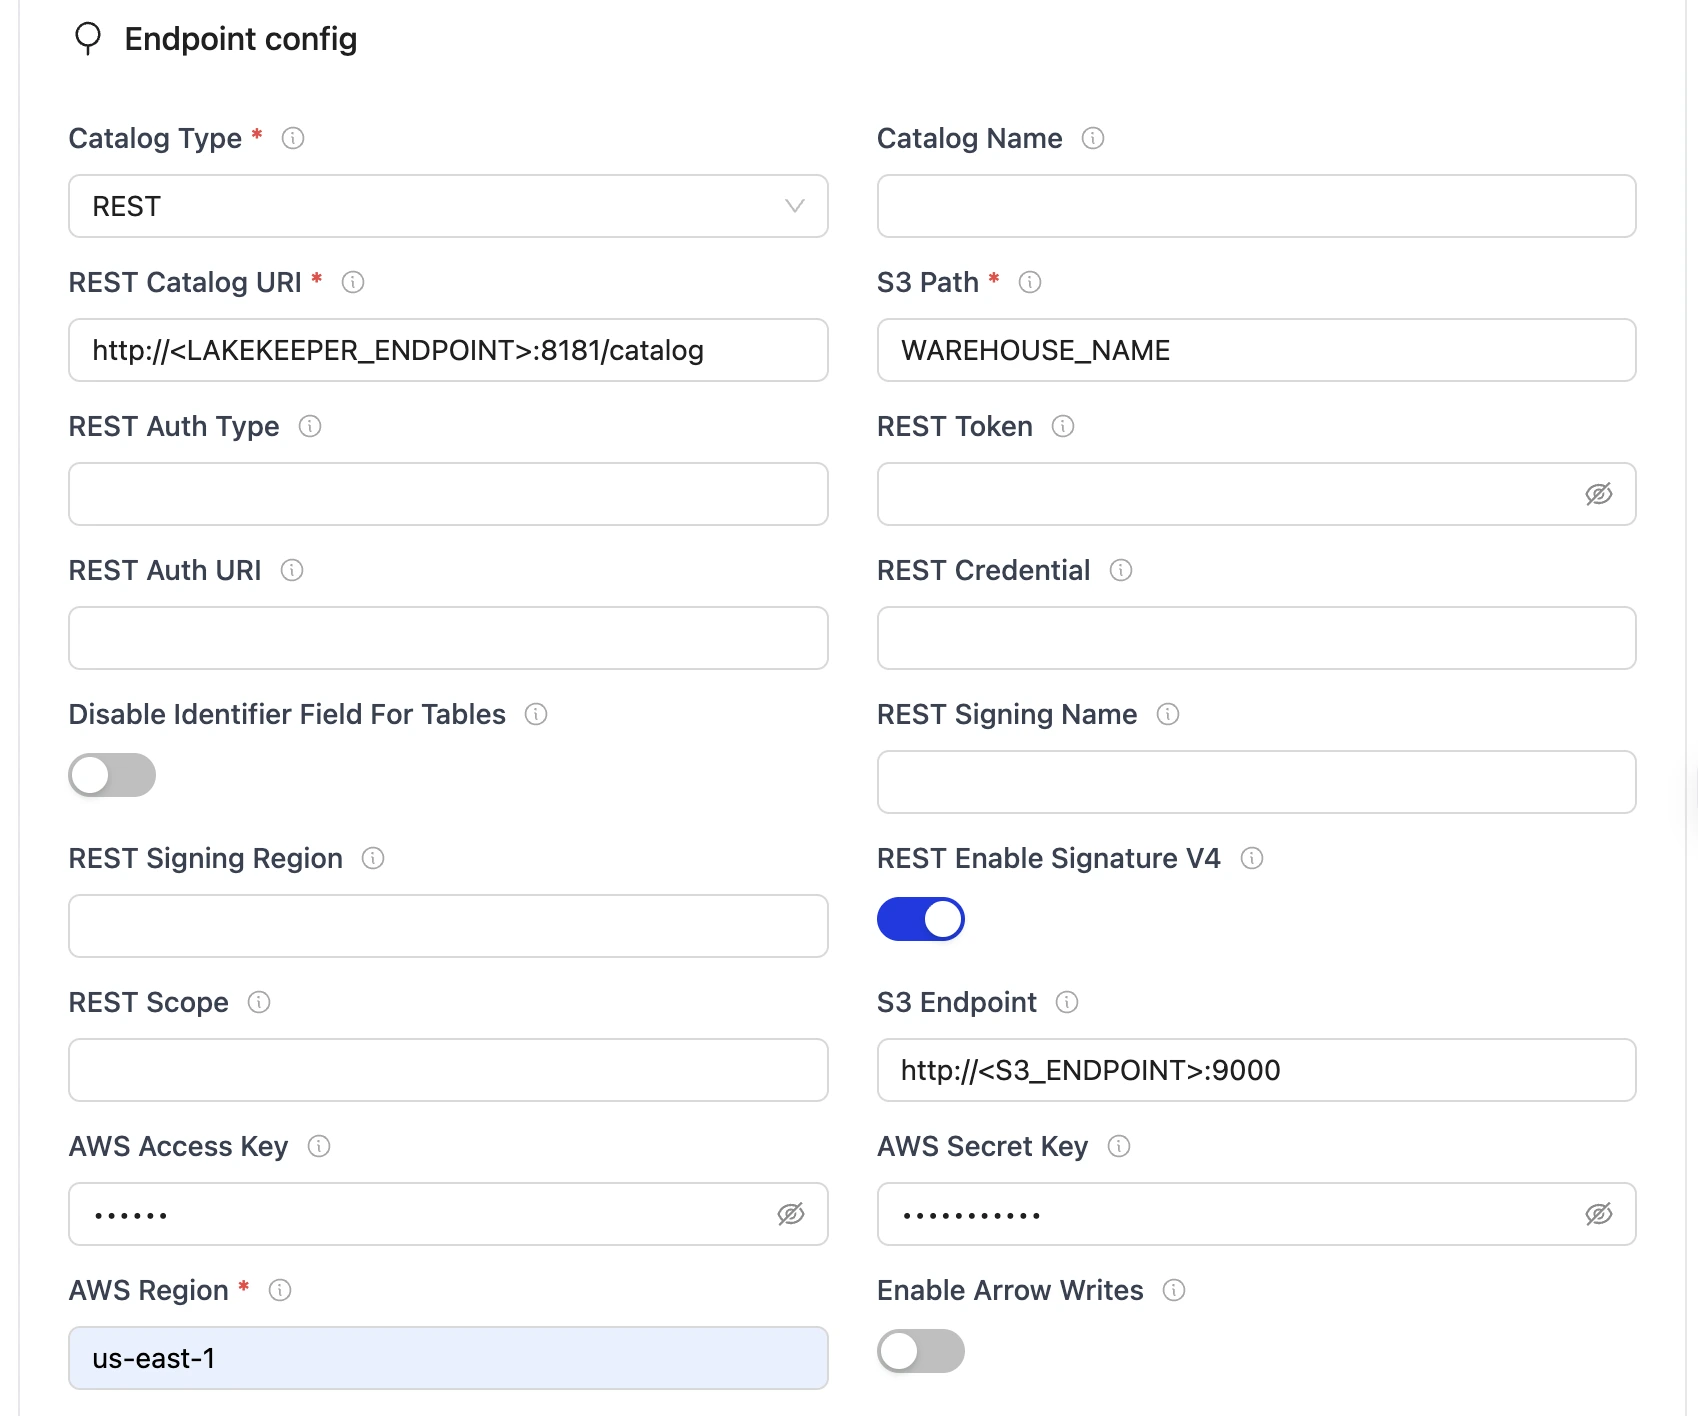
Lakekeeper Configuration Parameters:
| Parameter | Sample Value | Description |
|---|---|---|
| REST Catalog URI | http://<LAKEKEEPER_ENDPOINT>:8181/catalog | Endpoint for the Lakekeeper REST catalog service. |
| Catalog Name | olake_iceberg | Enter a name for your catalog. |
| Iceberg S3 Path | <WAREHOUSE_NAME> | The name of the warehouse you created in Lakekeeper |
| S3 Endpoint | http://<S3_ENDPOINT>:9000 | Endpoint for the S3-compatible service (e.g., MinIO, AWS S3). |
| AWS Region | <AWS_REGION> | Region of the S3 bucket. |
| AWS Access Key | <AWS_ACCESS_KEY> | Access key for S3 authentication. |
| AWS Secret Key | <AWS_SECRET_KEY> | Secret key for S3 authentication. |
| Enable Arrow Writes | false | Writes data and delete files using Apache Arrow based writer and registers them in Iceberg. |
For the catalog name, OLake only supports lowercase letters and underscores. Spaces and special characters are not supported.
After you have successfully set up the destination: Configure your streams
Create a destination.json with the following configuration:
{
  "type": "ICEBERG",
  "writer": {
    "catalog_type": "rest",
    "catalog_name": "olake_iceberg",
    "rest_catalog_url": "http://<LAKEKEEPER_ENDPOINT>:8181/catalog",
    "iceberg_s3_path": "<WAREHOUSE_NAME>",
    "s3_endpoint": "http://<S3_ENDPOINT>:9000",
    "aws_access_key": "<AWS_ACCESS_KEY>",
    "aws_secret_key": "<AWS_SECRET_KEY>",
    "aws_region": "<AWS_REGION>",
    "arrow_writes": false
  }
}
Lakekeeper Configuration Parameters:
| Parameter | Sample Value | Description |
|---|---|---|
| catalog_type | rest | Defines the catalog type used by the writer. "rest" means the writer interacts with a RESTful catalog service. |
| rest_catalog_url | http://<LAKEKEEPER_ENDPOINT>:8181/catalog | Endpoint for the Lakekeeper REST catalog service. |
| catalog_name | olake_iceberg | Enter a name for your catalog. |
| iceberg_s3_path | <WAREHOUSE_NAME> | The name of the warehouse you created in Lakekeeper |
| s3_endpoint | http://<S3_ENDPOINT>:9000 | Endpoint for the MinIO S3-compatible service. |
| aws_access_key | <AWS_ACCESS_KEY> | MinIO access key for authentication (Optional). |
| aws_secret_key | <AWS_SECRET_KEY> | MinIO secret key for authentication (Optional). |
| aws_region | <AWS_REGION> | Specifies the AWS region associated with the S3 bucket. |
| arrow_writes | false | Writes data and delete files using Apache Arrow based writer and registers them in Iceberg. |
For the catalog name, OLake only supports lowercase letters and underscores. Spaces and special characters are not supported.
After you have successfully set up the destination: Run the Discover command
Setup For Local Testing
Save the following docker-compose.yml which will start all required services for a Lakekeeper REST Catalog:
- Lakekeeper Server – Provides the REST API for Iceberg table operations.
- PostgreSQL – Metadata database.
- MinIO + MinIO Client – S3-compatible object store.
version: "3"

services:
  lakekeeper:
    image: &lakekeeper-image ${LAKEKEEPER__SERVER_IMAGE:-quay.io/lakekeeper/catalog:v0.11.1}
    pull_policy: &lakekeeper-pull-policy always
    environment: &lakekeeper-environment
      - LAKEKEEPER__PG_ENCRYPTION_KEY=This-is-NOT-Secure!
      - LAKEKEEPER__PG_DATABASE_URL_READ=postgresql://iceberg:password@postgres:5432/iceberg
      - LAKEKEEPER__PG_DATABASE_URL_WRITE=postgresql://iceberg:password@postgres:5432/iceberg
      - LAKEKEEPER__AUTHZ_BACKEND=allowall
    command: [ "serve" ]
    healthcheck:
      test: [ "CMD", "/home/nonroot/iceberg-catalog", "healthcheck" ]
      interval: 1s
      timeout: 10s
      retries: 3
      start_period: 3s
    depends_on:
      migrate:
        condition: service_completed_successfully
    ports:
      - "8181:8181"
    networks:
      iceberg_net:

  migrate:
    image: *lakekeeper-image
    pull_policy: *lakekeeper-pull-policy
    environment: *lakekeeper-environment
    restart: "no"
    command: [ "migrate" ]
    depends_on:
      postgres:
        condition: service_healthy
    networks:
      iceberg_net:

  minio:
    image: minio/minio:RELEASE.2025-04-03T14-56-28Z
    container_name: minio
    environment:
      - MINIO_ROOT_USER=admin
      - MINIO_ROOT_PASSWORD=password
      - MINIO_DOMAIN=minio
    networks:
      iceberg_net:
        aliases:
          - warehouse.minio
    ports:
      - 9001:9001
      - 9000:9000
    volumes:
      - ./data/minio-data:/data
    command: [ "server", "/data", "--console-address", ":9001" ]

  mc:
    depends_on:
      - minio
    image: minio/mc:RELEASE.2025-04-03T17-07-56Z
    container_name: mc
    networks:
      iceberg_net:
    environment:
      - AWS_ACCESS_KEY_ID=admin
      - AWS_SECRET_ACCESS_KEY=password
      - AWS_REGION=us-east-1
    entrypoint: |
      /bin/sh -c "
      until (/usr/bin/mc config host add minio http://minio:9000 admin password) do echo '...waiting...' && sleep 1; done;
      if ! /usr/bin/mc ls minio/warehouse > /dev/null 2>&1; then
        /usr/bin/mc mb minio/warehouse;
        /usr/bin/mc policy set public minio/warehouse;
      fi;
      tail -f /dev/null
      "

  postgres:
    image: postgres:15
    container_name: iceberg-postgres
    networks:
      iceberg_net:
    environment:
      - POSTGRES_USER=iceberg
      - POSTGRES_PASSWORD=password
      - POSTGRES_DB=iceberg
    healthcheck:
      test: [ "CMD", "pg_isready", "-U", "iceberg", "-d", "iceberg" ]
      interval: 2s
      timeout: 10s
      retries: 3
      start_period: 10s
    ports:
      - 5432:5432
    volumes:
      - ./data/postgres-data:/var/lib/postgresql/data

networks:
  iceberg_net:

volumes:
  postgres-data:
  minio-data:
Start the services:
docker-compose up -d
Once you have started the services you can access the Lakekeeper UI at: http://localhost:8181/ui
Steps to Create a Warehouse
- In the Lakekeeper UI, navigate to the Warehouse section.
- Click on the Add Warehouse button.
- Provide a name to your warehouse (e.g.,
WAREHOUSE_NAME) - Choose S3 as the storage option.
- Enter AWS Credentials
- Credential Type →
Access Key - Access Key ID →
admin - Secret Access Key →
password
- Credential Type →
- Configure S3 Settings
- Set S3 Flavor →
S3 Compatible Storage - Bucket Region →
us-east-1 - Enable toggle →
Enable alternative S3 protocols - Enable toggle →
Enable path style access
- Set S3 Flavor →
- Specify Bucket Details
- Bucket Name →
warehouse
- Bucket Name →
- Configure the Endpoint
- Endpoint →
http:<YOUR_MACHINE_IP>:9000 - To retrieve your machine’s IP address, run:
ipconfig getifaddr en0 - Endpoint →
After completing these steps, your Warehouse will be registered and ready for use with Iceberg tables via Lakekeeper.
All services involved in the sync — OLake, Lakekeeper, MinIO, and Postgres — must run in the same Docker network.
Troubleshooting
-
Invalid Database Connection
- Fix:
- Verify
LAKEKEEPER__PG_DATABASE_URL_*, username, and password. - Check PostgreSQL is running and healthy.
- Verify
- Fix:
-
Permission Denied on S3 Bucket
- Fix:
- Ensure the access key and secret key are correct.
- Verify the bucket (warehouse) exists and is accessible.
- Test with:
mc ls minio/warehouse
- Fix:
-
Access Denied / S3 or Object Store Permission Errors
- Fix:
- Make sure Lakekeeper’s runtime account/service role has the required access:
s3:GetObject,s3:PutObject,s3:DeleteObject,s3:ListBucket. - Check using this command:
aws s3 ls s3://<your-bucket>/<your-prefix>
- Make sure Lakekeeper’s runtime account/service role has the required access:
- Fix:
The REST Nessie Catalog integrates Project Nessie as the catalog for Apache Iceberg using the REST Catalog API.
Unlike the Generic REST Catalog, Nessie adds Git-like version control for data, enabling branching, tagging, and reproducible queries across multiple engines.
Prerequisites
Required services:
- Object store – e.g., S3, MinIO, or another S3-compatible storage for table data and metadata.
- Metadata database – typically PostgreSQL, with a dedicated database and user for Iceberg + Nessie.
- Nessie REST Service – a Nessie deployment that provides the REST catalog API along with versioning features
Permissions:
- The Nessie service requires read/write access permissions to the configured object store (e.g., S3, MinIO) buckets or directories used for table data and metadata storage.
- Ensure the IAM role or user permissions allow listing, reading, writing, and deleting objects.
- The database user for Nessie metadata storage (PostgreSQL or alternative) should have full create, read, update, and delete (CRUD) privileges on the dedicated Nessie schema or database.
Configuration
- OLake UI
- OLake CLI
Before setting up the destination, make sure you have successfully set up the source.
After setting up the source, configure your destination with REST Catalog.

Nessie Configuration Parameters:
| Parameter | Sample Value | Description |
|---|---|---|
| Catalog Type | rest | Defines the catalog type used by the writer. "rest" means the writer interacts with a RESTful catalog service. |
| REST Catalog URI | http://<YOUR_MACHINE_IP>:19120/iceberg/ | Specifies the endpoint URL for the Nessie REST catalog service. Linux: Use machine's IP (e.g., http://192.168.1.100:19120/iceberg/) macOS: Use http://host.docker.internal:19120/iceberg/ |
| Catalog Name | olake_iceberg | Enter a name for your catalog. |
| S3 Path | s3://<BUCKET_NAME> | Determines the S3 path or storage location for Iceberg data in the warehouse bucket. Example: s3://warehouse for the local testing |
| S3 Endpoint | http://<YOUR_MACHINE_IP>:9000/ | Endpoint for the MinIO S3-compatible service. Linux: Use machine's IP (e.g., http://192.168.1.100:9000/) macOS: Use http://host.docker.internal:9000/ |
| AWS Access Key | <S3_ACCESS_KEY> | MinIO access key for authentication (Optional). Default from docker-compose: minio |
| AWS Secret Key | <S3_SECRET_KEY> | MinIO secret key for authentication (Optional). Default from docker-compose: minio123 |
| AWS Region | <S3_REGION> | Specifies the AWS region associated with the S3 bucket where the data is stored. Example: us-east-1 |
| Enable Arrow Writes | false | Writes data and delete files using Apache Arrow based writer and registers them in Iceberg. |
For the catalog name, OLake only supports lowercase letters and underscores. Spaces and special characters are not supported.
Authentication Fields (optional):
| Parameter | Sample Value | Description |
|---|---|---|
| Token | abc...xyz | Specifies the Bearer token sent in the Authorization header for authenticating with the REST catalog service. |
| OAuth2 Auth URI | https://auth.server.com/oauth/token | OAuth2 server URI for OAuth2 authentication. |
| REST Auth Type | oauth2 | Authentication type (e.g., "oauth2"). |
| Credential (OAuth2) | your_id:your_secret | Specifies the client ID and secret for OAuth2, formatted as client_id:client_secret. |
| Scope (OAuth2) | api.read api.write | OAuth2 scopes (space-separated). |
| REST Signing Name | s3tables | Service name for AWS Signature V4 (e.g., "s3tables"). |
| REST Signing Region | us-east-1 | Region for AWS Signature V4 signing. |
| REST Enable Signature V4 | true | Enable AWS Signature V4 signing (boolean). |
| Disable Identifier Tables | false | Needed to set true for Databricks Unity Catalog as it doesn't support identifier fields |
After you have successfully set up the destination: Configure your streams
To connect to Iceberg using Nessie as the catalog, create destination.json with the following configuration:
{
  "type": "ICEBERG",
  "writer": {
    "catalog_type": "rest",
      "rest_catalog_url": "http://<YOUR_MACHINE_IP>:19120/iceberg/",
      "catalog_name": "olake_iceberg",
      "iceberg_s3_path": "s3://<BUCKET_NAME>",
      "s3_endpoint": "http://<YOUR_MACHINE_IP>:9000/",
      "aws_access_key": "<S3_ACCESS_KEY>",
      "aws_secret_key": "<S3_SECRET_KEY>",
      "aws_region": "<AWS_REGION>",
      "arrow_writes": false
  }
}
Nessie Configuration Parameters
| Parameter | Sample Value | Description |
|---|---|---|
| catalog_type | rest | Defines the catalog type used by the writer. "rest" means the writer interacts with a RESTful catalog service. |
| rest_catalog_url | http://<YOUR_MACHINE_IP>:19120/iceberg/ | Specifies the endpoint URL for the Nessie REST catalog service. Linux: Use machine's IP (e.g., http://192.168.1.100:19120/iceberg/) macOS: Use http://host.docker.internal:19120/iceberg/ |
| catalog_name | olake_iceberg | Enter a name for your catalog. |
| iceberg_s3_path | s3://<BUCKET_NAME> | Determines the S3 path or storage location for Iceberg data in the warehouse bucket. Example: s3://warehouse for the local testing |
| s3_endpoint | http://<YOUR_MACHINE_IP>:9000/ | Endpoint for the MinIO S3-compatible service. Linux: Use machine's IP (e.g., http://192.168.1.100:9000/) macOS: Use http://host.docker.internal:9000/ |
| aws_access_key | <S3_ACCESS_KEY> | MinIO access key for authentication (Optional). Default from docker-compose: minio |
| aws_secret_key | <S3_SECRET_KEY> | MinIO secret key for authentication (Optional). Default from docker-compose: minio123 |
| aws_region | <S3_REGION> | Specifies the AWS region associated with the S3 bucket where the data is stored. Example: us-east-1 |
| arrow_writes | false | Writes data and delete files using Apache Arrow based writer and registers them in Iceberg. |
For the catalog name, OLake only supports lowercase letters and underscores. Spaces and special characters are not supported.
Authentication Fields (optional):
| Parameter | Sample Value | Description |
|---|---|---|
| token | abc...xyz | Specifies the Bearer token sent in the Authorization header for authenticating with the REST catalog service. |
| oauth2_uri | https://auth.server.com/oauth/token | OAuth2 server URI for OAuth2 authentication. |
| rest_auth_type | oauth2 | Authentication type (e.g., "oauth2"). |
| credential | your_id:your_secret | Specifies the client ID and secret for OAuth2, formatted as client_id:client_secret. |
| scope | api.read api.write | OAuth2 scopes (space-separated). |
| rest_signing_name | s3tables | Service name for AWS Signature V4 (e.g., "s3tables"). |
| rest_signing_region | us-east-1 | Region for AWS Signature V4 signing. |
| rest_signing_v_4 | true | Enable AWS Signature V4 signing (boolean). |
| no_identifier_fields | false | Needed to set true for Databricks Unity Catalog as it doesn't support identifier fields |
After you have successfully set up the destination: Run the Discover command
Setup For Local Testing
Save the following as docker-compose.yml: which will start the services required for a Nessie REST Catalog:
- Nessie REST Service – Provides the REST API for managing Iceberg tables with version control.
- PostgreSQL – Stores Nessie's metadata and catalog state.
- MinIO + MinIO Client – An S3-compatible object store used to store table data and snapshots.
Before starting the services, update the nessie.catalog.service.s3.default-options.external-endpoint configuration in the docker-compose file:
For Linux machines:
- Replace
<YOUR_MACHINE_IP>with machine's private IP address - Find private IP using:
hostname -I | awk '{print $1}'orip addr show
For macOS machines:
- Replace
<YOUR_MACHINE_IP>withhost.docker.internal
services:
  nessie:
    image: ghcr.io/projectnessie/nessie:0.105.0
    container_name: nessie
    ports:
      - "19120:19120"
    environment:
      - nessie.version.store.type=JDBC
      - quarkus.datasource.db-kind=postgresql
      - quarkus.datasource.jdbc.url=jdbc:postgresql://postgres:5432/nessie_db
      - quarkus.datasource.username=nessie
      - quarkus.datasource.password=nessie
      - nessie.catalog.default-warehouse=warehouse
      - nessie.catalog.warehouses.warehouse.location=s3://warehouse/
      - nessie.catalog.service.s3.default-options.region=us-east-1
      - nessie.catalog.service.s3.default-options.path-style-access=true
      - nessie.catalog.service.s3.default-options.endpoint=http://minio:9000/
      - nessie.catalog.service.s3.default-options.external-endpoint=http://<YOUR_MACHINE_IP>:9000/
      - nessie.catalog.service.s3.default-options.access-key=urn:nessie-secret:quarkus:nessie.catalog.secrets.access-key
      - nessie.catalog.secrets.access-key.name=minio
      - nessie.catalog.secrets.access-key.secret=minio123
    depends_on:
      postgres:
        condition: service_healthy
      mc:
        condition: service_completed_successfully
    networks:
      - nessie-network

  minio:
    image: quay.io/minio/minio:RELEASE.2025-07-18T21-56-31Z
    container_name: minio
    ports:
      - "9000:9000"
      - "9090:9090"
    environment:
      MINIO_ROOT_USER: minio
      MINIO_ROOT_PASSWORD: minio123
      MINIO_ADDRESS: ":9000"
      MINIO_CONSOLE_ADDRESS: ":9090"
    volumes:
      - minio-data:/data
    command: server /data
    networks:
      - nessie-network
    healthcheck:
      test: ["CMD-SHELL", "curl -f http://localhost:9000/minio/health/live || exit 1"]
      interval: 5s
      timeout: 2s
      retries: 15

  mc:
    image: quay.io/minio/minio:RELEASE.2025-07-18T21-56-31Z
    container_name: mc
    depends_on:
      minio:
        condition: service_healthy
    entrypoint: /bin/bash
    restart: "no"
    command: >
      -c "mc alias set myminio http://minio:9000/ minio minio123 &&
          mc mb myminio/warehouse --ignore-existing"
    networks:
      - nessie-network

  postgres:
    image: postgres:15
    container_name: postgres
    environment:
      POSTGRES_USER: nessie
      POSTGRES_PASSWORD: nessie
      POSTGRES_DB: nessie_db
    ports:
      - "5432:5432"
    volumes:
      - postgres-data:/data
    networks:
      - nessie-network
    healthcheck:
      test: ["CMD-SHELL", "pg_isready -U nessie"]
      interval: 5s
      timeout: 2s
      retries: 10

volumes:
  minio-data:
  postgres-data:

networks:
  nessie-network:
    driver: bridge
Start the services:
docker-compose up -d
All services involved in the sync — OLake, Nessie, MinIO, and Postgres — must run in the same Docker network.
Troubleshooting
-
Invalid Reference (Branch/Tag Not Found)
- Fix: Verify that the branch/tag exists before running operations like sync or queries.
- Use the REST API or CLI to list branches/tags:
curl https://<nessie-endpoint>/api/v2/trees/branch
-
Commit Conflicts
- Cause: Nessie uses optimistic concurrency control. If multiple writers update the same branch, a commit may be rejected because the branch has advanced since your last fetch
- Fix: If multiple writers update the same table, Nessie may reject the commit. Retry after pulling the latest state.
S3 Tables is an AWS service that provides a REST catalog implementation for Apache Iceberg tables. It allows you to manage Iceberg tables directly through AWS S3 with AWS Signature V4 authentication.
Prerequisites
Required services:
- AWS S3 Bucket – for storing Iceberg table data and metadata.
- AWS Account – with permissions to create and manage S3 Tables and access related AWS analytics services.
- AWS Credentials – access key ID and secret key for authentication, with permissions to read/write to the S3 bucket.
- Compatible Query Engine – such as Amazon Athena, EMR (Spark), Glue, or other Iceberg-aware engines configured to use S3 Tables.
Configuration
- OLake UI
- OLake CLI
Before setting up the destination, make sure you have successfully set up the source.
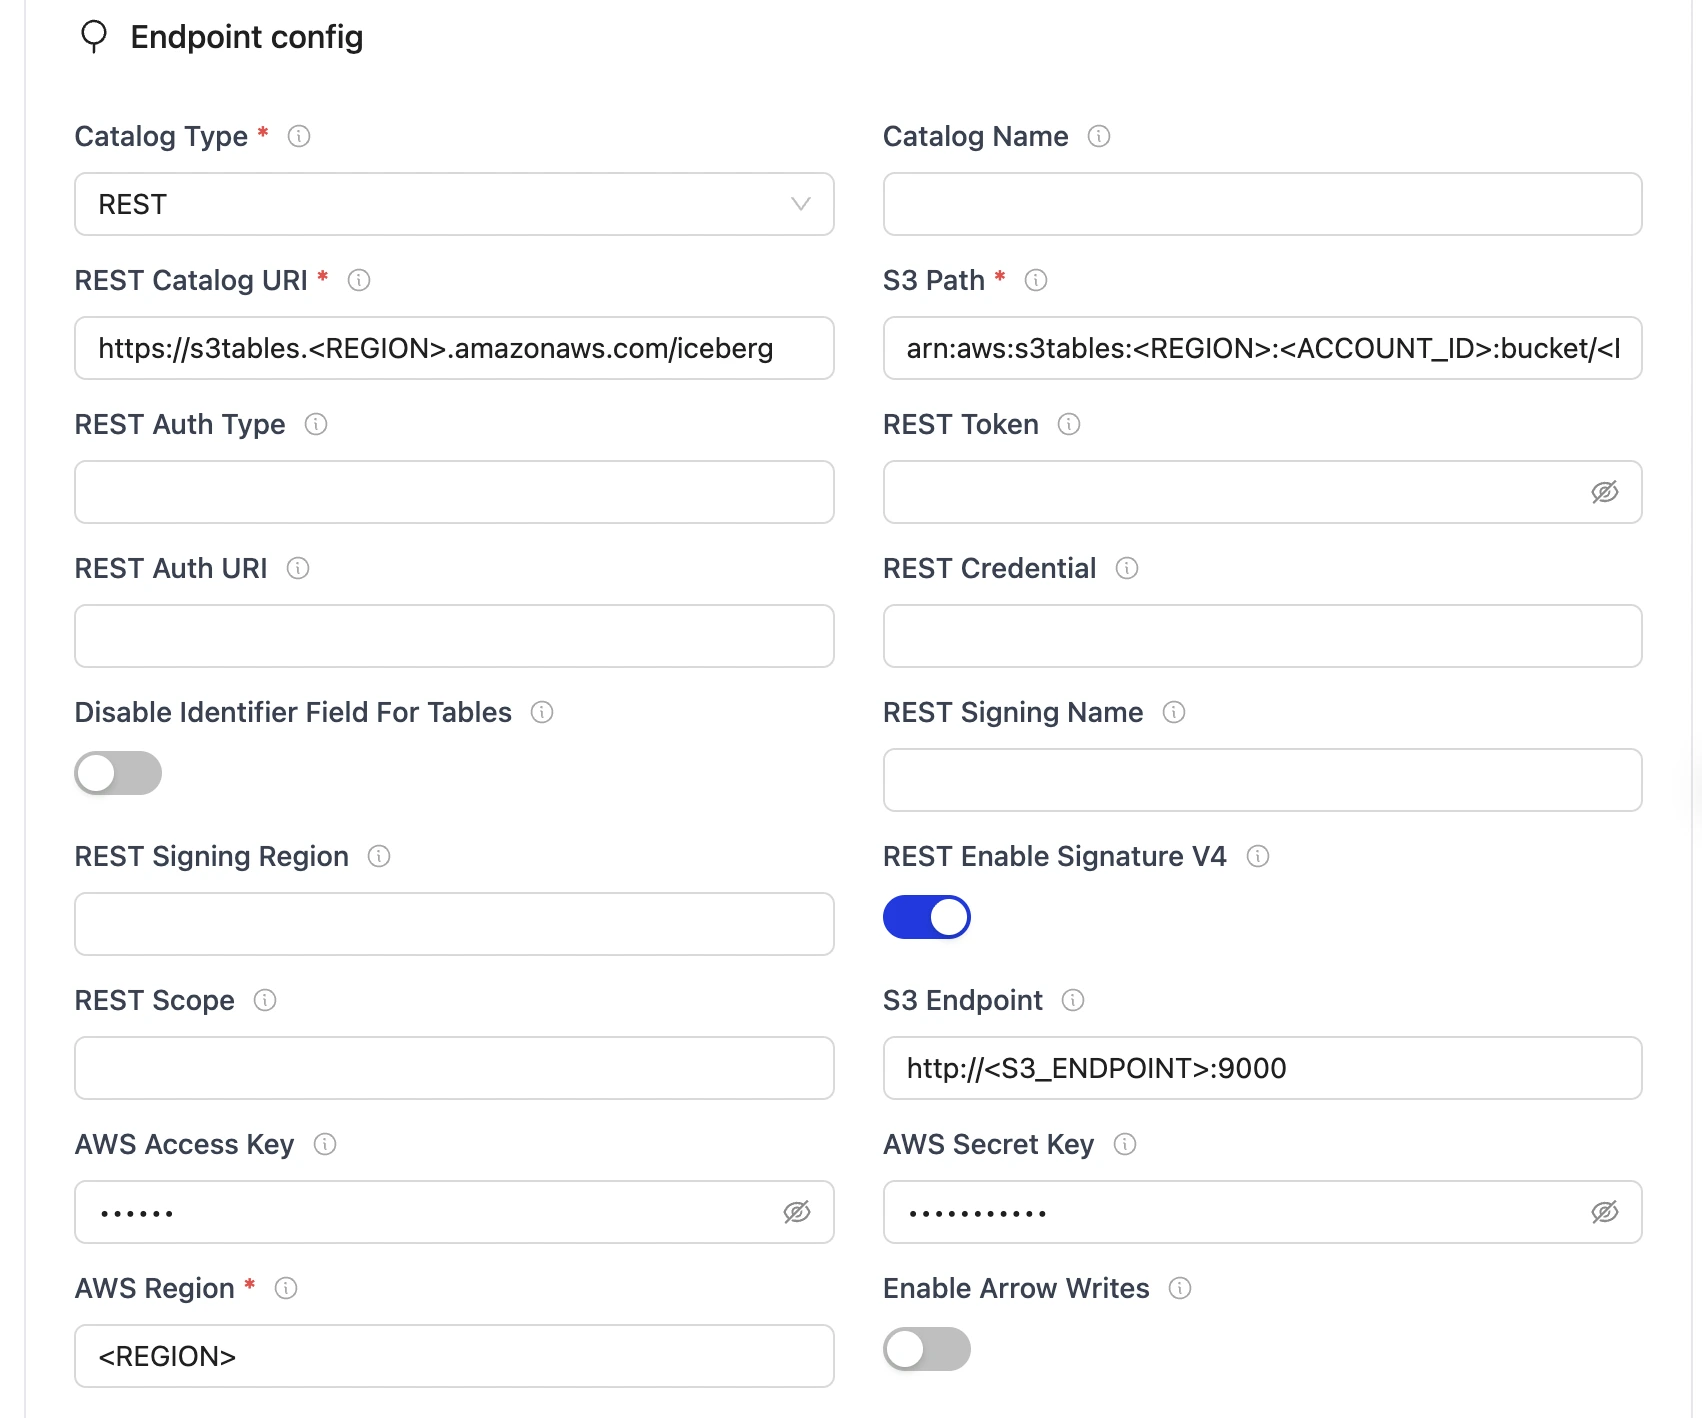
S3 Tables Configuration Parameters:
| Parameter | Sample Value | Description |
|---|---|---|
| REST Catalog URI | https://s3tables.<REGION>.amazonaws.com/iceberg | Specifies the endpoint URL for the S3 Tables REST catalog service. |
| Catalog Name | olake_iceberg | Enter a name for your catalog. |
| Iceberg S3 Path | arn:aws:s3tables:<REGION>:<ACCOUNT_ID>:bucket/<BUCKET_NAME> | Determines the S3 Tables ARN for the bucket and namespace. |
| AWS Region | <REGION> | Specifies the AWS region for the S3 Tables service. |
| AWS Access Key | <AWS_ACCESS_KEY> | AWS access key for authentication. |
| AWS Secret Key | <AWS_SECRET_KEY> | AWS secret key for authentication. |
| REST Signing Name | s3tables | Service name for AWS Signature V4. |
| REST Signing Region | <REGION> | Region for AWS Signature V4 signing. |
| REST Enable Signature V4 | true | Enable AWS Signature V4 signing. |
| Enable Arrow Writes | false | Writes data and delete files using Apache Arrow based writer and registers them in Iceberg. |
For the catalog name, OLake only supports lowercase letters and underscores. Spaces and special characters are not supported.
Authentication Fields (optional):
| Parameter | Sample Value | Description |
|---|---|---|
| Token | abc...xyz | Specifies the Bearer token sent in the Authorization header for authenticating with the REST catalog service. |
| OAuth2 Auth URI | https://auth.server.com/oauth/token | OAuth2 server URI for OAuth2 authentication. |
| REST Auth Type | oauth2 | Authentication type (e.g., "oauth2"). |
| Credential (OAuth2) | your_id:your_secret | Specifies the client ID and secret for OAuth2, formatted as client_id:client_secret. |
| Scope (OAuth2) | api.read api.write | OAuth2 scopes (space-separated). |
After you have successfully set up the destination: Configure your streams
To connect to Iceberg using S3 Tables as the catalog, create destination.json with the following configuration:
{
"type": "ICEBERG",
"writer": {
    "catalog_type": "rest",
    "rest_catalog_url": "https://s3tables.<REGION>.amazonaws.com/iceberg",
    "catalog_name": "olake_iceberg",
    "iceberg_s3_path": "arn:aws:s3tables:<REGION>:<ACCOUNT_ID>:bucket/<BUCKET_NAME>",
    "aws_access_key": "<AWS_ACCESS_KEY>",
    "aws_secret_key": "<AWS_SECRET_KEY>",
    "aws_region": "<REGION>",
    "rest_signing_name": "s3tables",
    "rest_signing_region": "<REGION>",
    "rest_signing_v_4": true,
    "arrow_writes": false
  }
}
S3 Tables Configuration Parameters
| Parameter | Sample Value | Description |
|---|---|---|
| catalog_type | rest | Defines the catalog type used by the writer. "rest" means the writer interacts with a RESTful catalog service. |
| rest_catalog_url | https://s3tables.<REGION>.amazonaws.com/iceberg | Specifies the endpoint URL for the S3 Tables REST catalog service. |
| catalog_name | olake_iceberg | Enter a name for your catalog. |
| iceberg_s3_path | arn:aws:s3tables:<REGION>:<ACCOUNT_ID>:bucket/<BUCKET_NAME> | Determines the S3 Tables ARN for the bucket and namespace. |
| aws_access_key | <AWS_ACCESS_KEY> | AWS access key for authentication. |
| aws_secret_key | <AWS_SECRET_KEY> | AWS secret key for authentication. |
| aws_region | <REGION> | Specifies the AWS region for the S3 Tables service. |
| rest_signing_name | s3tables | Service name for AWS Signature V4. |
| rest_signing_region | <REGION> | Region for AWS Signature V4 signing. |
| rest_signing_v_4 | true | Enable AWS Signature V4 signing (boolean). |
| arrow_writes | false | Writes data and delete files using Apache Arrow based writer and registers them in Iceberg. |
For the catalog name, OLake only supports lowercase letters and underscores. Spaces and special characters are not supported.
Authentication Fields (optional):
| Parameter | Sample Value | Description |
|---|---|---|
| token | abc...xyz | Specifies the Bearer token sent in the Authorization header for authenticating with the REST catalog service. |
| oauth2_uri | https://auth.server.com/oauth/token | OAuth2 server URI for OAuth2 authentication. |
| rest_auth_type | oauth2 | Authentication type (e.g., "oauth2"). |
| credential | your_id:your_secret | Specifies the client ID and secret for OAuth2, formatted as client_id:client_secret. |
| scope | api.read api.write | OAuth2 scopes (space-separated). |
After you have successfully set up the destination: Run the Discover command
Troubleshooting
-
Permission denied (AccessDenied)
- Cause: Missing or insufficient IAM permissions
- Fix:
- Ensure your IAM role or user has these permissions::
s3tables:*s3:GetObject,s3:PutObject,s3:DeleteObject,s3:ListBucket
- Verify bucket policies or resource-based policies do not block access.
- Ensure your IAM role or user has these permissions::
-
Invalid or expired credentials
- Cause: Incorrect keys or expired session tokens
- Fix:
- Double-check your
AWS Access KeyandAWS Secret Key. - For temporary credentials (assumed roles, sessions), refresh them before they expire.
- Verify that the IAM role is correctly attached and trusted.
- Double-check your
-
Incorrect REST Catalog URI
- Cause: Wrong endpoint or region.
- Fix:
- The REST catalog endpoint must follow the pattern:
https://s3tables.<REGION>.amazonaws.com/iceberg - Confirm the region is correct and the URI is reachable.
- The REST catalog endpoint must follow the pattern:
OLake supports Databricks Unity Catalog as a REST catalog destination using Token-based or OAuth2 authentication via the Iceberg REST Catalog API.
⚠️ Important Limitations
- Append Only: Unity Catalog supports append operations only (no equality delete-based updates).
- Managed Tables Only: Iceberg REST writes are supported only for Unity Catalog managed Iceberg tables.
- OAuth2 Status: OAuth2 authentication is supported but may experience internal server errors. Token-based authentication is recommended.
For more details, refer to the official Databricks documentation.
Prerequisites
- Admin access to the Databricks workspace
- Access to external object storage (e.g., AWS S3) backing the tables
Setup Instructions
Step 1: Create a New User & Token
Create the User
It is recommended to create a dedicated user for OLake access.
- Go to top right corner user section → Settings → Identity and Access → Users (Manage)
- Add a new user (email-based)
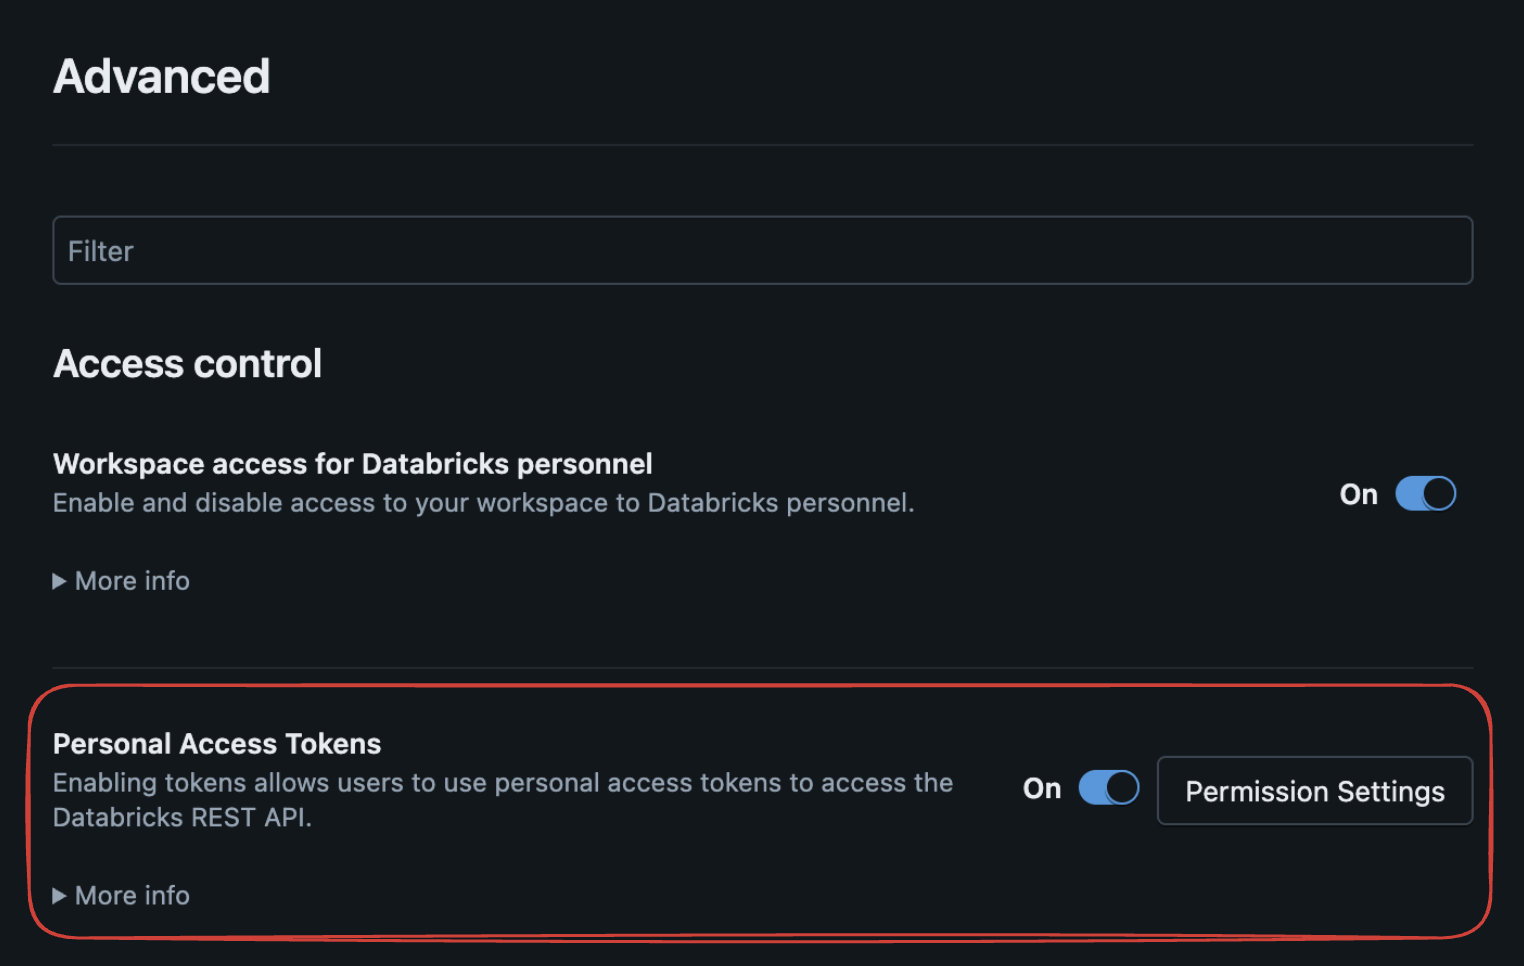
- Go to Settings → Advanced → Access Control
- Enable Personal Access Tokens
- Go to Permissions and add the new user to allow token generation
Create the Token
- Login as the new user
- Navigate to Settings → Developer → Access Tokens → Manage
- Create a new token
- Copy and securely store it (visible only once)
Step 2: Configure External Location
- Go to Catalog
- Create a new External Location
- Follow the recommended Databricks guide to add object storage quickly and securely.
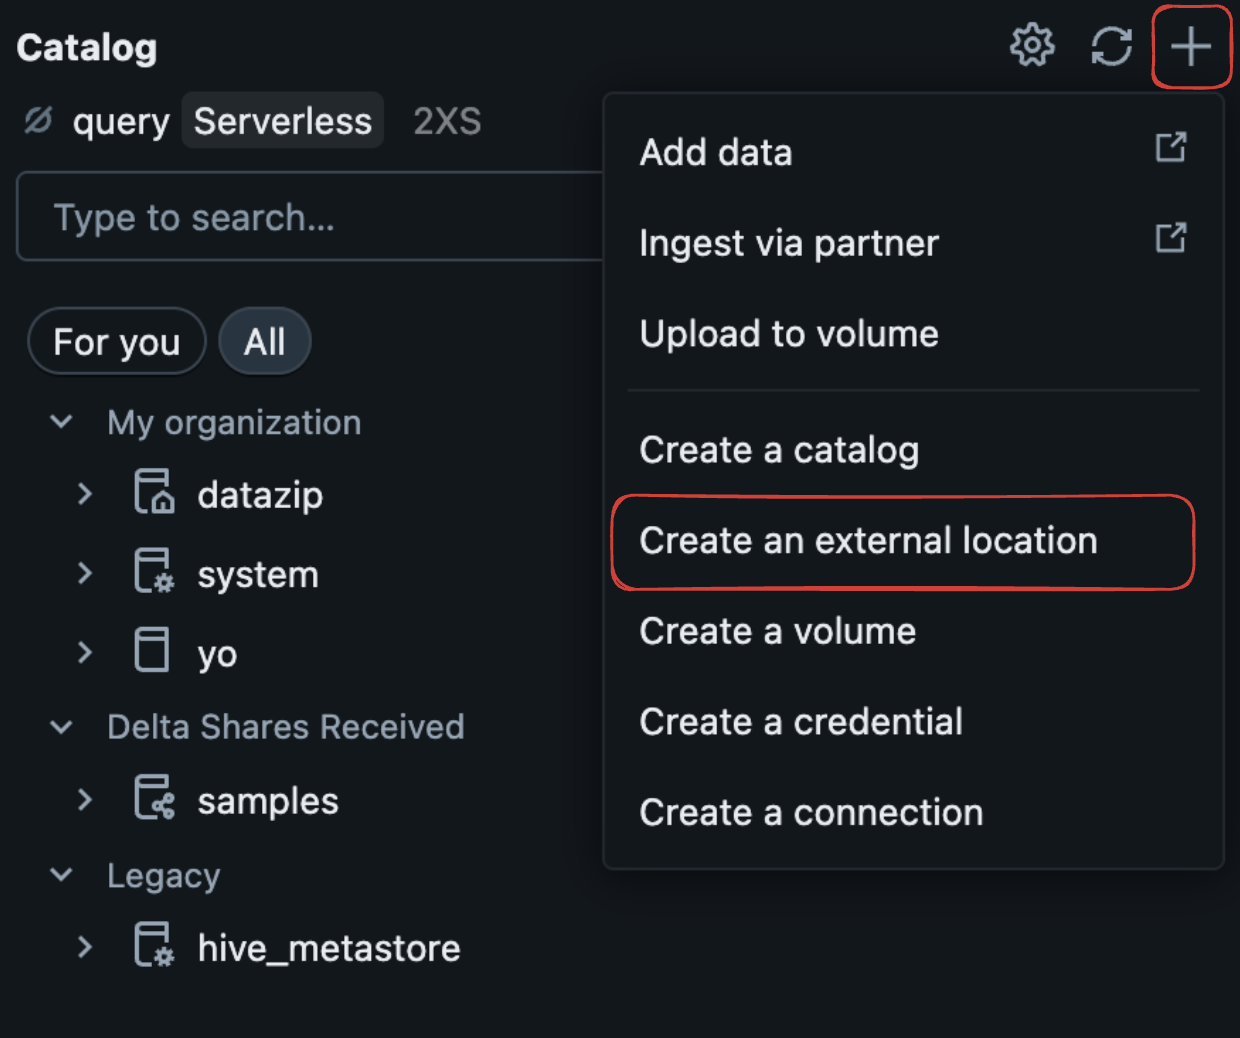
Unity Catalog requires properly configured external storage for Iceberg tables.
Step 3: Create Schema with Proper Permissions
- Go to your Catalog → Create Schema
- Select the external storage location
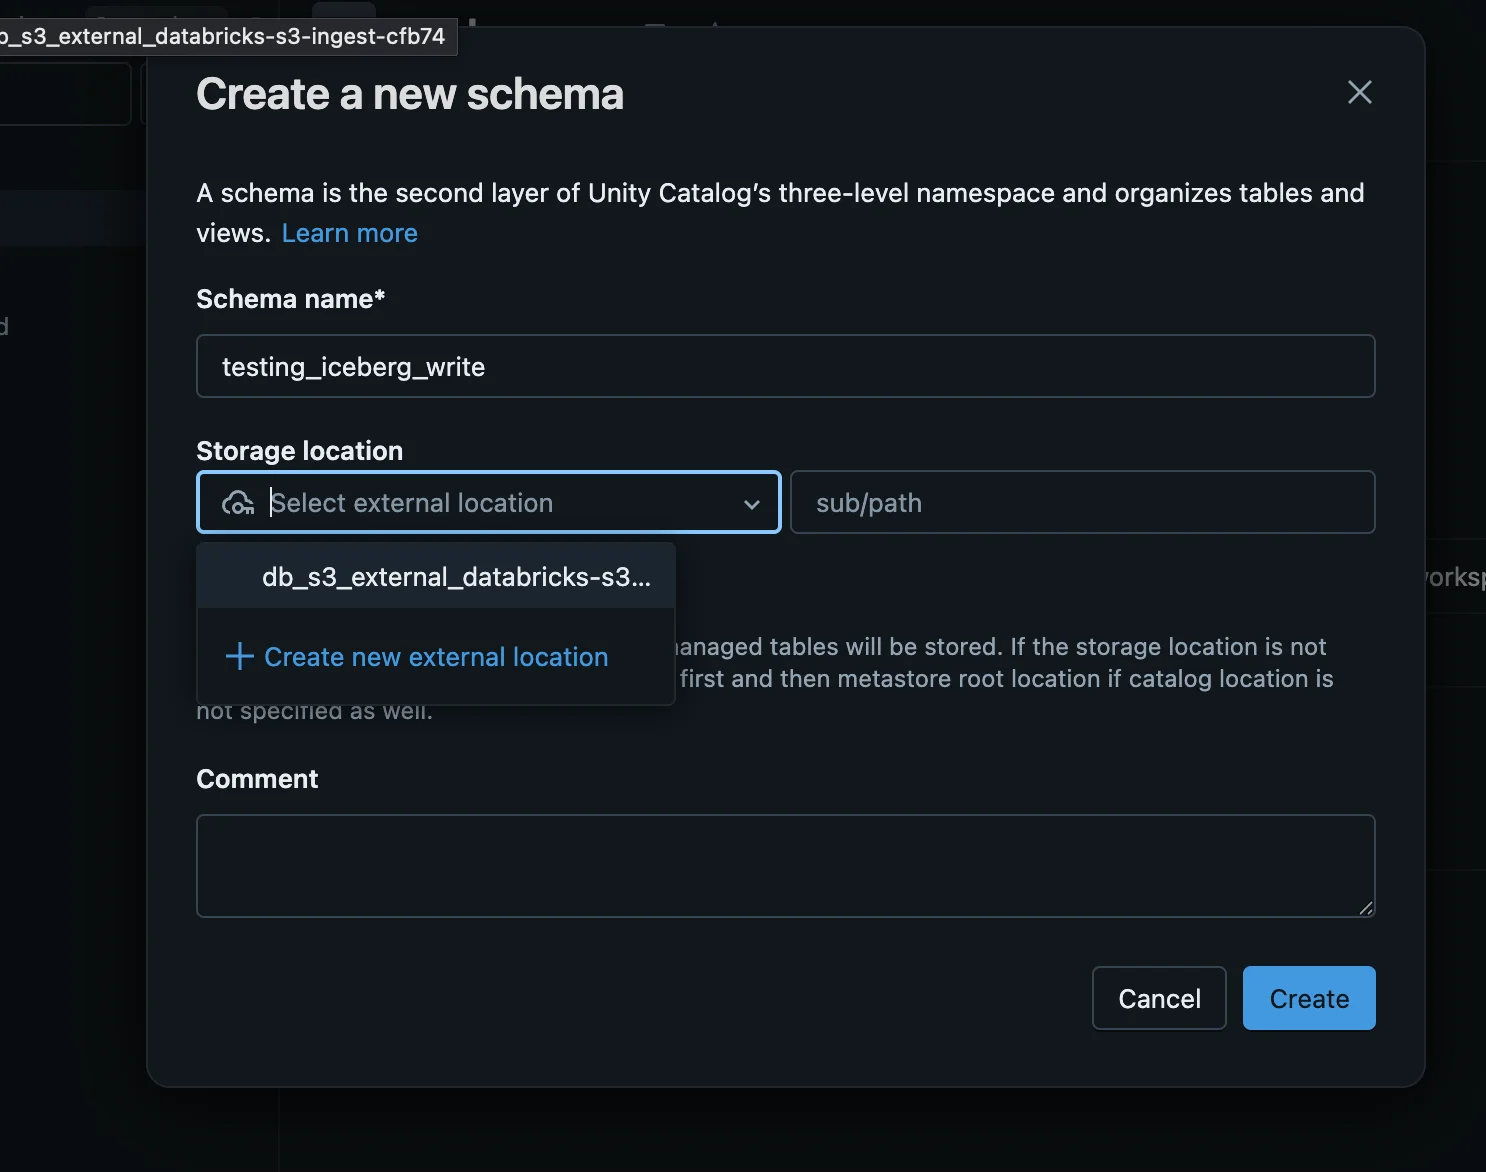
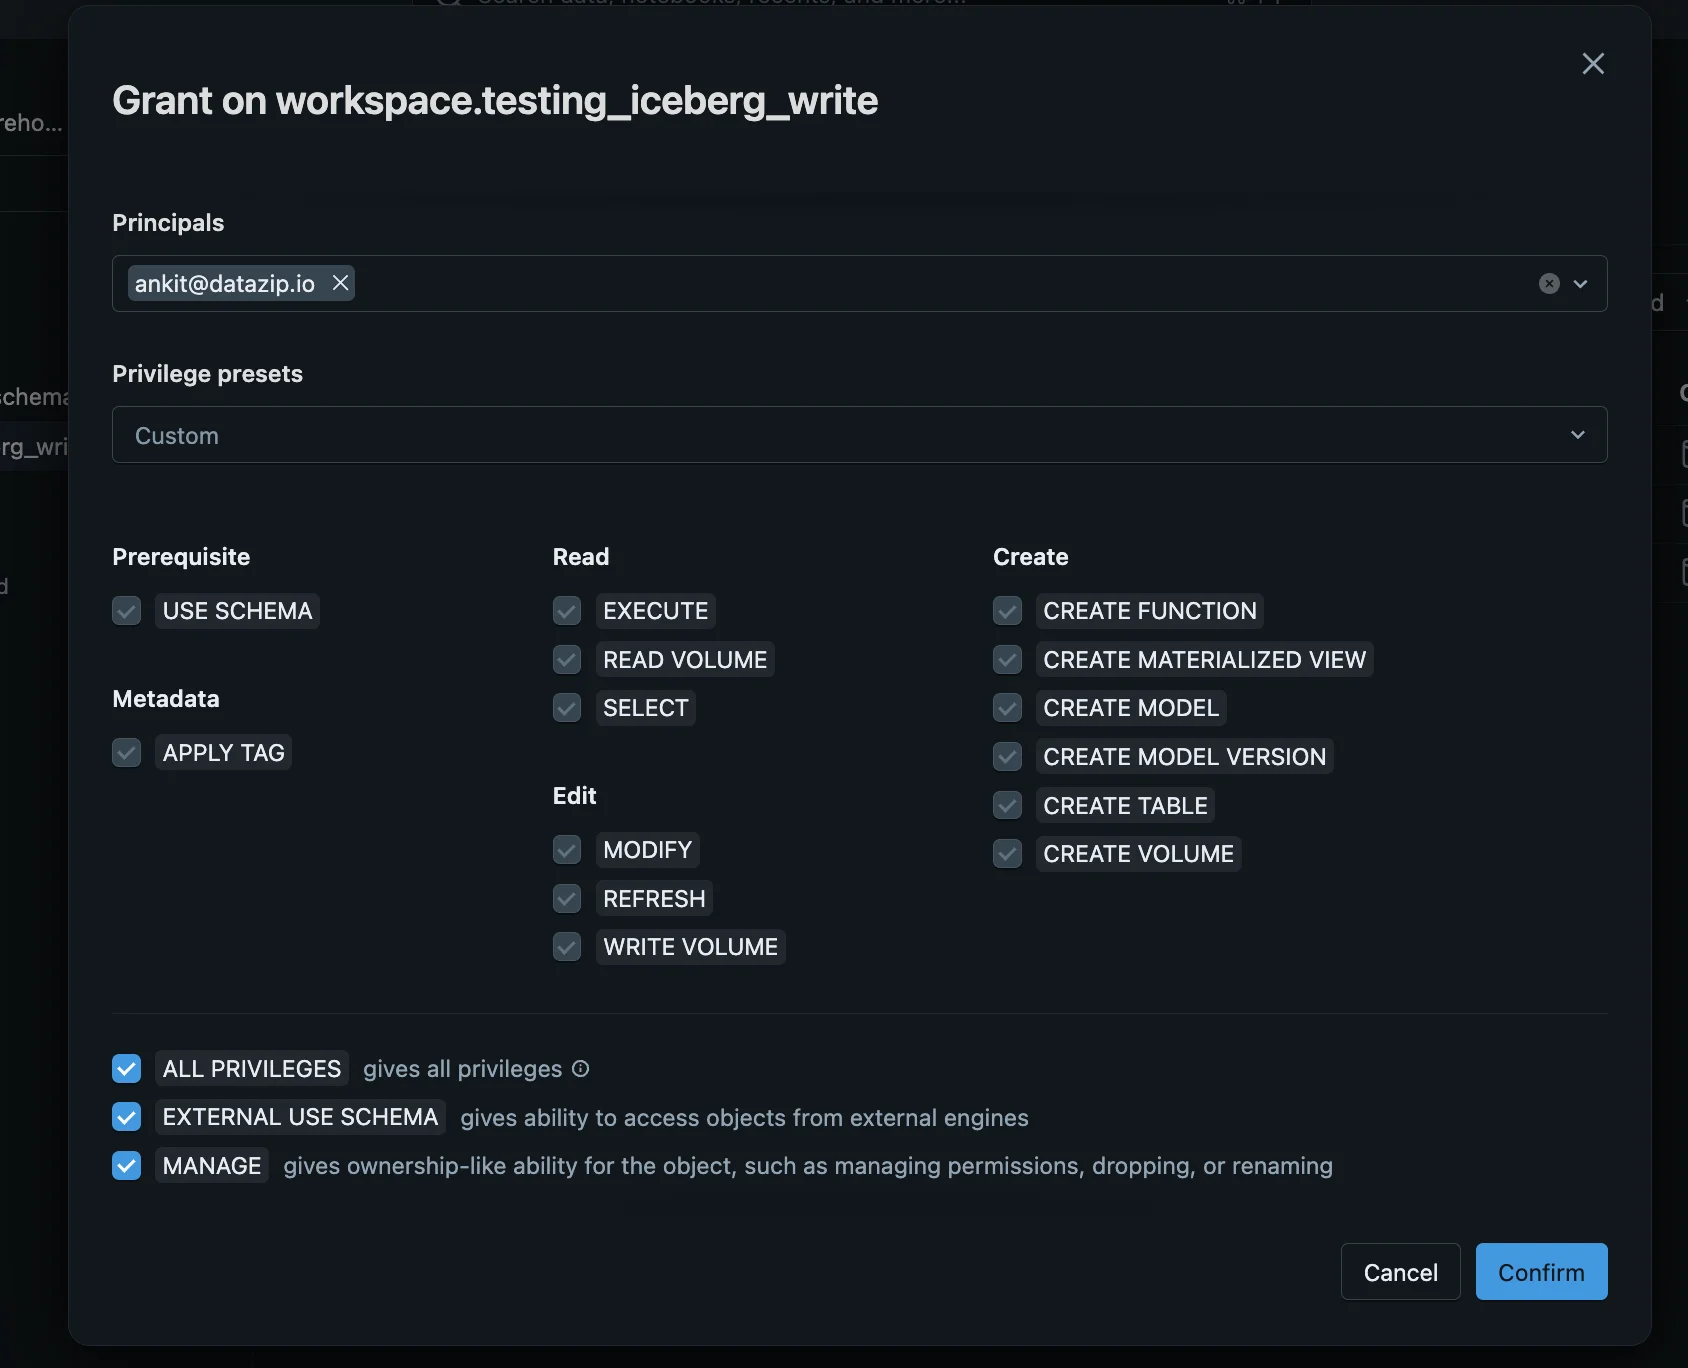
- After creation, go to Schema → Permissions
- Grant the following privileges to the new user created in Step 1:
ALL PRIVILEGESEXTERNAL USE SCHEMAMANAGE
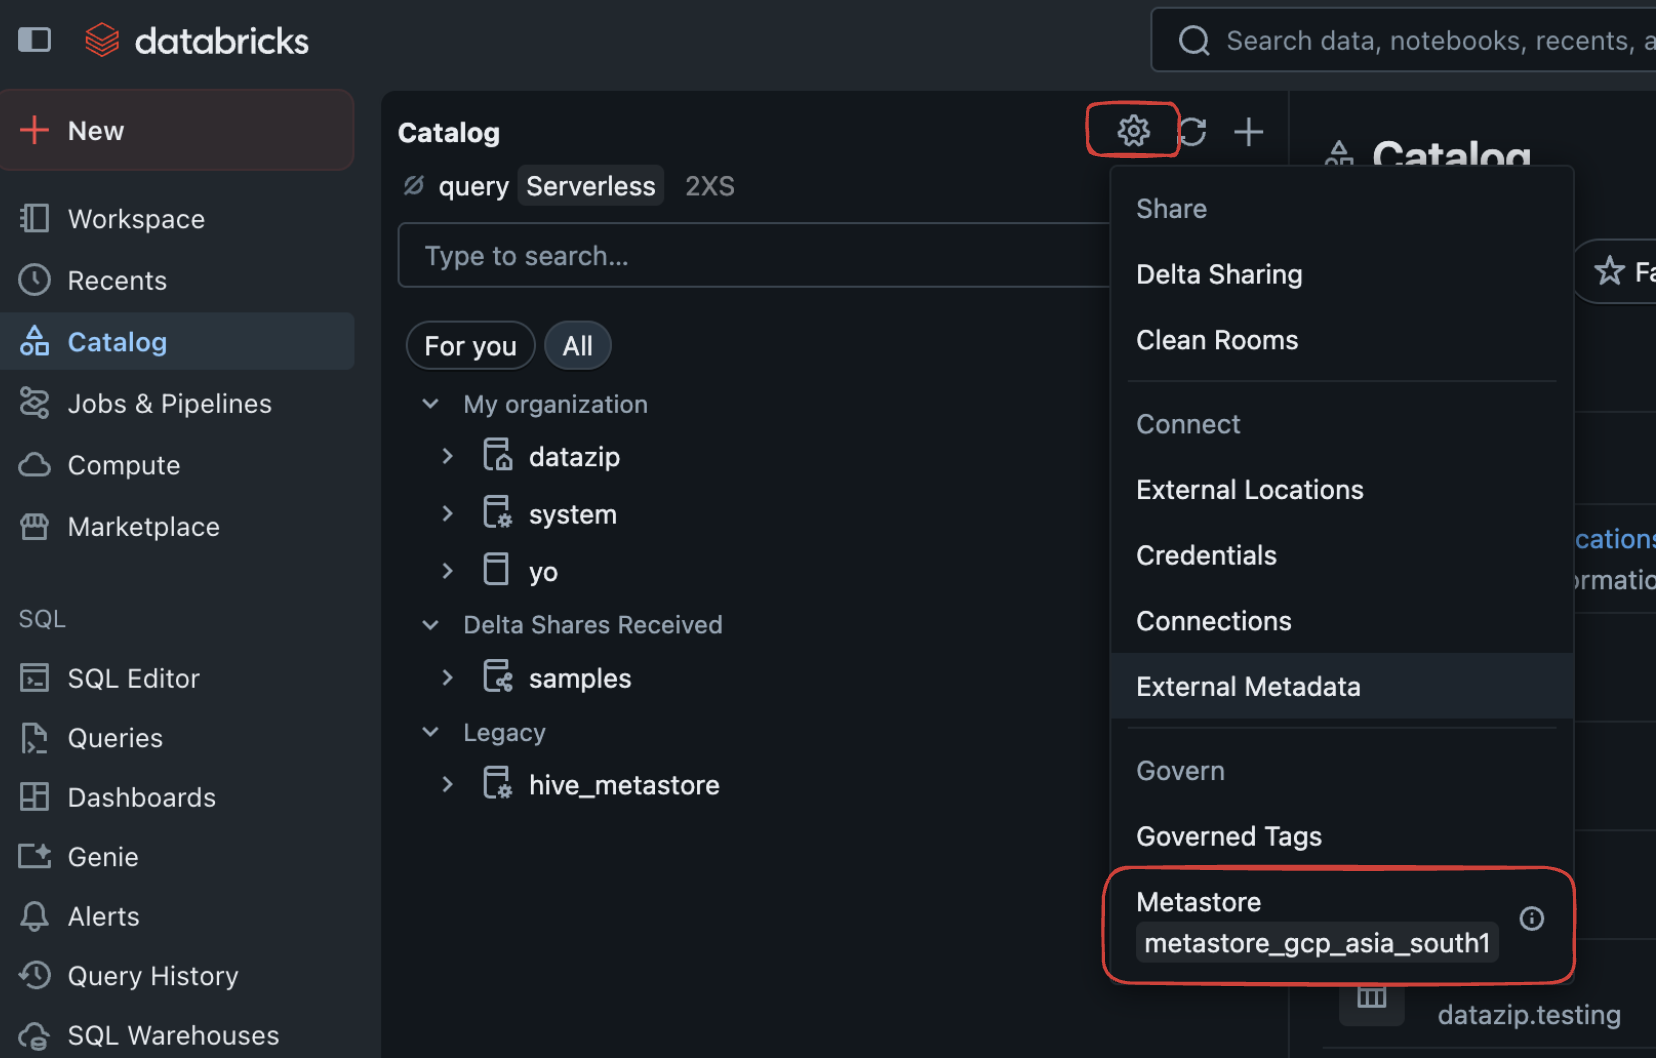
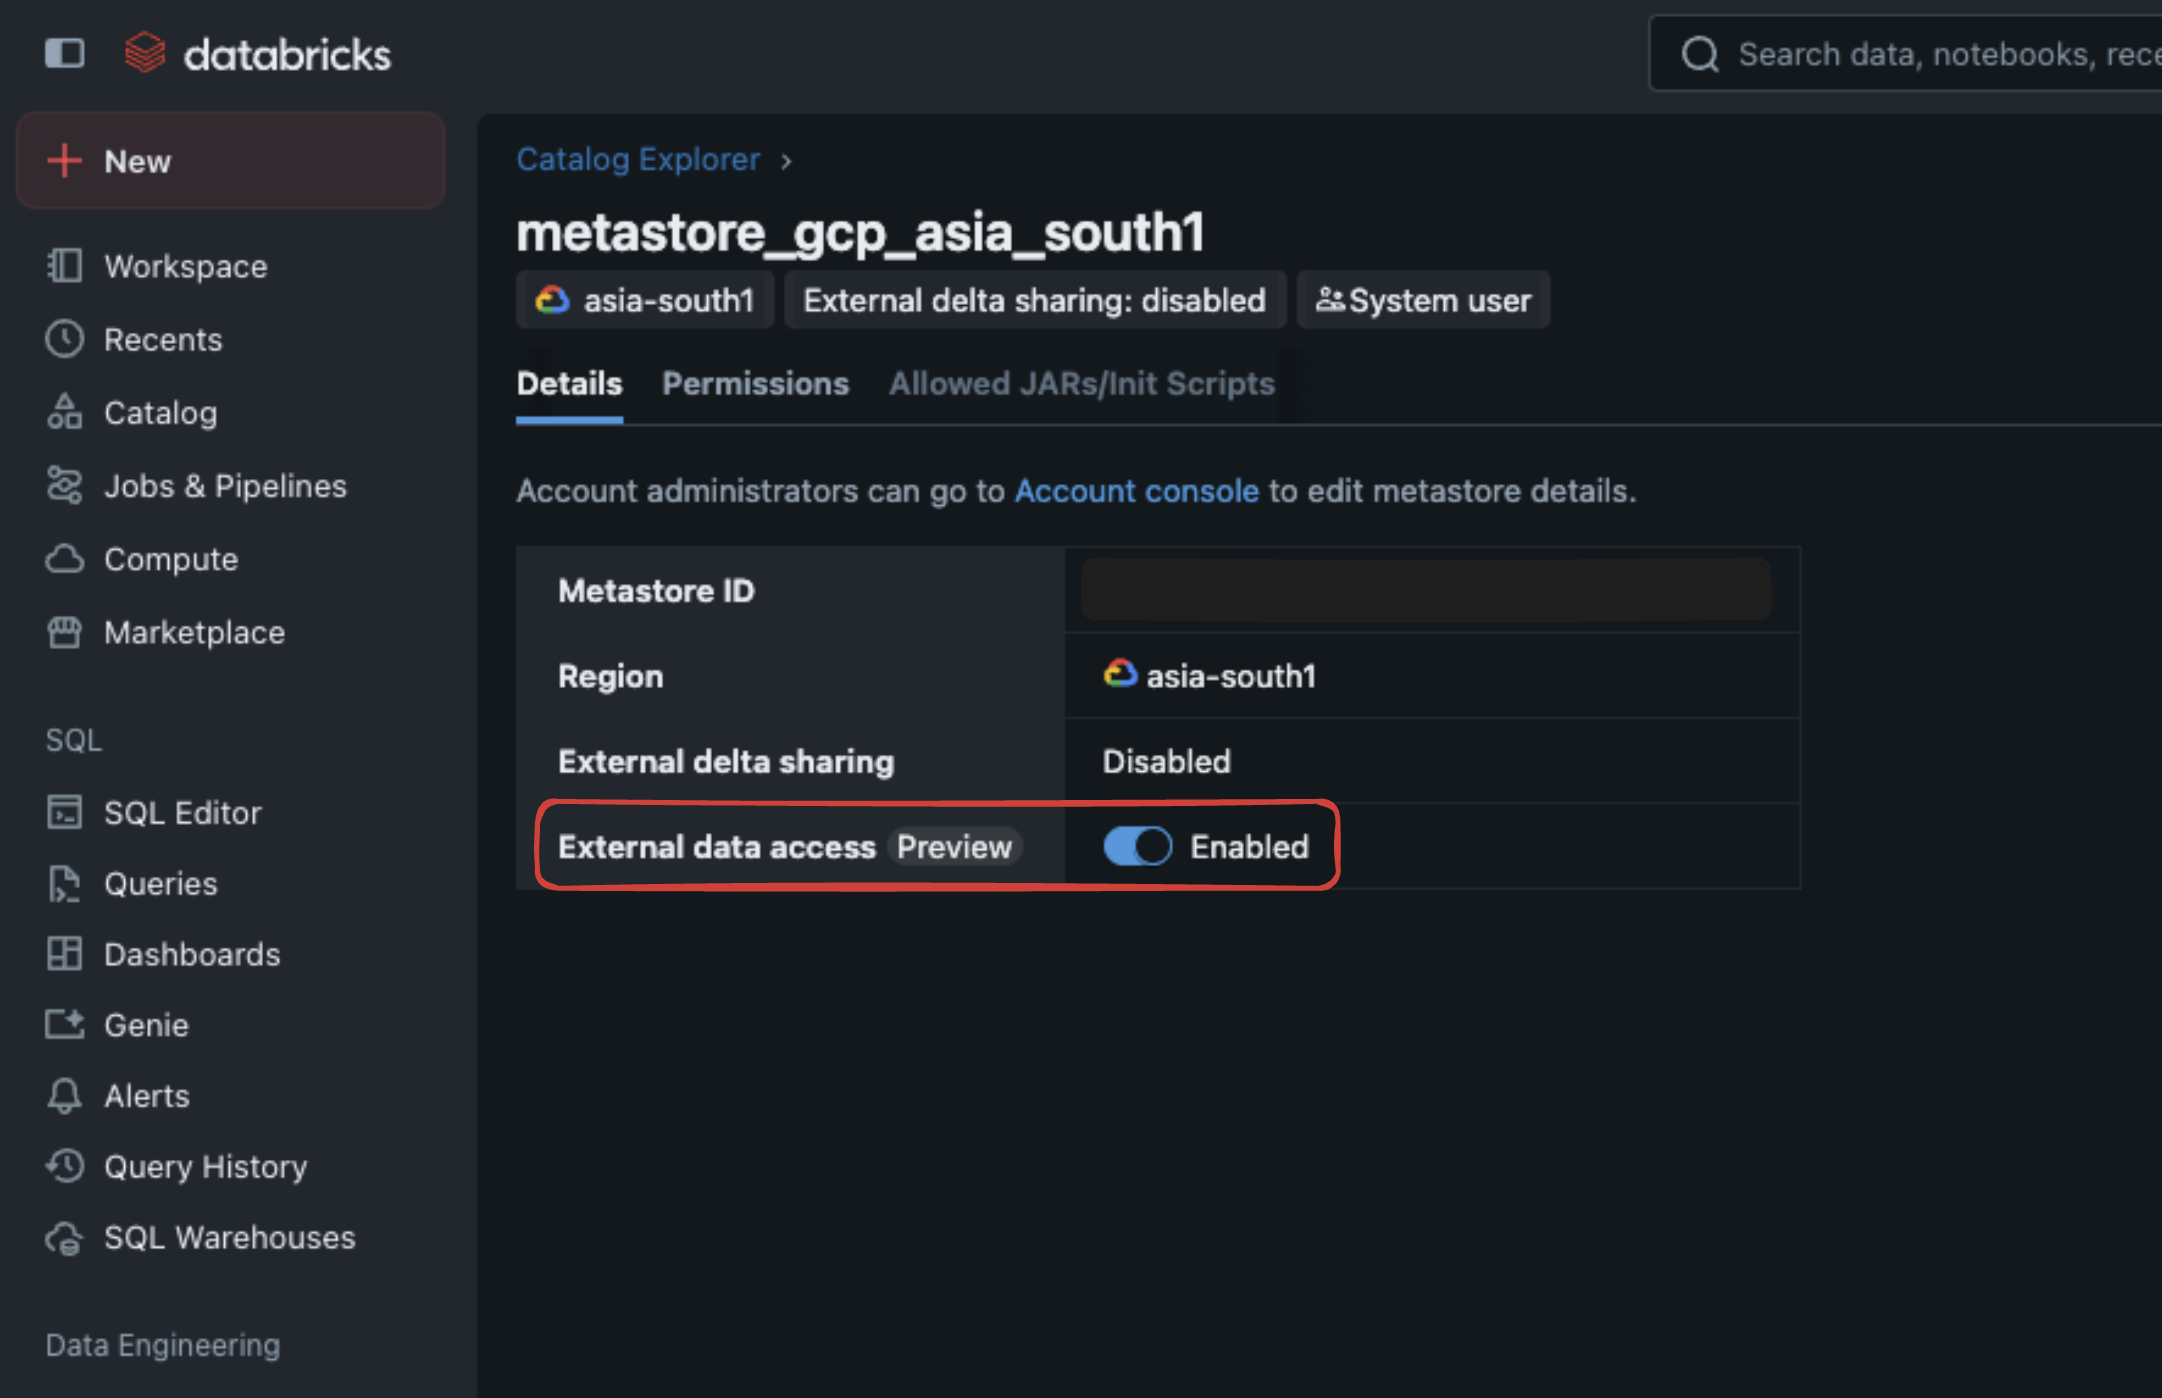
If you're not an administrator, contact your admin to enable external data access: Go to Catalog → Settings → Metastore
Enable External Data Access
⚠️ Enable Metastore External Data Access
Configuration
- OLake UI
- OLake CLI
Common Configuration Fields
| Parameter | Sample Value | Description |
|---|---|---|
| REST Catalog URL | https://adb-xxxx.databricks.com/api/2.1/unity-catalog/iceberg-rest | Databricks workspace URL with Unity Catalog REST API endpoint. Use your actual workspace URL. |
| Catalog Name | olake_iceberg | Name of the Unity Catalog |
| S3 Path | workspace | Name of the catalog in Unity Catalog (e.g., "workspace", "main"). This appears as iceberg_s3_path in JSON config. |
| Disable Identifier Field For Tables | true | Required because Unity Catalog does not support equality deletes |
| Enable Arrow Writes | false | Writes data and delete files using Apache Arrow based writer and registers them in Iceberg. |
For the catalog name, OLake only supports lowercase letters and underscores. Spaces and special characters are not supported.
Authentication
Unity Catalog supports two authentication methods:
✅ Token-Based Authentication (Recommended)
| Parameter | Sample Value | Description |
|---|---|---|
| Token | dapi123456789... | Databricks Personal Access Token |
OAuth2 Authentication (Alternative)
⚠️ OAuth2 may experience internal server errors.
| Parameter | Sample Value | Description |
|---|---|---|
| REST Auth Type | oauth2 | Set authentication type to OAuth2 |
| REST Auth URI | https://adb-xxxx.databricks.com/oidc/v1/token | OAuth2 server URI for your Databricks workspace |
| REST Credential | client_id:client_secret | Client ID and secret in format "id:secret" |
| REST Scope | sql offline_access | OAuth2 scopes (space-separated) |
JSON Configuration
Create a json for destination config (destination.json)
{
  "type": "ICEBERG",
  "writer": {
    "catalog_type": "rest",
    "catalog_name": "olake_iceberg",
    "rest_catalog_url": "https://<DATABRICK_WORKSPACE_URL>/api/2.1/unity-catalog/iceberg-rest",
    "iceberg_s3_path": "<CATALOG_NAME>",
    "token": "<DATABRICK_USER_PERSONAL_ACCESS_TOKEN>",
    "no_identifier_fields": true,
    "arrow_writes": false
  }
}
For the catalog name, OLake only supports lowercase letters and underscores. Spaces and special characters are not supported.
Configuration Key Details
Change the following placeholders in the above configuration with:
DATABRICK_WORKSPACE_URL-> Databricks workspace URL (URL that you use to access your Databricks console)CATALOG_NAME-> Catalog name (e.g., "workspace")NAMESPACE-> Namespace name inside catalog (e.g., "default")DATABRICK_USER_PERSONAL_ACCESS_TOKEN-> Go to Settings > Developer > Create Personal Access Tokenno_identifier_fields-> Set totrue(Required for environments that don't support equality delete-based updates, such as Databricks Unity managed Iceberg tables)arrow_writes-> Set tofalse
OAuth2 Authentication (Alternative - Currently Having Issues)
⚠️ Note: OAuth2 authentication is currently experiencing issues with internal server errors from Databricks during testing. Personal Access Token authentication is recommended until these issues are resolved.
You can attempt OAuth2 authentication by modifying the configuration:
{
  "type": "ICEBERG",
  "writer": {
    "catalog_type": "rest",
    "catalog_name": "olake_iceberg",
    "rest_catalog_url": "https://<DATABRICK_WORKSPACE_URL>/api/2.1/unity-catalog/iceberg-rest",
    "iceberg_s3_path": "<CATALOG_NAME>",
    "rest_auth_type": "oauth2",
    "oauth2_uri": "<OAUTH2_SERVER_URI>",
    "credential": "<CLIENT_ID>:<CLIENT_SECRET>",
    "scope": "<OAUTH2_SCOPES>",
    "no_identifier_fields": true,
    "arrow_writes": false
  }
}
Additional OAuth2 fields:
rest_auth_type-> Set to "oauth2"oauth2_uri-> OAuth2 server URI for your Databricks workspacecredential-> Client ID and secret in format "id:secret"scope-> OAuth2 scopes (space-separated)
Important Notes
- Unity Catalog Compatibility: Setting
Disable Identifier Field For Tablestotrueis crucial for Unity Catalog–managed Iceberg tables, as they do not support equality delete–based updates. - REST API: Unity Catalog uses Iceberg's REST catalog API for table operations
- Permissions: Ensure your user or service principal has appropriate permissions on the target catalog and schema
Troubleshooting
Common Issues
- Authentication Errors: Verify your Personal Access Token is valid and has the necessary permissions
- Catalog Not Found: Ensure the catalog name exists in your Unity Catalog
- Schema Permissions: Check that you have CREATE TABLE permissions on the target schema
- Network Access: Verify your OLake instance can reach the Databricks workspace URL
For more general guidance on Iceberg integration, refer to the Iceberg writer documentation.
Apache Polaris is an Iceberg REST catalog implementation that provides table management through a REST API. It supports OAuth2 authentication, fine-grained access control, and integrates with cloud object stores like AWS S3 for metadata and data storage
Prerequisites
Required services:
- EC2 Instance - To host your own Apache Polaris Catalog.
- Object store – e.g., AWS S3, MinIO, GCS, or any cloud-compatible storage for Iceberg table data and metadata.
- Polaris REST Service – Provides the Iceberg REST Catalog API with built-in OAuth2 authentication, authorization, and management features.
- Identity and access management (OAuth2) – Polaris uses OAuth2 to issue and validate tokens, supporting fine-grained role-based access control (RBAC).
- Metadata database (optional) – Polaris can use an internal backing database (e.g., PostgreSQL) for managing tokens and system metadata, handled internally.
Required permissions:
-
Object Store Permissions
Polaris requires read/write privileges on the target object storage buckets or prefixes where Iceberg data and metadata reside. -
IAM Role and Trust Policy
- For AWS S3, create an IAM role with permissions scoped to the Polaris bucket and assign a trust policy allowing Polaris service principals to assume the role.
- Include permissions like
s3:ListBucket,s3:GetObject,s3:PutObject, ands3:DeleteObject. Check Setup Guide for detailed instructions on IAM configuration.
-
OAuth2 Client and Service Principals
- Define Polaris service principals and OAuth2 clients with credentials (client ID and secret) that query engines and clients use to authenticate.
- Assign RBAC permissions to control access at the catalog, namespace, table, and column level.
Configuration
- OLake UI
- OLake CLI
Before setting up the destination, ensure the source has been successfully configured.
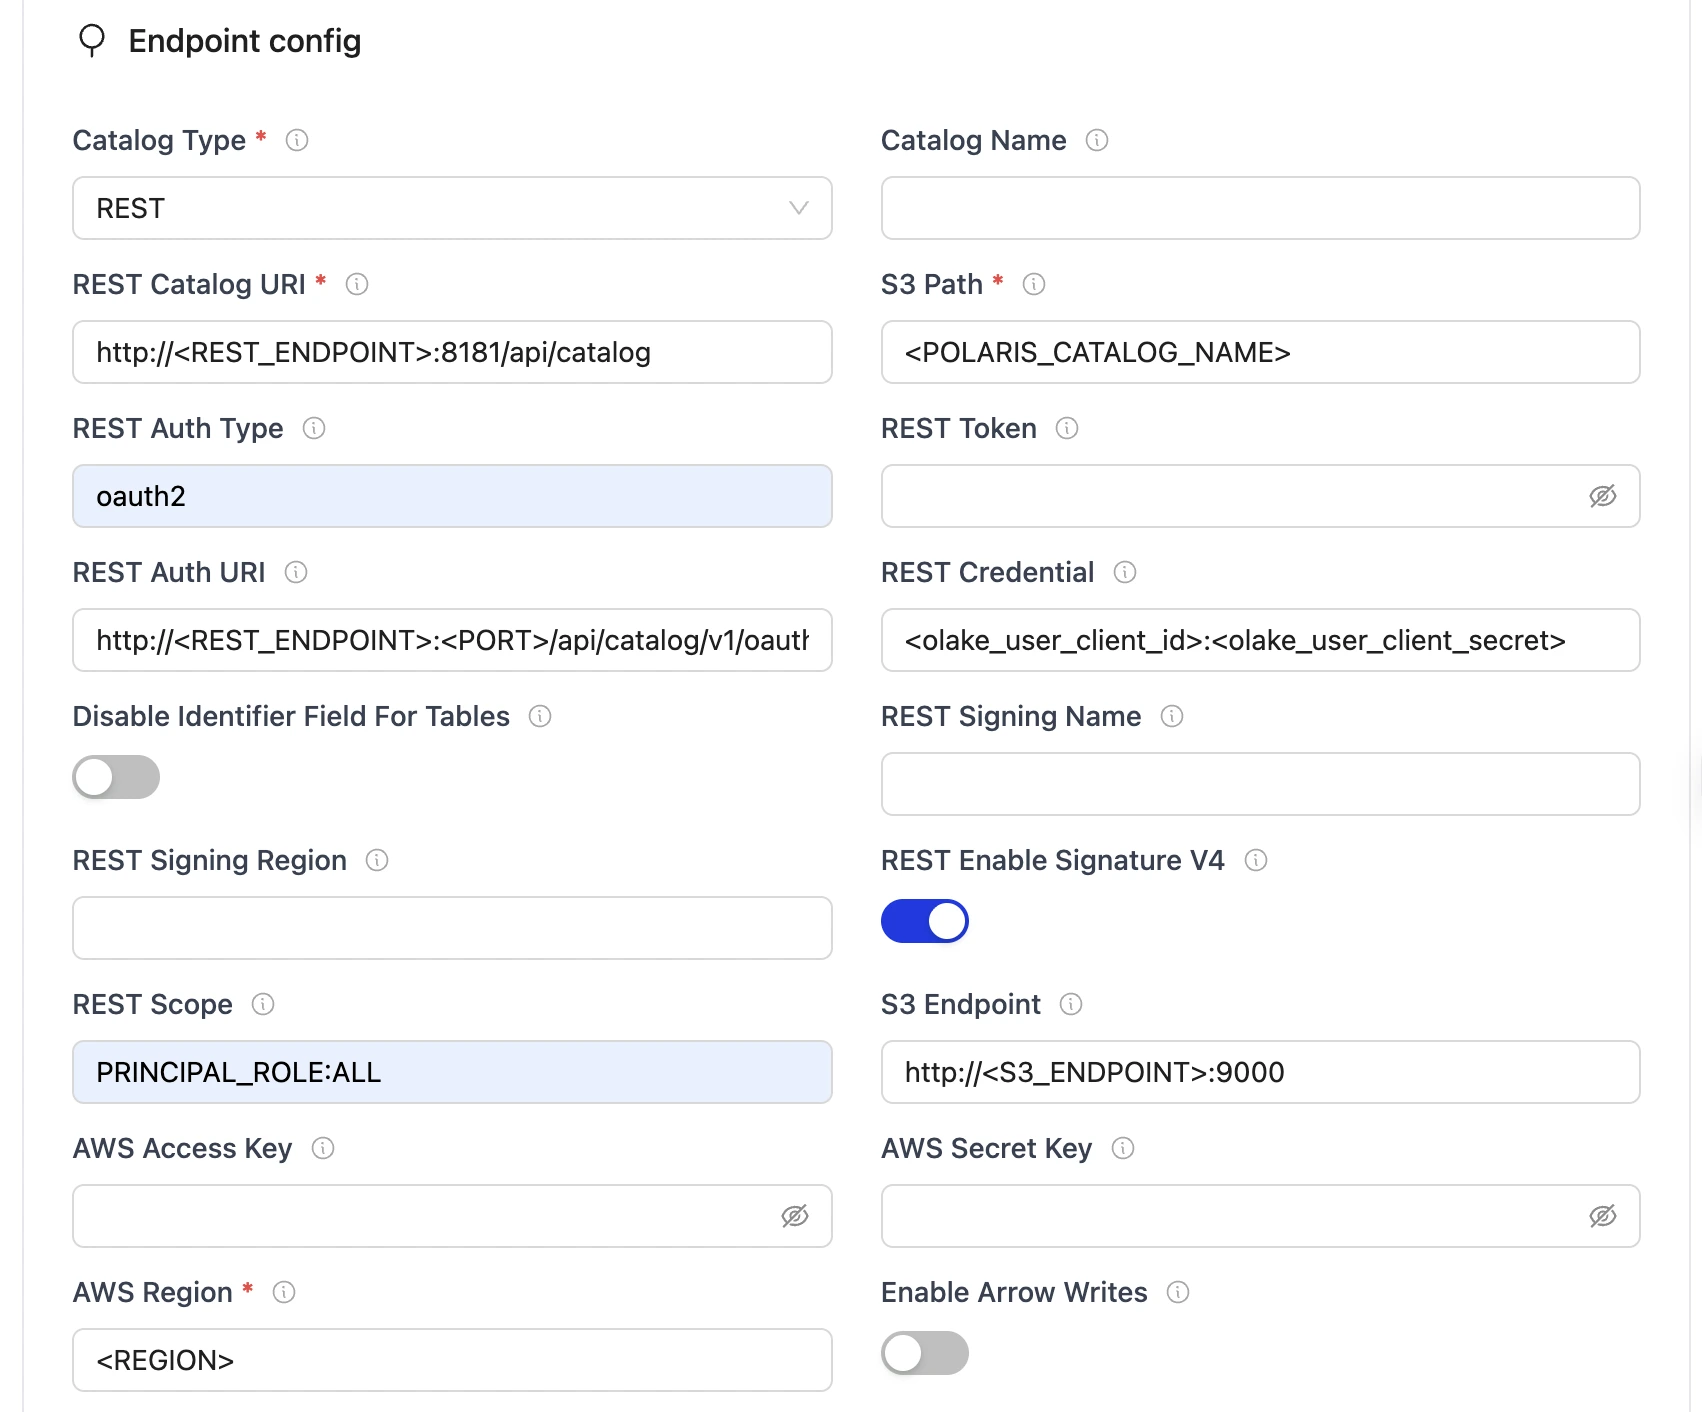
| Parameter | Sample Value | Description |
|---|---|---|
| Catalog Type | rest | Defines the catalog type used by the writer. |
| REST Catalog URL | http://<REST_ENDPOINT>:8181/api/catalog | Endpoint URL for the Polaris REST catalog service. |
| Catalog Name | olake_iceberg | Enter a name for your catalog. |
| Iceberg S3 Path | <POLARIS_CATALOG_NAME> | Name of the Polaris catalog. |
| REST Auth Type | oauth2 | Type of authentication (e.g., "oauth2"). |
| REST Auth URI | http://<REST_ENDPOINT>:8181/api/catalog/v1/oauth/tokens | OAuth2 server URI for authentication. |
| REST Credential | <olake_user_client_id>:<olake_user_client_secret> | OAuth2 client ID and secret, formatted as client_id:client_secret. |
| REST Scope | PRINCIPAL_ROLE:ALL | OAuth2 scopes (space-separated). |
| AWS Region | <S3_REGION> | AWS region associated with the S3 bucket. |
| Enable Arrow Writes | false | Writes data and delete files using Apache Arrow based writer and registers them in Iceberg. |
For the catalog name, OLake only supports lowercase letters and underscores. Spaces and special characters are not supported.
After the destination has been successfully configured: Configure the streams
To connect to Iceberg using Polaris as the catalog, create destination.json with the following configuration
{
    "type": "ICEBERG",
    "writer": {
      "catalog_type": "rest",
      "rest_catalog_url": "http://<REST_ENDPOINT>:8181/api/catalog",
      "catalog_name": "olake_iceberg",
      "iceberg_s3_path": "<POLARIS_CATALOG_NAME>",
      "rest_auth_type": "oauth2",
      "oauth2_uri": "http://<REST_ENDPOINT>:8181/api/catalog/v1/oauth/tokens",
      "credential": "<olake_user_client_id>:<olake_user_client_secret>",
      "scope": "PRINCIPAL_ROLE:ALL",
      "aws_region": "<S3_REGION>",
      "arrow_writes": false
    }
}
Configuration Parameters
| Parameter | Sample Value | Description |
|---|---|---|
| catalog_type | rest | Defines the catalog type used by the writer. "rest" means the writer interacts with a RESTful catalog service. |
| rest_catalog_url | http://<REST_ENDPOINT>:8181/api/catalog | Specifies the endpoint URL for the Polaris REST catalog service that the writer will connect to. |
| catalog_name | olake_iceberg | Enter a name for your catalog. |
| iceberg_s3_path | <POLARIS_CATALOG_NAME> | Name of the Polaris catalog. |
| rest_auth_type | oauth2 | Authentication type for Polaris REST catalog service. |
| oauth2_uri | http://<REST_ENDPOINT>:8181/api/catalog/v1/oauth/tokens | OAuth2 server URI for Polaris authentication. |
| credential | <olake_user_client_id>:<olake_user_client_secret> | OAuth2 client ID and secret, formatted as client_id:client_secret. |
| scope | PRINCIPAL_ROLE:ALL | OAuth2 scopes for Polaris authentication. |
| aws_region | <AWS_REGION> | Specifies the AWS region associated with the S3 bucket where the data is stored. |
| arrow_writes | false | Writes data and delete files using Apache Arrow based writer and registers them in Iceberg. |
For the catalog name, OLake only supports lowercase letters and underscores. Spaces and special characters are not supported.
After the destination has been successfully configured: Run the Discover command
Setup Steps:
- Save the following as
docker-compose.yml:
services:
  polaris:
    image: apache/polaris:1.1.0-incubating
    container_name: polaris
    ports:
      - "8181:8181"
    networks:
      - polaris-network

networks:
  polaris-network:
    driver: bridge
- Start the services:
docker-compose up -d
- Get Polaris root credentials from logs:
docker logs polaris | grep --text "root principal credentials"
Look for a line similar to:
realm: default-realm root principal credentials: bd0b5cde9ffb3966:9c377f72a27ba22c47e26cd53423fa96
In case, you cannot find it, run docker logs polaris to check for the credentials.
Extract the credentials:
- Client ID:
bd0b5cde9ffb3966 - Client Secret:
9c377f72a27ba22c47e26cd53423fa96
- Get bearer token for API requests (replace
<client_id>and<client_secret>with the root credential):
curl -i -X POST \
  http://localhost:8181/api/catalog/v1/oauth/tokens \
  -d 'grant_type=client_credentials&client_id=<client_id>&client_secret=<client_secret>&scope=PRINCIPAL_ROLE:ALL'
-
Setup an AWS S3 bucket.
-
Create an AWS IAM Role with the following policy attached:
S3 Access Policy:
{
    "Version": "2012-10-17",
    "Statement": [
        {
            "Effect": "Allow",
            "Action": [
                "s3:GetObject",
                "s3:PutObject",
                "s3:DeleteObject",
                "s3:ListBucket"
            ],
            "Resource": [
                "arn:aws:s3:::your-bucket-name",
                "arn:aws:s3:::your-bucket-name/*"
            ]
        }
    ]
}
For detailed instructions on creating and attaching the IAM role to your EC2 instance, refer to the IAM setup guide.
The IAM role ARN will be in the format:
arn:aws:iam::############:role/polaris-lakehouse-role
Copy this ARN as it will be needed in the next step.
When setting up OLake, ensure OLake runs on an instance with the same AWS IAM Role and Region configured as used for Polaris.
- Create catalog (replace
<bearer_token>with token received in previous steps,your-bucket-namewith the S3 bucket name, and<your-iam-role-arn>with the ARN from step 6):
curl -i -X POST http://localhost:8181/api/management/v1/catalogs \
  -H "Authorization: Bearer <bearer_token>" \
  -H 'Accept: application/json' \
  -H 'Content-Type: application/json' \
  -d '{
    "name": "olake_catalog",
    "type": "INTERNAL",
    "properties": {
      "default-base-location": "s3://your-bucket-name"
    },
    "storageConfigInfo": {
      "storageType": "S3",
      "roleArn": "<your-iam-role-arn>",
      "allowedLocations": ["s3://your-bucket-name"]
    }
  }'
- Create user and assign roles (replace
<bearer_token>with your bearer token). The create user command's response includes the new user's client credentials.
# Create user (output includes client_id and client_secret, note them required in olake configuration)
curl -i -X POST "http://localhost:8181/api/management/v1/principals" \
  -H "Authorization: Bearer <bearer_token>" \
  -H "Content-Type: application/json" \
  -d '{"name": "olake_user", "type": "user"}'

# Create principal role
curl -i -X POST "http://localhost:8181/api/management/v1/principal-roles" \
  -H "Authorization: Bearer <bearer_token>" \
  -H "Content-Type: application/json" \
  -d '{"principalRole": {"name": "olake_user_role"}}'

# Assign role to user
curl -i -X PUT "http://localhost:8181/api/management/v1/principals/olake_user/principal-roles" \
  -H "Authorization: Bearer <bearer_token>" \
  -H "Content-Type: application/json" \
  -d '{"principalRole": {"name": "olake_user_role"}}'

# Create catalog role
curl -i -X POST "http://localhost:8181/api/management/v1/catalogs/olake_catalog/catalog-roles" \
  -H "Authorization: Bearer <bearer_token>" \
  -H "Content-Type: application/json" \
  -d '{"catalogRole": {"name": "olake_catalog_role"}}'

# Assign catalog role to principal role
curl -i -X PUT "http://localhost:8181/api/management/v1/principal-roles/olake_user_role/catalog-roles/olake_catalog" \
  -H "Authorization: Bearer <bearer_token>" \
  -H "Content-Type: application/json" \
  -d '{"catalogRole": {"name": "olake_catalog_role"}}'

# Grant privileges
curl -i -X PUT "http://localhost:8181/api/management/v1/catalogs/olake_catalog/catalog-roles/olake_catalog_role/grants" \
  -H "Authorization: Bearer <bearer_token>" \
  -H "Content-Type: application/json" \
  -d '{"grant": {"type": "catalog", "privilege": "CATALOG_MANAGE_CONTENT"}}'
All services involved in the sync process — including the OLake source image, Polaris, and any other dependencies — must be part of the same Docker network or accessible via network configuration.
While setting up REST Catalog URI for Polaris, in any case, if either localhost or host.docker.internal do not work in place of hostname, you can pass the machine IP where Polaris is hosted.
Important Notes:
- The
olake_usercredentials (not root credentials) must be used for the final OLake configuration. - The IAM role ARN is required for S3 access permissions.
- The AWS region must match across all configurations.
When accessing the Polaris REST Catalog from outside the EC2 instance, the EC2 instance's public IP address or domain name must be used instead of localhost
Example External Configuration:
{
  "rest_catalog_url": "https://polaris.olake.io/api/catalog",
  "oauth2_uri": "https://polaris.olake.io/api/catalog/v1/oauth/tokens"
}
Troubleshooting
-
Invalid OAuth2 credentials (401 Unauthorized)
- Cause: Incorrect or expired OAuth2 client credentials
- Fix:
- Verify that client_id, client_secret, scope, and token endpoint match your Polaris configuration.
- Refresh tokens if expired
-
Permission Denied on S3 Bucket
- Cause: Missing or incorrect IAM permissions.
- Fix:
- Ensure the IAM Role ARN configured for Polaris has the following permissions on your bucket:
s3:GetObjects3:PutObjects3:DeleteObjects3:ListBucket
- Confirm the bucket name matches exactly, including letter case.
- If using prefixes, check that your role has access to the correct path (e.g., mybucket/tenant-prefix/*)
- Ensure the IAM Role ARN configured for Polaris has the following permissions on your bucket:
-
Connection Errors to Polaris REST API
- Cause: The REST service is not reachable
- Fix:
- Confirm that the Polaris REST service is running and accessible on the correct port (default is
8181). - Ensure the service is reachable from your OLake environment; verify Docker network connectivity or firewall rules if self-hosted.
- If TLS is enabled, check that certificates are trusted and correctly configured
- Confirm that the Polaris REST service is running and accessible on the correct port (default is