Step-by-Step Guide - Replicating PostgreSQL to Iceberg with OLake & AWS Glue

1. Introduction
Ever wanted to run analytics on your Postgres data without overloading your production database or blowing your budget? Replicating PostgreSQL to Apache Iceberg is quickly emerging as the go-to solution for savvy tech teams.
Iceberg isn’t your average table format—it's built for large-scale, cost-effective analytics. With native support for ACID transactions, seamless schema evolution, and compatibility with engines like Trino, Spark, and DuckDB, it’s tailor-made for modern data lakehouses.
That said, setting up Postgres-to-Iceberg replication isn’t without its challenges. You have to deal with change data capture (CDC), manage evolving schemas, ensure consistency, and fine-tune performance.
In this blog, we’ll dive into:
- The rising traction of Postgres-to-Iceberg replication
- Common pitfalls and strategies to avoid them
- A step-by-step guide using OLake for a smooth setup
Whether you’re exploring replication, building a data lakehouse, or optimizing analytics at scale, this guide has you covered.
2. Why Replicate Postgres to Iceberg?
Replicating PostgreSQL to Apache Iceberg unlocks scalable, real-time analytics while streamlining costs and complexity. Here’s why it’s so appealing:
-
Analytics & BI: Run efficient, cost-effective queries on live operational data without burdening your production Postgres.
-
Real-Time Reporting: Keep dashboards and reports fresh with near real-time syncs.
-
Data Lakehouse Architecture: Embrace open, cloud-agnostic formats like Iceberg to future-proof your data stack.
Traditional CDC pipelines feeding cloud data warehouses can be clunky, expensive, and rigid when it comes to schema changes. With Postgres-to-Iceberg replication, you can decouple storage from compute:
- Pick the best compute engine for your needs (Trino, Spark, DuckDB, etc.)
- Store your data once and access it anywhere
- Sidestep vendor lock-in and trim down warehouse expenses
If you’re after a modern, flexible alternative to rigid warehouse pipelines, this replication strategy is a smart move toward an open, efficient data platform.
3. Key Challenges in Postgres to Iceberg Replication
While the benefits are clear, achieving reliable Postgres-to-Iceberg replication comes with its own set of hurdles:
-
Change Data Capture (CDC): Real-time vs. batch replication affects data freshness and infrastructure complexity. Real-time offers low latency at the cost of added complexity, whereas batch replication might simplify management but lag behind on updates.
-
Schema Evolution: PostgreSQL’s flexible data types can clash with Iceberg’s stricter type system. Careful mapping and backward compatibility are crucial.
-
Performance and Cost: Frequent, small writes—especially with real-time CDC—can lead to metadata bloat and higher storage costs. Optimizing compaction and write strategies is essential.
-
Consistency and Ordering: Getting a reliable pipeline, especially during the initial full load, is a challenge. Missing or duplicate events can compromise data quality. Tools like OLake that offer at-least-once delivery guarantees help ensure reliability, while deduplication and idempotent writes are must-have safeguards.
-
Metadata Management & Partitioning: Iceberg relies on robust metadata for fast queries. Poor partitioning, missing statistics, or lack of proper compaction can degrade performance and ramp up costs.
Overcoming these challenges isn’t just about setting up connectors—it’s about building a pipeline that’s smart, resilient, and in tune with the nuances of your underlying storage engine.
Step By Step Guide
Prerequisites:
- Docker, Postgres, AWS S3 credentials, Apache Iceberg and Catalog configuration credentials
For this guide we will be using AWS Glue catalog for Apache Iceberg and S3 as the object store.
Step 1: Setting up Postgres and Enable Logical Replication
Before OLake can start replicating data from PostgreSQL to Apache Iceberg, you need to configure the database for logical replication. Here’s how to do it using simple SQL commands.
✅ Prerequisites
- PostgreSQL 10 or higher (pgoutput is native from v10+)
- Superuser or a role with replication privileges
Enable Logical Replication Settings via SQL
Instead of modifying postgresql.conf, use SQL commands to apply runtime settings (if your Postgres setup allows it):
-- Enable logical WAL level
ALTER SYSTEM SET wal_level = 'logical';

-- Set max replication slots and senders
ALTER SYSTEM SET max_replication_slots = 4;
ALTER SYSTEM SET max_wal_senders = 4;

-- Apply the changes
SELECT pg_reload_conf();
Some cloud-hosted databases (like RDS or Cloud SQL) require you to modify these settings via the provider’s console or parameter groups.
🔓 Grant Replication Permissions
If you are using separate role for OLake with name “olake_user”, ensure this user has the required privileges:
ALTER ROLE olake_user WITH REPLICATION;
Or you can use any other Superuser or role with Replication permissions.
🎯 Create a Publication and a Logical Replication Slot
OLake reads changes via a logical replication slot (pgoutput) and requires a publication to define which tables to replicate:
CREATE PUBLICATION olake_publication FOR ALL TABLES WITH (publish = 'insert,update,delete,truncate');
SELECT * FROM pg_create_logical_replication_slot('olake_slot', 'pgoutput');
This starts tracking changes from the current WAL position. Ensure the publication name matches your OLake source.json.
Step 2: Set Up the OLake Configuration Directory
Next, you’ll set up a working directory for OLake to manage your replication config. This directory will contain all the necessary files to connect to your Postgres database and define your target Iceberg destination.
Create the OLake Working Directory
In your terminal, run:
mkdir olake_directory
cd olake_directory

touch destination.json
touch source.json
This creates a folder to house OLake’s configuration files:
olake_directory/
├─ destination.json     # Destination settings (e.g., local filesystem, S3)
└─ source.json     # Source database connection config (e.g., Postgres)
What Each File Does
-
destination.json– Defines where OLake will write the replicated data (e.g., a local Iceberg table or a cloud storage path like S3). -
source.json– Contains your source database connection details, including the replication slot name and user credentials.
We’ll populate these files in the next steps. For now, you’re all set to proceed!
Step 3: Configure Connection and Destination Settings
Now that your olake_directory is ready, let’s configure the two essential files OLake uses: source.json and destination.json.
🔌 source.json – Define Your Postgres Source
This file contains the connection settings to your PostgreSQL database, along with table-level CDC configurations.
Here’s a sample source.json:
{
    "host": "localhost",
    "port": 5432,
    "database": "main",
    "username": "main",
    "password": "password",
    "jdbc_url_params": {"connectTimeout":"20"},
    "retry_count": 3,
    "schemas": ["public", "analytics"],
    "ssl": {
        "mode": "disable"
    },
    "update_method": {
        "replication_slot": "postgres_slot",
        "publication": "postgres_pub",
        "initial_wait_time": 120
    },
    "max_threads": 5,
    "ssh_config": {
        "host": "my-tunnel-host",
        "port": 22,
        "username": "my-tunnel-user",
        "password": "tunnel-password"
    }
}
Refer the following document for detailed understanding: Postgres Config.
📤 destination.json – Define Your Iceberg Output
This file tells OLake where to write the data—whether locally or to a remote object store like S3.
Example destination.json for writing in Glue
{
    "type": "ICEBERG",
    "writer": {
      "catalog_type": "glue",
      "catalog_name": "olake_iceberg",
      "iceberg_s3_path": "s3://<BUCKET_NAME>/",
      "aws_region": "<AWS_REGION>",
      "aws_access_key": "XXX",
      "aws_secret_key": "XXX",
      "arrow_writes": false
    }
}
Refer the following document for detailed understanding: Glue Config
In this guide we are using Glue catalog to configure other catalogs like Rest (Lakekeeper, Polaris and more) you can check out the following documentations: Catalogs config
Disable the normalisation in destination.json to get the entire row stored as json in destination.
Step 4: Discover Source Tables and Generate the Catalog
With your source.json and destination.json ready, the next step is to run OLake’s discovery process. This generates a streams.json file that tells OLake how to map your source tables (from Postgres) into Iceberg-compatible datasets.
🧠 What is streams.json?
It’s an auto-generated file that:
- Scans your configured Postgres tables
- Extracts column metadata and types
- Prepares the mapping needed for Iceberg ingestion
▶️ Run the Discovery Command
Run from the same directory which we set up in step 2. ie olake_directory
- macOS / Linux
- CMD
- Powershell
docker run --pull=always  \
  -v "$HOME/PATH_TO_OLAKE_DIRECTORY:/mnt/config" \
  olakego/source-postgres:latest \
  discover \
  --config /mnt/config/source.json
docker run --pull=always  ^
  -v "%USERPROFILE%\PATH_TO_OLAKE_DIRECTORY:/mnt/config" ^
  olakego/source-postgres:latest ^
  discover ^
  --config /mnt/config/source.json
docker run --pull=always  `
  -v "$env:USERPROFILE\PATH_TO_OLAKE_DIRECTORY:/mnt/config" `
  olakego/source-postgres:latest `
  discover `
  --config /mnt/config/source.json
Once you run this discovery command you will find a file named streams.json in the OLake directory. This file has following 2 sections:
selected_streams: The streams / tables / collections OLake will replicate. You can Exclude Stream collections by editing selected_streams directly and removing the streams you want to remove from this file. This also has section to define the partition regex where you can define how you want to partition the selected stream.streams: Metadata for each discovered collection, including schemas and sync modes (e.g.,cdc,full_refresh).
Step 5: Run Your First Full Load Sync
With the streams.json in place, it’s time to run your first sync. This will perform a full load of the source tables from Postgres into your Iceberg destination.
🚀 Run the Full Load
From within your olake_directory, execute:
- macOS / Linux
- CMD
- Powershell
docker run --pull=always  \
  -v "$HOME/PATH_TO_OLAKE_DIRECTORY:/mnt/config" \
  olakego/source-postgres:latest \
  sync \
  --config /mnt/config/source.json \
  --catalog /mnt/config/streams.json \
  --destination /mnt/config/destination.json
docker run --pull=always  ^
  -v "%USERPROFILE%\PATH_TO_OLAKE_DIRECTORY:/mnt/config" ^
  olakego/source-postgres:latest ^
  sync ^
  --config /mnt/config/source.json ^
  --catalog /mnt/config/streams.json ^
  --destination /mnt/config/destination.json
docker run --pull=always  `
  -v "$env:USERPROFILE\PATH_TO_OLAKE_DIRECTORY:/mnt/config" `
  olakego/source-postgres:latest `
  sync `
  --config /mnt/config/source.json `
  --catalog /mnt/config/streams.json `
  --destination /mnt/config/destination.json
This command will:
- Read from your configured source tables
- Load the entire data (snapshot) into Iceberg
- Create a
state.jsonfile that tracks replication progress
What Is state.json?
This file acts as a CDC cursor, storing the latest replication slot position for each table. On subsequent runs, OLake will:
- Skip already-synced data
- Fetch only the new changes (incremental CDC)
- Ensure data is not reloaded or duplicated
📁 Folder After First Sync
olake_directory/
├─ source.json
├─ destination.json
├─ streams.json
└─ state.json
# checkpoint for incremental syncs
Ordering during this initial full load is not guaranteed. If ordering is important for your use case, consider handling it during downstream consumption.
A preview of database created in S3 bucket:
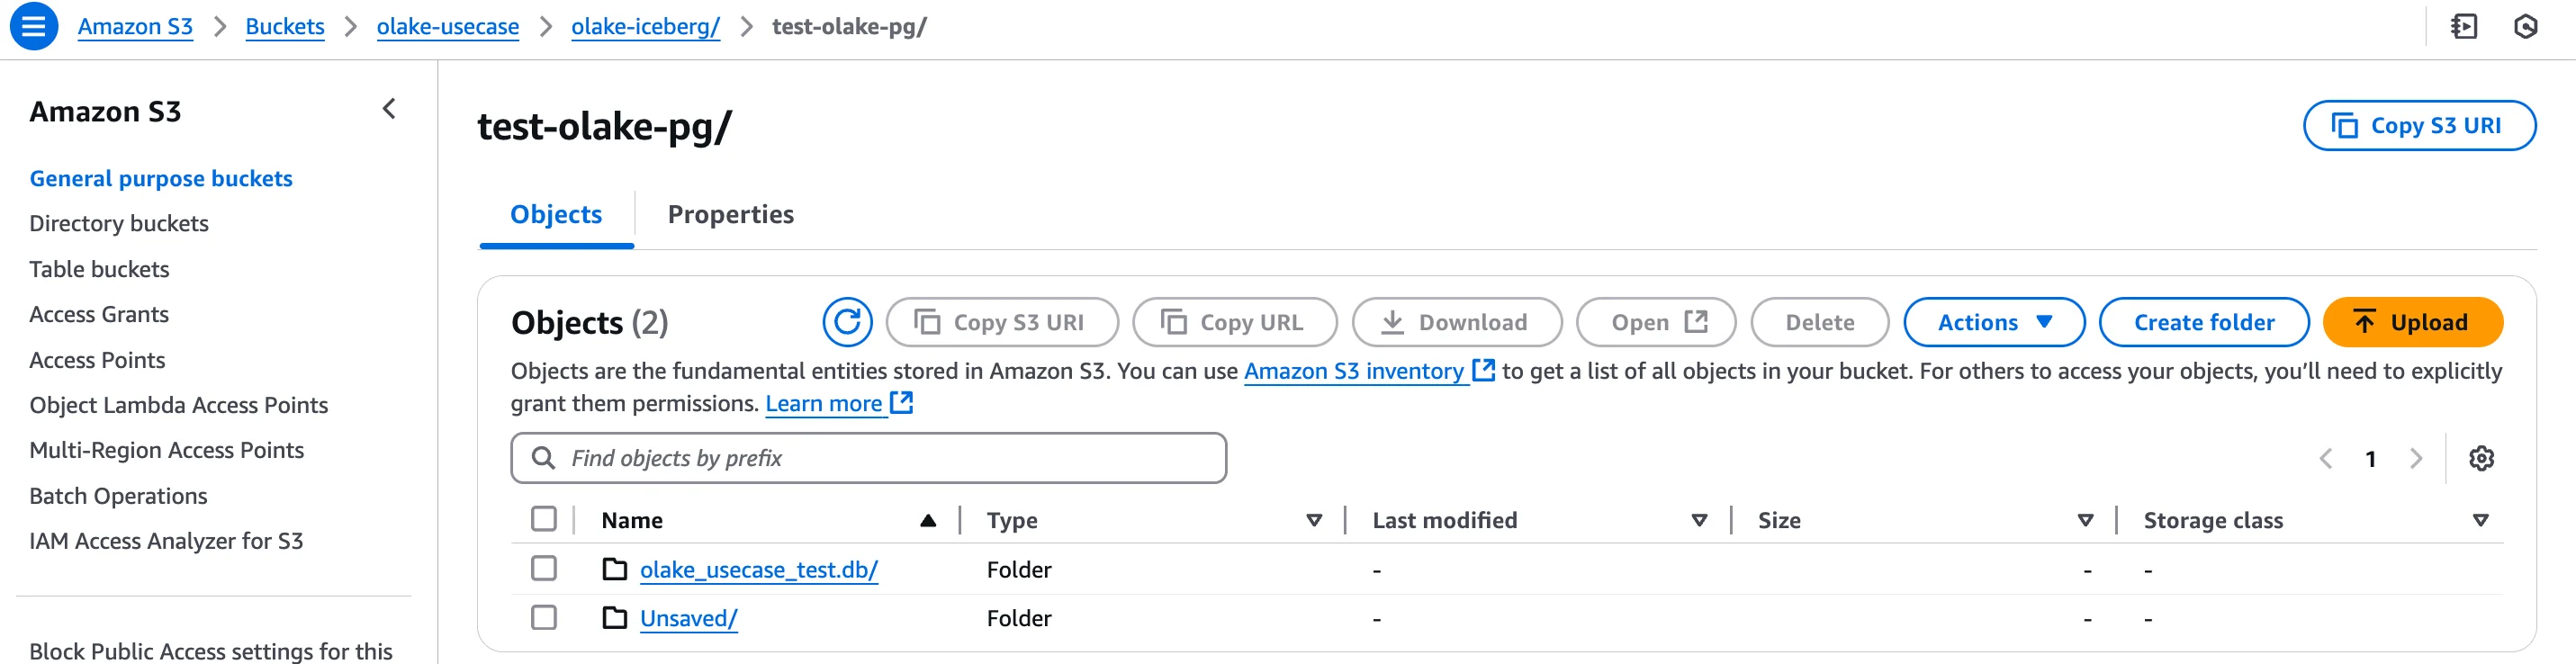
Within this “.db” folder you will find your tables synched from the source.
Each Table will have its respective data and metadata files like:
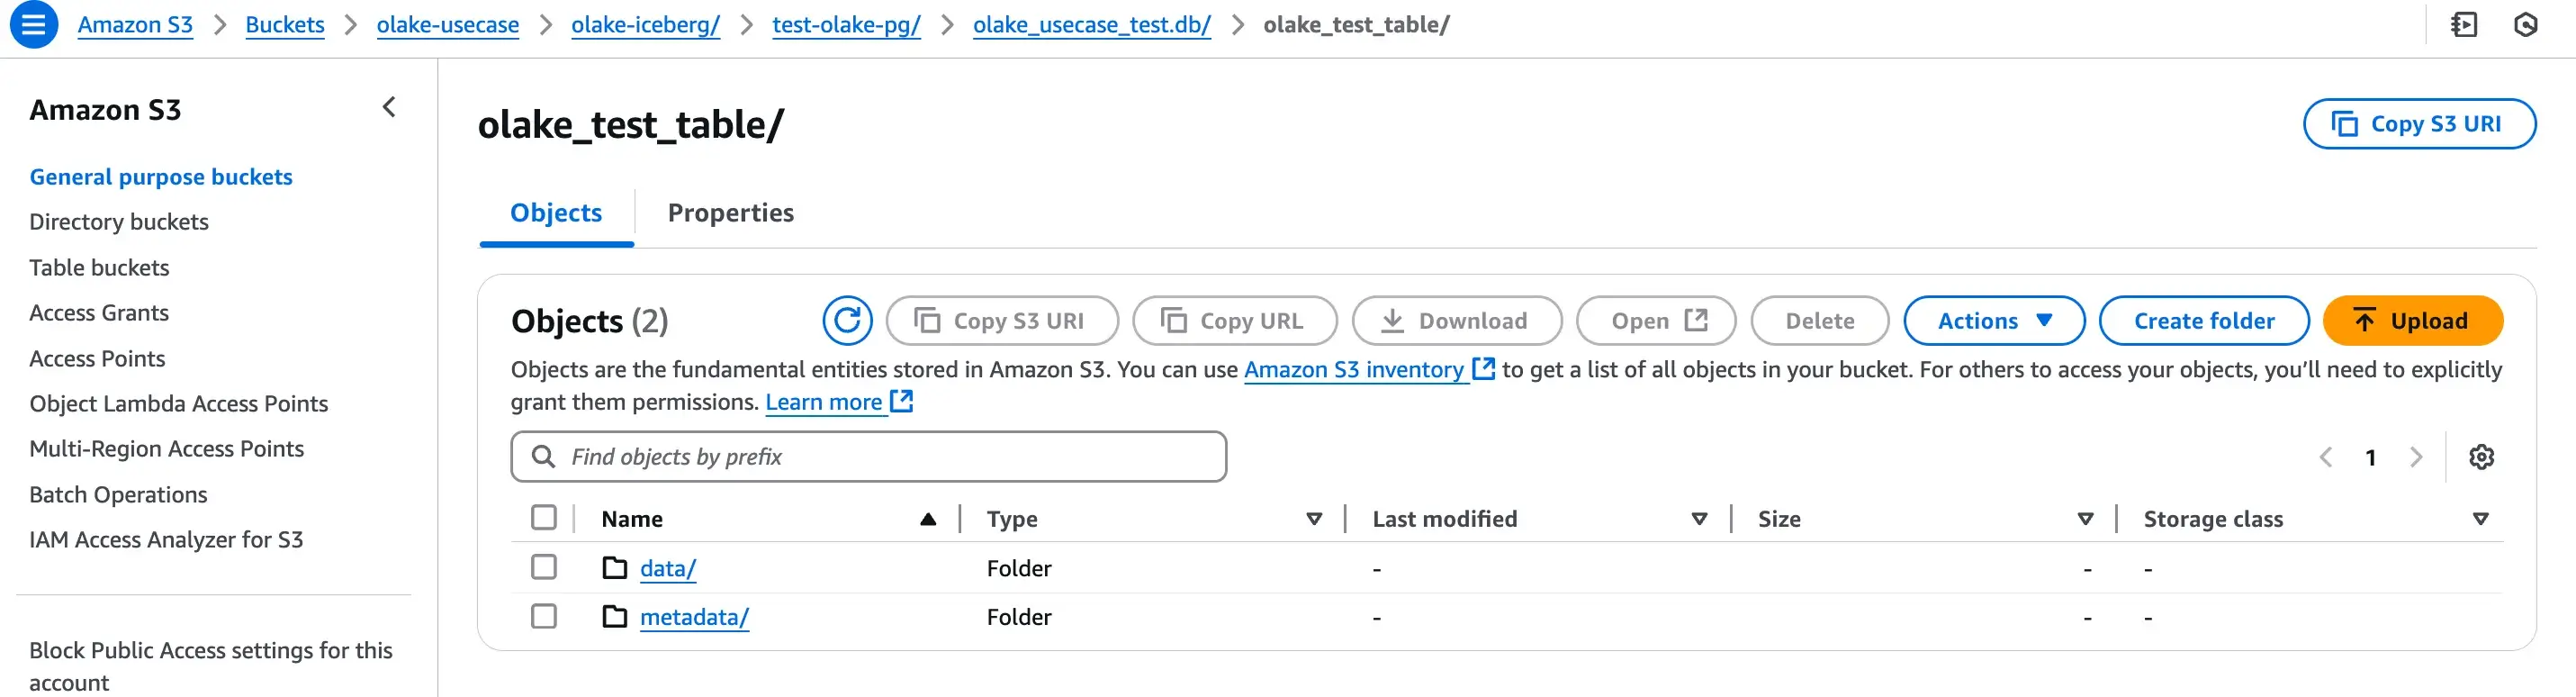
By default OLake sync the data files as parquet files and metadata file in JSON and avro formats as suggested by Iceberg.
Step 6: Run Your First Full Load Sync
Now that your initial full load is complete and state.json has been generated, you can start syncing ongoing changes from PostgreSQL to Apache Iceberg using OLake’s incremental CDC mode.
🔁 Start Incremental Sync
To begin consuming new inserts, updates, and deletes from your Postgres tables, simply re-run:
OLake will:
- Read the latest position from
state.json - Stream only the new changes since the last sync
- Append them to the corresponding Iceberg tables
This allows you to maintain near real-time data freshness without reloading the entire dataset.
🔄 Recommended: Schedule Periodic Syncs
While OLake doesn’t yet offer a long-running daemon mode, you can run this command on a schedule (e.g., using cron, Airflow, or any orchestration tool) to keep your data lake in sync.
With this, you now have a fully functional Postgres-to-Iceberg pipeline running with CDC support — ready for analytics, lakehouse querying, or whatever your downstream needs require.
Step 7 (optional) : Read the iceberg files via AWS Athena:
You can setup the AWS Athena to read/write the iceberg db built with Glue catalog:

Final Tips & Best Practices for Postgres to Iceberg Replication
Before you ship this pipeline to production, here are a few tips to help you run it reliably and cost-effectively:
✅ 1. Use Primary Keys Wherever Possible
Primary keys are essential for deduplication and ensuring accurate CDC. OLake uses them to detect updates vs inserts—especially important if out-of-order events occur.
✅ 2. Partition Iceberg Tables Wisely
Choose partition columns based on query patterns and data volume. Common patterns include:
created_atorupdated_atfor event tablescustomer_idorregionfor lookup or dimensional data
Poor partitioning = slow queries and high file scan costs.
✅ 3. Automate Compaction
Frequent small CDC writes can create many tiny files (small file problem). Set up periodic compaction jobs to:
- Merge small files
- Optimize metadata
- Reduce read overhead in Iceberg engines like Trino or DuckDB
✅ 4. Monitor Replication Lag
Track replication slot lag and sync timestamps to catch delays early. Large lag may indicate backpressure or Postgres WAL bloat.
✅ 5. Keep State Backups
state.json is the single source of truth for where replication left off. Back it up periodically to avoid accidental resets or data loss during recovery.
🔚 Wrapping Up
Replicating Postgres to Apache Iceberg gives you the flexibility of a modern, open lakehouse without the costs and limits of traditional warehouse pipelines.
With OLake, you get:
- Full + incremental sync with minimal setup
- Support for schema evolution and multiple tables
- Open file formats that play nicely with your favorite query engines
Give it a try, explore the internals, and feel free to contribute or share feedback on how we can make it even better.
Happy syncing! 🧊🐘
OLake
Achieve 5x speed data replication to Lakehouse format with OLake, our open source platform for efficient, quick and scalable big data ingestion for real-time analytics.